Download presentation
Presentation is loading. Please wait.

1
Chapter 3: Digital Inputs - Pushbuttons
Presentation based on: "What's a Microcontroller ?" By Andy Lindsay Parallax, Inc Presentation developed by: Martin A. Hebel Southern Illinois University Carbondale College of Applied Sciences and Arts Electronic Systems Technologies 9/02/03

2
Presentation Index Use and Copyright Pushbuttons
Activity #1: Testing a Pushbutton/LED Circuit Activity #2: Reading a Pushbutton Activity #3: Pushbutton Controlled LED Activity #4: 2 Pushbuttons, 2 LEDs Logical Operators – AND, OR, XOR Activity #5: Reaction Timer Using the PIN and CON commands Real World Testing Chapter 3 Review

3
Use and Copyright This presentation supplements "What's a Microcontroller" by Andy Lindsay. (Link to text at Parallax) This presentation is not a replacement for the text. Important concepts of the text are highlighted. In some cases, additional material has been added to augment the text. Denoted by titles colored gold. Full program listings are generally not provided in the presentation. Distribution: This presentation may be freely distributed without modifications. Modifications are permitted by schools and organizations for internal use only. Credits, use and copyright slides must remain.

4
COPYRIGHTS AND TRADEMARKS
This documentation is Copyright 2003 by Parallax, Inc. By downloading or obtaining a printed copy of this documentation or software you agree that it is to be used exclusively with Parallax products. Any other uses are not permitted and may represent a violation of Parallax copyrights, legally punishable according to Federal copyright or intellectual property laws. Any duplication of this documentation for commercial uses is expressly prohibited by Parallax, Inc. Check with Parallax for approval prior to duplicating any of our documentation in part or whole for any use. BASIC Stamp is a registered trademark of Parallax, Inc. If you decide to use the name BASIC Stamp on your web page or in printed material, you must state that "BASIC Stamp is a registered trademark of Parallax, Inc." Other brand and product names are trademarks or registered trademarks of their respective holders. DISCLAIMER OF LIABILITY Parallax, Inc. and Southern Illinois University are not responsible for special, incidental, or consequential damages resulting from any breach of warranty, or under any legal theory, including lost profits, downtime, goodwill, damage to or replacement of equipment or property, or any costs of recovering, reprogramming, or reproducing any data stored in or used with Parallax products. Parallax is also not responsible for any personal damage, including that to life and health, resulting from use of any of our products. You take full responsibility for your BASIC Stamp application, no matter how life threatening it may be.

5
Pushbuttons Pushbuttons are virtually everywhere interactions with an electronics device are required. In Chapter #2, the BASIC Stamp was used for output control of a device – an LED. In this chapter the BASIC Stamp will be used to read the state of an input from a simple device – the pushbutton.

6
Activity #1: Testing a PushButton/LED Circuit
The pushbuttons supplied with the kits are normally-open, momentary contact. That is, the switch does not make contact until the button is pressed. Once released, it returns to the open position. Open State: The pins on either side are electrically the same point. With the button released, there is no path for electrons between pins 1,4 and 2,3.

7
Closed State: With the button pressed, a conductive material bridges the gap allowing electrons, and thus current, to flow.

8
Pushbutton Test Circuit
This circuit demonstrates how the push-buttons switch allows current to flow when closed. Not pressed - Open: No current flow, LED is not-lit. Pressed – Open: Current flows lighting the LED.

9
This circuit demonstrates how the switch can create a short-circuit around the LED. Current will take the easiest path and not flow through the LED. Shorts are usually not desirable. Note that resistor is still in the path either way to ensure excessive current is not drawn.

10
Activity #2: Reading a Pushbutton
Construct the circuit. Pay attention to the values/colors of the resistors.

11
Enter and test the code by occasionally pressing the pushbutton and monitoring the state in the DEBUG Window.

12
DEBUG. IN3 displays the value of I/O P3 in the DEBUG Window
DEBUG ? IN3 displays the value of I/O P3 in the DEBUG Window. Which state relates to 1? Pressed or not pressed? Answer this question and the others on a separate sheet of Paper and turn in to your instructor when complete

13
When the switch is released, Vss (0V) is sensed at the input of P3.
When the switch is pressed, Vdd (+5V) is sensed at the input of P3. When the switch is released, Vss (0V) is sensed at the input of P3. The 10K resistor prevents a short circuit from Vdd to Vss
 is sensed at the input of P3. When the switch is released, Vss (0V) is sensed at the input of P3. The 10K resistor prevents a short circuit from Vdd to Vss.")
14
In this configuration, the 10K is said to be a Pull-Down resistor since it is pulling the input down to ground or Vss when the button is not active (not pressed). The switch is said to be Active-High since activating it (pressing it) will cause the input of P3 to be High.
 will cause the input of P3 to be High.")
15
This configuration shows a Pull-Up resistor to Vdd, with an Active-Low button.
When the same code is ran with this configuration, when will IN3 be a value of 1? Answer this question and the others on a separate sheet of paper and turn in to your instructor when complete

16
A BASIC Stamp input must always be pulled high or low
A BASIC Stamp input must always be pulled high or low. If not connected to either, it is said to be floating and produce erratic readings as voltages at the pin fluctuate around 1.4V. <1.4V = Low >1.4V = High The majority of switches on devices are configured for Active-Low. This is due to input current-draw considerations of most semi-conductor devices.

17
Activity #3: Pushbutton Controlled LED
Now that you can work with both outputs and inputs, a pushbutton will be used as control for an LED. Pseudo-code: If button is pressed: Blink LED quickly at 20mSec Or else, if not pressed: Keep LED off for 100mSec Loop back to Step 1 We know how to blink an LED: On, pause, Off, Pause. To reduce our design work, 'Blink' will suffice.

18
Flowchart: Flow Connectors are used to connect points without having to draw flow lines all around. Start Display Value A Button is Pressed False True Blink LED at 20mSec Pause 100mSec A A

19
Code for Pushbutton controlled LED Control:

20
The IF…THEN…ELSE is a decision making structure.
If the condition is True, then perform this code: If false, then perform this code:

21
Other forms of IF…THEN:
IF (condition) THEN code ENDIF IF (condition) THEN code ELSEIF (condition) THEN
 THEN code. ENDIF. IF (condition) THEN. code. ELSEIF (condition) THEN.")
22
Activity #4: 2 Pushbuttons, 2 LEDs
In this activity 2 buttons are used to control 2 LEDs.

23
Fragments of decision code and flow :
PB on 3 Pressed F T LED on 14 ON PB on 4 Pressed F T Pause LED on 15 ON PAUSE B B Pause What happens when both buttons are pressed? B Both LEDs OFF B

24
Logical Operators – AND, OR, XOR
With both pressed, only one LED blinks because the flow path for the other was not met. With the use of the logical operators, two or more conditions can be checked for a single statement. This is called Boolean Algebra. IF (condition1) AND (condition2) THEN IF (condition1) OR (condition2) THEN
 AND (condition2) THEN IF (condition1) OR (condition2) THEN.")
25
AND: BOTH conditions have to be true for the overall statement to be true. It needs this AND that to be true. OR: EITHER condition or both have to be true. It needs this OR that to be true. XOR (Exclusive OR): This OR that must be true, but BOTH cannot be true. It needs this OR that, but NOT both to be true.
: This OR that must be true, but BOTH cannot be true. It needs this OR that, but NOT both to be true.")
26
What values of X would cause 'True' to be printed for each of the IF…THEN's below? (click for answer) 1st : X is 4 or 5 2nd: X is 0,1,2,3 or 9,10,11….

27
For the LED control, logical operators can be used to make both LED's operate when both buttons are pressed.

28
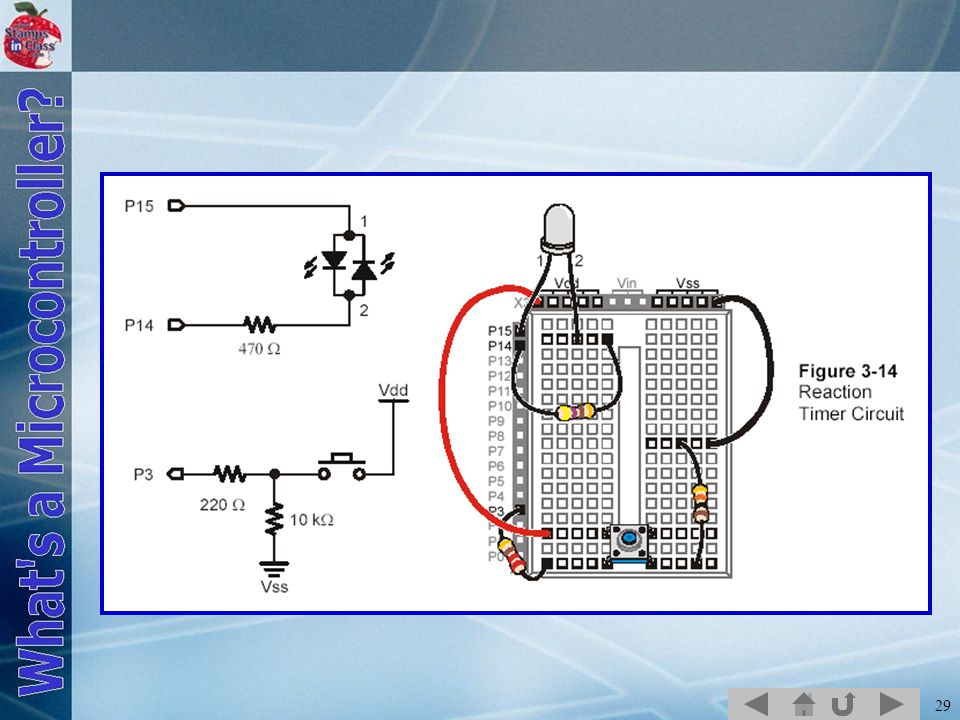
Activity #5: Reaction Timer
The Reaction Timer game tests how quickly a person can react to the LED changing colors. The player must let go of the button as quickly as possible when the LED turns green. The time is measured in milliseconds.

30
The game brings out some real world examples of problems involved.
The nested loop to measure reaction time (nested means a loop within a loop) only measures half as long as the actual time held because instructions take time to process adding to the loop time limiting counts.
 only measures half as long as the actual time held because instructions take time to process adding to the loop time limiting counts.")
31
After playing a few rounds, a player starts to expect when the LED will turn green. The RANDOM command can be used to provide a pseudo-random number generator based on a seed Value. Seed values provide a starting point. Pseudo-Random generators always follow a repeating sequence of 'randomness'. By changing the seed, the sequence changes.

32
The RANDOM instruction 'randomizes' the value of the variable.
Finally, it is noted if the button is released too soon, the player is able to cheat and get a score of 1mS. IF…THEN conditionals can be added to check for that event.

33
Using the PIN and CON commands
The PIN command is used to name I/O. Use of the command can greatly improve the readability of code. The CON command is used to name static values – constants. Take for example the Pushbutton control of LEDs on the next slide.

34
With those numbers for I/O devices and states, it can become a little confusing what is being referred to.

35
PIN is used to name the I/O:
LED_Green PIN 14 LED_RED PIN 15 PB1 PIN 3 PB2 PIN 4 CON is used to name a value: Pressed CON 1

36
The code becomes so readable that it greatly reduces the need for comments to understand what is being performed.

37
Real World Testing Real world use of a product requires careful testing to ensure it is accurate and operates correctly under ALL circumstances. Human interaction is the most difficult to program for because of the user's misuse, intentional or not.

38
The pushbutton switch is only one of many devices that can be read as a digital inputs. You will come across many more in your explorations with the BASIC Stamp and electronics.

39
Chapter 3 Review What electronic action does a switch perform?
What is meant by: Active-High? Active-Low? What command is used to read the state of an input? What command structure is used to make decisions? AND, OR, XOR are ________ operators. What does each require to be true? What does the RANDOM command do? What is meant by the seed value? ____ and ____ can greatly increase code readability. Why does real-world use requires extensive testing. Answer these questions and the others on a separate sheet of paper and turn in to your instructor when complete

Similar presentations


 Pin grouping code!. I/O Pin Group Operations: The Spin language has provisions for assigning values to groups of bits in the.>")