Download presentation
Presentation is loading. Please wait.

1
1-877-2baptist bhsala.com Student Teaching Module PXP 2014

2
1-877-2baptist bhsala.com Medisense PXP – Precision Xeed Pro

3
Basic use guidelines ON/OFF Numeric keypad Enter button Scan button Information screen Menu Clear Backlight

4
Meter Care Keep the Meter clean Use the hospital approved wipes Super Sani-Cloth®. Do not leave blood on the meter. Clean between each patient! Keep the meter level. Holding the meter upright may allow a sample or control to travel down the strip into the meter.

5
Decontamination of Meter The Center for Disease Control has identified the failure to decontaminate your PXP Glucometer and all other shared Point of Care meter instrumentation used at the bedside could result in transmission of infectious agents such as Hepatitis B virus to patients and yourself. Therefore to insure safety from the transmission of infectious agents all Point of Care testing meters will be wiped with Sani-wipes between patients. Most recently Centers for Medicare and Medicaid Services (CMS) has informed its accrediting surveyors to cite hospital facilities who fail to clean and disinfect shared instrumentation by patients at a level of immediate jeopardy. This citation level carries a serious consequence up to loss of federal reimbursement and loss of accreditation status.
 has informed its accrediting surveyors to cite hospital facilities who fail to clean and disinfect shared instrumentation by patients at a level of immediate jeopardy. This citation level carries a serious consequence up to loss of federal reimbursement and loss of accreditation status..")
6
Meter Exchange My meter died -Now what do I do? Replacement meters are available from the Laboratory. You must bring broken meter with you for exchange. Indicate exactly what is wrong with the meter. Does not accept the strip Wont display correct date and time Does not upload Dont say, Not working Take care not to drop a meter or leave a meter in a patients room or linens.

7
Action Ranges for PXP Any result less than 40 OR greater than 400 MUST be confirmed by sending a sample to the laboratory to confirm the glucose level. You only need to send a sample to the laboratory for confirmation following the initial daily bedside result of less than 40 or greater than 400. Patients on Tight Glycemic Control Protocol must have every glucose outside the reporting range confirmed by lab. Meter reporting range: 40 – 400 Continue patient treatment as necessary, but compare PXP results to laboratory results.

8
Test Strips Available from Central Supply or Pyxis Blue and Silver foil packet with the following information: On the back of the strip is a white label with eye readable information and a bar code. Each test strip comes wrapped in a foil packet bearing a barcode label. The individual foil packet maintains the integrity of each test strip by protecting it from exposure to air and moisture, and accidental contamination. The bar code label holds information about the test strip including the lot number, calibration, expiration date, and expected control solution ranges. One quick scan provides the monitor with all this information at the time of the test. NEVER tape a test strip to the case lid. There are several current lot #s in use.

9
Tear strips from indentation

10
Port Protection Device Prevents fluids from entering electronics. Never Remove from Meter.

11
Battery life Monitor requires two (2) AA alkaline batteries The average alkaline battery life is approximately 60 days, based on an average of 9 tests per day and monitor being shut off within 2 minutes of it not being used (depending on barcode usage). Battery life will vary based upon actual use.

12
Barcode Scanner Scan button Step 1: Place the barcode on a flat surface. Step 2: Hold the barcode scanner 3-12 inches from the barcode to be scanned, and at a 30 to 135 degree angle to the barcode. Step 3: Press and hold down the Scan button until a visible red beam is emitted by the monitor. Step 4: Slowly move the monitor, if needed, so that the red beam is directly over the barcode. Step 5: The monitor will beep in acknowledgement when it accepts the barcode.

13
Goal: Reducing patient ID errors Use the barcode function. Do not scan from the chart. Barcode scanning improves the accuracy of results transferred to the LIS.* Barcode data entry: 1 error per 10 million characters. Manual data entry: 1 error per 100 characters. Again use the barcode function.

14
Patient Testing and Identification Always follow standard protocol when identifying a patient, at least two sources. Enter the CSN Number into the PXP. Not the MR number. Scan the CSN Number Bar Code on the Patients ID arm band. The correct Patient Number MUST be entered for every glucose test!!!!!

15
Temporary Patient ID Number If the CSN Number is not available, assign a temporary patient number to the sample using one of the following methods. The 8 -digit birth date can be used. Example: DOB = Aug 5, 1962 Patient ID = 08051962

16
Temporary Patient ID Number If the birth date is not available: Use emergency ID 00911911 as the Identifying Number. Newborn infants: Use the infant identification band number preceded by zeros to make an 8 digit number. You must send Point of Care correct patient number within 24 hours.

17
ID Error Follow up 1. Remember to use only the Operator ID that you are given. 2. Any Patient ID errors must be corrected in order to chart the patients results. 3. The instructor is responsible for responding to any emails from Point of Care. 1-877-2baptist bhsala.com

18
Comment Codes Comment codes are used to document actions other than routine testing. The comment codes are taped to the lid of the case. System will prompt for codes if a control is out of range, the operator repeats a test or if the patient results fall into an action range. Comment codes must be entered at the time of the action. POC sends out corrective action reports monthly for failure to enter a comment code when prompted. The instructor is responsible for follow up on QC failure without comment code documented.

19
Controls Must test LOW and HIGH control every 24 hrs. Meter will display QC DUE NOW Controls are available from Central Supply or Pyxis. Controls are good unopened until the manufacturer expiration printed on the bottle. The manufacturer states that once opened the controls are good for 90 days (3 months). Write the expiration date on the bottle when opening a new set of controls. –A bottle opened on 05/16/09 = 08/16/09 as the expiration. –If the manufacturers expiration is less than 90 days, Write the shortest date. –Remember = NOT the date opened
. Write the expiration date on the bottle when opening a new set of controls. –A bottle opened on 05/16/09 = 08/16/09 as the expiration. –If the manufacturers expiration is less than 90 days, Write the shortest date. –Remember = NOT the date opened.")
20
select

22
This control value is out. You would use your comment code for this result.

23
Controls Controls can be run as often as needed or if you suspect a problem.

24
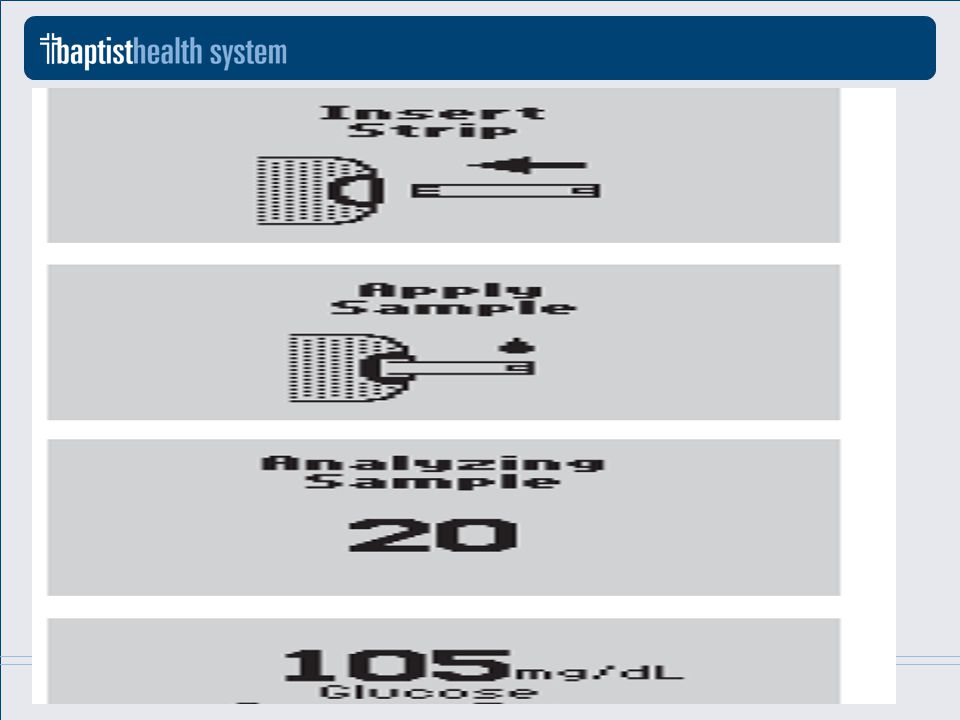
Patient Testing

25
select

26
Please remember to do the following before testing : 1. Upload/Download meter before running Glucose(s). This will capture your patients demographics. 2. Continue to barcode CSN number, strips and controls as needed by meter. Push confirm if correct patient. True ID feature will Show patient demographics. If patient not admitted you can enter (2) Continue. This will allow you to perform test You must follow Point of Care policy for invalid patient numbers.
. This will capture your patients demographics. 2. Continue to barcode CSN number, strips and controls as needed by meter. Push confirm if correct patient. True ID feature will Show patient demographics. If patient not admitted you can enter (2) Continue. This will allow you to perform test You must follow Point of Care policy for invalid patient numbers..")
28
Isolation Procedure 1)Place glucometer inside the biohazard transport bag and seal. 2)While meter is inside the bag (with bag closed) enter all required information. 3)Open glucometer test strip and insert strip through the bag into the glucometer testing port. 4)Perform capillary puncture and testing on isolation patient. 5)Dispose of biohazard transport bag and used strip in the biohazard trash. 6)Wipe down glucometer using hospital approved disinfecting wipes.
While meter is inside the bag (with bag closed) enter all required information. 3)Open glucometer test strip and insert strip through the bag into the glucometer testing port. 4)Perform capillary puncture and testing on isolation patient. 5)Dispose of biohazard transport bag and used strip in the biohazard trash. 6)Wipe down glucometer using hospital approved disinfecting wipes..")
29
Operator Management Students will operate under their instructors ID. Instructors who are non employees must attend at least one PXP class per year. Baptist Employee instructors must complete yearly netlearning and run a set of controls every 6 months. The instructor must be in good standing with Joint Commission guidelines.

30
Meter Upload Upload meter with every use. Removal and insertion into the cradle will upload and download patient results and demographics. This will occur only once per insertion. Turn off meter before placing in the cradle. Meter upload takes about one minute to upload.

31
Meter Upload Meter will display circular moving arrows during upload. Cradle is attached to a PC. Reboot the PC weekly. Do not remove meter during upload. Meter battery voltage must be at least 2.5.

32
Questions Call ext. 3662 for the Point of Care Department. 1-877-2baptist bhsala.com

Similar presentations


>")


