Download presentation
Presentation is loading. Please wait.

1
Character Design for Animation and Games Week 3b: Photoshop Painting #5: Material Specularity, 3D Modeling #3: Heads

2
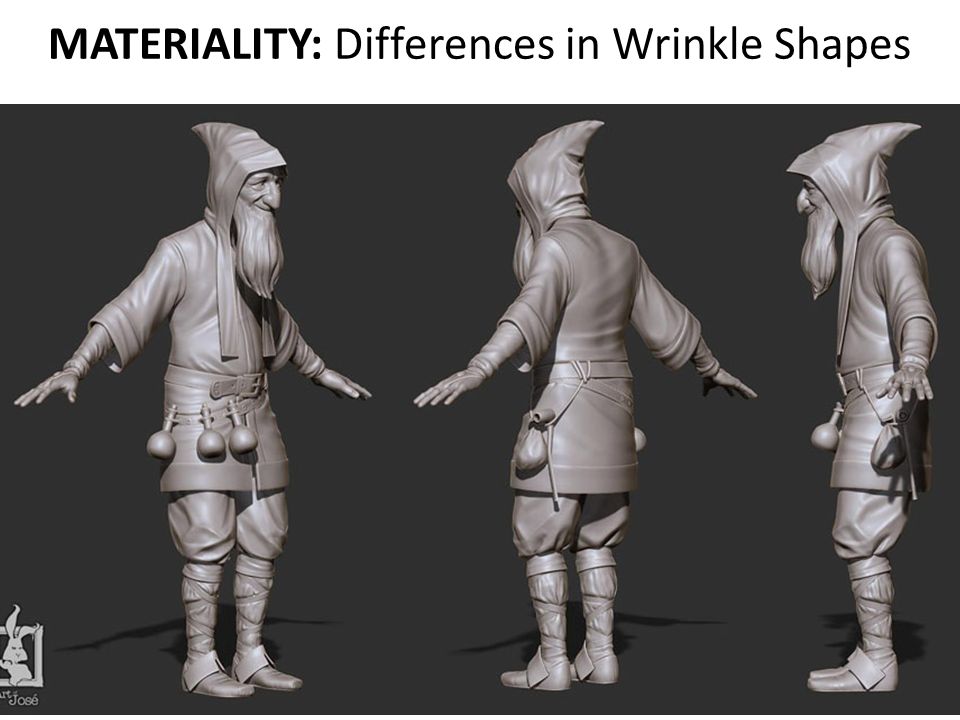
MATERIALITY: Differences in Wrinkle Shapes To draw, paint, or sculpt clothing convincingly, research how different cloths drape, wrap, and fold. In particular, examine the wrinkles: Thickness Depth Length Amount

3
MATERIALITY: Differences in Wrinkle Shapes

7
MATERIALITY: Differences in Specularity To paint believable surfaces, vary your specular highlights to represent varied materiality: Size Solidity (v Scattered) Sharpness/Softness Brightness Roughness Anisotrophy
 Sharpness/Softness Brightness Roughness Anisotrophy")
8
Build an image library “morgue” of different materials, to study & reference specular reflections. For example consider the variety available in these costume materials: MATERIALITY: Differences in Specularity Wood Metals Cotton Denim Rubber leather Silk Wool Fur Feather

9
MATERIALITY: Denim and Leather

10
MATERIALITY: Silk

11
MATERIALITY: Wool

12
MATERIALITY: Hair

13
MATERIALITY: Animal Hide

14
EXERCISE 1: Paint 2 Different Speculars Open 1 of the posted Lion/Snake line images. Fill the background with a mid-gray (100), and create a layer above it named “Color”. Quickly fill the snake skin area with a mid-cool color and lion body/hair with a mid-warm color. Consider the posted reference images of Fur & Snake Skin highlights. Note the specular properties of each, especially sizes & shapes. Paint these Highlights and Shadows for specular differences: With a 30% solid brush, build white reflections and black shadows the shapes of the snake skin or the fur. Save your file!
, and create a layer above it named Color . Quickly fill the snake skin area with a mid-cool color and lion body/hair with a mid-warm color. Consider the posted reference images of Fur & Snake Skin highlights. Note the specular properties of each, especially sizes & shapes. Paint these Highlights and Shadows for specular differences: With a 30% solid brush, build white reflections and black shadows the shapes of the snake skin or the fur. Save your file!.")
15
MATERIALITY: Animal Fur

16
MATERIALITY: Animal Hide

17
EXERCISE 2: Partner Research 1.Choose a partner and an environment material types, clean and worn: wood, metal, plastic, rubber, stone, brick, stucco, stains, various glass. 2.Take 10 minutes to find 20-30 strong examples online, clearly showing the material and its specularity (highlights). 3. Consult with your partner to choose 5 exemplary examples. Discuss with each other the specular properties typical of your material: Size, Solidity, Sharpness, Brightness, Anisotropy 4.Upload to provided “Specular Morgue” post.
. 3. Consult with your partner to choose 5 exemplary examples. Discuss with each other the specular properties typical of your material: Size, Solidity, Sharpness, Brightness, Anisotropy 4.Upload to provided Specular Morgue post..")
18
EXERCISE 3: Maya 3D Character Development: Head HEAD PROFILE: Using the CreatePolygon tool, trace the profile of the character head starting at the bottom of the neck. Use as few clicks as possible to define neckfront, chin, lower and upper lips, nose, forehead, skull, and neckback. Hit [Enter] to end. DuplicateSpecial as Instance and move/rotate to center in front view image reference. HEAD VOLUME: Extrude & Scale (shrink) slightly for half- nose width. MultiCut to distinguish & deselect nose. Extrude & Scale the rest to mouth-end. MultiCut to distinguish & deselect neck, and TargetWeld mouth-end closed. Extrude & Scale the remaining faces to outer-eye, then to head-side. ALL DETAILS: MultiCut & Extrude ears, nostrils, and hair. For clothing details, MultiCut 2 edges and move 1. For eyes and a more detailed mouth, MultiCut & move edge loops. HEAD VIDEO TUTORIAL: bit.ly/293HvUdbit.ly/293HvUd
 slightly for half- nose width. MultiCut to distinguish & deselect nose. Extrude & Scale the rest to mouth-end. MultiCut to distinguish & deselect neck, and TargetWeld mouth-end closed. Extrude & Scale the remaining faces to outer-eye, then to head-side. ALL DETAILS: MultiCut & Extrude ears, nostrils, and hair. For clothing details, MultiCut 2 edges and move 1. For eyes and a more detailed mouth, MultiCut & move edge loops. HEAD VIDEO TUTORIAL: bit.ly/293HvUdbit.ly/293HvUd.")
19
HELPFUL MAYA TIPS: EXTRUDE ISSUES Always select one or more Faces before hitting Extrude, or the Extrude may duplicate ALL of the geometry of your model, creating a “shell” that is hard to delete if not caught until too late to undo. Always pull your geometry out immediately after hitting Extrude on a Face. Extrude on a face creates new geometry but unless you pull that new geo out it does not look like much has happened, and so it is easy to keep hitting extrude, thus creating a lot of doubled (overlapping) vertices. If this happens, a global fix is to select around all vertices in your model and under the Modeling module Edit Mesh menu hit "merge." The default low threshold should merge all double vertices, leaving your regular structure intact. EDIT/DELETE BY TYPE/HISTORY: The history of every change you make is kept in memory, be sure to delete that history before saving and closing your file, or before applying Skin for rigging.
 vertices. If this happens, a global fix is to select around all vertices in your model and under the Modeling module Edit Mesh menu hit merge. The default low threshold should merge all double vertices, leaving your regular structure intact. EDIT/DELETE BY TYPE/HISTORY: The history of every change you make is kept in memory, be sure to delete that history before saving and closing your file, or before applying Skin for rigging..")
20
Homework #6: Revise & Paint Animal Professional 3D: Watch the HEAD video and progress your practice- character from class. 2D: Revise your Professional Animal for improved anatomy, clothing detail, and pose. Draw 3 Final Images: Front and Back in same contropposto pose, and Skeleton in front pose. Create a Painting of this image with attention to various Material Specularity. Use reference images for all revision and painting! Post to hw6 folder in Piazza by noon Thursday: piazza.com/class/ippn0kwpb904xh piazza.com/class/ippn0kwpb904xh

21
Post-Class Viewing: Gravity Falls X-Files as a Kids Cartoon! Two siblings stay with their kooky elderly relative and discover and investigate a series of bizarre phenomena.

Similar presentations