Download presentation
Presentation is loading. Please wait.

1
How Did They Do That? Some secrets you can use to fool the eye. Lessons by Mary Erickson, Ph.D. with art teacher Hillary Andrelchik Masters of Illusion: Unveiling the Mystery of Trompe L’Oeil Tempe Center for the Arts Secondary

2
All of these features are important when an artist makes a drawing or painting that tricks the eye. Value Lit Area Highlight Shaded Area Shadow Contrast Light Source

3
Value is the lightness or darkness of a color. Think of a black and white photo. How many different values (shades of gray) can you see? In order to make a drawing or painting look ultrarealistic you need to think about value.
 can you see. In order to make a drawing or painting look ultrarealistic you need to think about value..")
4
The lit area is the part of an object receiving the most direct light. In this photo of a woman’s head, can you find the lit area? In order to make value look even more realistic, you need to pay attention to which side of the object is the lit area.

5
A highlight is a small area where light is reflected off a shiny or wet surface. Often, a highlight is a place of extreme white. Where do you see highlights? By paying attention to small changes in value, you can be even more convincing, so pay attention to the highlight on an object.

6
A shaded area is an area darker than the rest of the object. The shading tells us that the area is not getting direct light. Can you find any shaded areas on the apple in the photo? You can also add realism to your drawing by shading parts of the objects.

7
A shadow is an area that is not illuminated or partially illuminated because a solid object is between the it and the light source. Shading an object, however, is not enough. An artist still needs to add a shadow to make an object look realistic.

8
Contrast is the difference in brightness between the light and dark areas of an image. In an image there can be areas of high contrast, that is, very dark adjacent to very light. When talking about all these areas of different values, artists use the term contrast.

9
Middle Contrast Changes of grays are mostly gradual. Low Contrast Very gradual changes in value.

10
Finally, the last trick is to know where all the values should go. Artists do this by using a light source. The light source is the object or direction from which the light on an object is coming. If the light source changes, so will the values, highlights, shaded areas and areas of shadow.

11
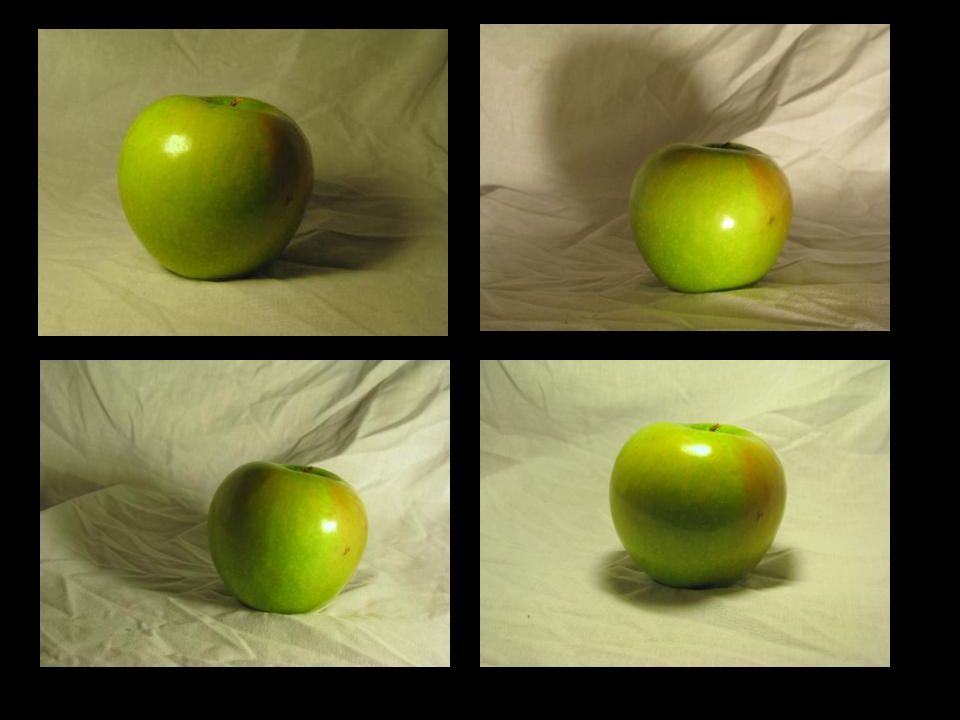
Look at the following photographs of an apple. Each one has a different light source. See if you can identify the highlight, shaded area and shadow. Based on these things, try to figure out the location of the light source.

12
Apple #1

13
Were you able to find all the areas for Apple #1? shaded side shadow lit area highlight light source is on the right side of the apple

14
Apple #2

15
Were you able to find all the areas for Apple #2? highlight lit area shaded side shadow light source is on the left side of the apple

16
Apple #3

17
Were you able to find all the areas for Apple #3? Shaded area is on the bottom half of the apple highlight lit area shadow The light source is coming from above and in front of the apple

18
Apple #4

19
Were you able to find all the areas for Apple #4? shadow shaded area is behind the apple highlight lit area The light source is coming from nearly straight in front of the apple.

21
Now you try it… Choose one of the images of apples you just saw. Start by sketching or lightly drawing out the shape of the apple. Look closely, make sure you are drawing the actual shape of the apple you are viewing. Many people start out by drawing an apple that looks like these, but does the apple really look like any of these sketches?

22
Pay close attention to all the details in the actual apple… Make sure you sketch lightly with your pencil. Any heavy outline will make your apple look less real.

23
Add a light pencil dot on your paper indicating where the light is coming from. light source

24
Now start to add value using your pencil. Start by lightly filling in the darkest areas and then work on the area of lighter value. And don’t forget to leave the highlight!

25
Gradually add the darker values. Pay attention to the areas that needed to be shaded. They will be on the opposite side of the object from the light source.

26
Keep adding darker values.

27
Finally, add the shadow of your object. Look carefully at the apple you are working from. Notice the shape of the shadow.

28
Voila! You are done!

Similar presentations


>")


