Download presentation
Presentation is loading. Please wait.

1
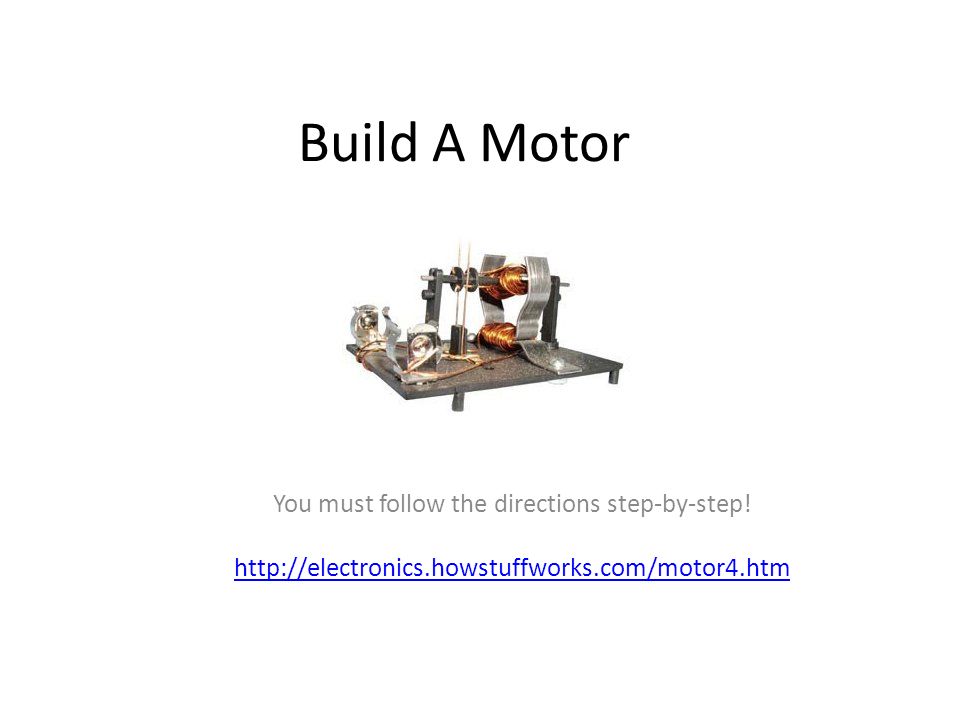
Build A Motor You must follow the directions step-by-step! http://electronics.howstuffworks.com/motor4.htm
2
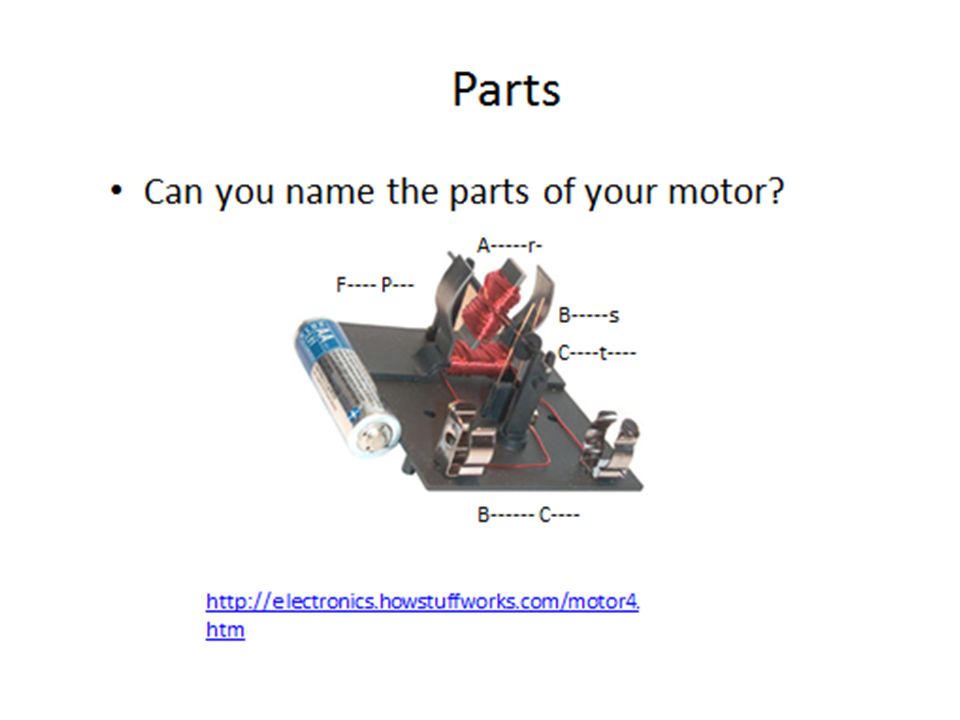
STEP 1 You need to layout all of your parts Check them off your list and sign with the teacher. Familiarize yourself with the name of the parts (page 1)
.")
3
STEP 2 - Field Coil Take out one wire coil Start to unwind it by putting your finger through the coil hole and pulling the end of the coil Use the ruler to measure 6 inches to cut off, put this piece back into your baggy for later use. Sand one inch of insulation off both ends of your unwound coil. You are to start building the Field Coil (look at the motor picture to know what it looks like)
.")
4
Parts Can you name the parts of your motor? Field Coil Armature Commutator Brushes Battery Clips http://electronics.howstuffworks.com/motor4. htm

5
Field Coil continued You have the mounting bracket, the field pole and your unwound wire. Measure and mark 2 inches from one end of your wire. Put the field pole on top of the mounting bracket as shown in Diagram 1 Holding the field pole on top of the mounting bracket, place the wire so the 2 inches sticks out of the bottom towards you so the wire is at the bottom and on the left side Start wrapping the wire towards you tightly so the wire squeezes the field pole to the mounting bracket Continue wrapping until you have about 6 inches at the right side sticking out the top towards you Put this away in your bag

6
STEP 3 - Armature Unroll the second wire coil by holding the coil on your finger and pulling the end. You are to start building the Armature – you will need the two metal armature halves and the metal motor shaft (look at the motor picture to know what it looks like, this part is tricky) Put the two pieces of armature together with the shaft between them, place the wire so the 2 inches sticks out of the bottom towards you so the wire is at the bottom and on the left side Wrap the wire coil 8 times toward the center pole, cross over and wrap it 8 times toward the outside (tightly) then come back toward the center 8 times, cross over and continue doing this on both sides until there is at least 2 inches of wire left on the right side (if more that’s ok) Have the windings always go in the same direction and about the same number of windings on each side. Put this piece away
 Put the two pieces of armature together with the shaft between them, place the wire so the 2 inches sticks out of the bottom towards you so the wire is at the bottom and on the left side Wrap the wire coil 8 times toward the center pole, cross over and wrap it 8 times toward the outside (tightly) then come back toward the center 8 times, cross over and continue doing this on both sides until there is at least 2 inches of wire left on the right side (if more that’s ok) Have the windings always go in the same direction and about the same number of windings on each side. Put this piece away.")
7
Parts Can you name the parts of your motor? Field Coil Armature Commutator Brushes Battery Clips http://electronics.howstuffworks.com/motor4. htm

8
STEP 4 - COMMUTATOR Take out the armature piece, plastic tubing and the commutator piece Measure 7/16 of the tubing and cut it using the wire cutters ( make sure the cut is square) Slide this cut piece onto the armature bar where the wires stick out, making sure this piece fully contacts the armature halves Pull the commutator halves apart and connect them together as shown on the parts list Slide the commutator onto the armature shaft until it touches the tubing
 Slide this cut piece onto the armature bar where the wires stick out, making sure this piece fully contacts the armature halves Pull the commutator halves apart and connect them together as shown on the parts list Slide the commutator onto the armature shaft until it touches the tubing")
9
Parts Can you name the parts of your motor? Field Coil Armature Commutator Brushes Battery Clips http://electronics.howstuffworks.com/motor4. htm

10
Commutator continued Turn the commutator so the holes are 90degrees to the armature wires Run the wires from the armature through the holes on the commutator, pull them tight but do not let the commutator turn. (the holes are vertical when the armature is horizontal or it won’t run) Bend the wire so it is holding the commutator tight Cut the plastic tubing one piece 7/16” and another piece ¼” Put the ¼” at the end with the commutator and the 7/16” piece on the opposite end so it touches the armature halves. Make sure this piece looks like Diagram 7 Put everything back in your bag.
 Bend the wire so it is holding the commutator tight Cut the plastic tubing one piece 7/16 and another piece ¼ Put the ¼ at the end with the commutator and the 7/16 piece on the opposite end so it touches the armature halves. Make sure this piece looks like Diagram 7 Put everything back in your bag..")
11
STEP 5 - MOTOR ASSEMBLY Take out the Plastic Base, the Field Coil assembly, and the Support Shafts Look at Diagram 6 and familiarize yourself with the hole numbers and what they are for You will fasten the field coil assembly to the base by pressing the field coil assembly brackets into the holes labeled #1 Break apart the support shafts and attach them to the base with the notches facing outward into slots labeled 2 and 7 You can put the commutator and armature assembly onto the shafts Make sure your armature spins between the field coil Put this away

12
Parts Can you name the parts of your motor? Field Coil Armature Commutator Brushes Battery Clips http://electronics.howstuffworks.com/motor4. htm

13
STEP 6 - BRUSHES Take out the two wire brushes and sand the shafts (don’t over sand them, just lightly run the paper over them) Lay the brush on your table so the loop is flat on the table Measure ¼” from the end of the loop down the shaft. This is where you will bend the shaft up 90degrees using a needle nose plier, pushing the loop to the table. Take out the two Fasteners Stick the brushes through the tiny holes (# 5 & 6) from the bottom of the base and secure them with the fasteners stuck into holes (# 3 & 4) fed through the loops of the brushes. Make sure the brushes lay next to the commutator as shown in Diagram 10
 from the bottom of the base and secure them with the fasteners stuck into holes (# 3 & 4) fed through the loops of the brushes. Make sure the brushes lay next to the commutator as shown in Diagram 10.")
14
STEP 7 - WIRING Make sure the ends if the wires sticking out from the field pole are sanded bare Loop the end of the 2” wire around the fastener from hole 3 and stick the fastener back in making sure it is holding the brush at 90 degrees to the commutator Open the fastener Take out the 6” piece of wire from Step #1 and sand 1” of both ends Wrap one end of this 6” wire around the fastener from hole 4, place the fastener back into hole 4 and through the brush loop, open the fastener

15
Parts Can you name the parts of your motor? Field Coil Armature Commutator Brushes Battery Clips http://electronics.howstuffworks.com/motor4. htm

16
STEP 8 – BATTERY CLIPS Take out the two battery clips Lace the end of the remaining wire sticking out of the field coil through the hole in the back of the battery clip wrapping it around the back Stick this battery clip into hole #8 Wrap the remaining end of the 6” wire through the second battery clip and clip this into hole #9 Put a AA battery into the battery clips and try to spin the armature by gently starting it with your finger tip. If it doesn’t run check the back of your instruction sheet to troubleshoot it.

Similar presentations

 national clean energy goals is to put one million.>")


