Download presentation
Presentation is loading. Please wait.

1
Using Indents and Tabs In this lesson, you will learn how to use the tab selector and the horizontal ruler to set tabs and indents, as well as how to use the Increase Indent and Decrease Indent commands. Indents and tabs are useful tools for making your text more readable. Indenting text adds structure to your document by allowing you to separate information. Depending on your needs, you can use tabs and indents to move a single line or an entire paragraph.

2
Indenting text In many types of documents, you may want to indent only the first line of each paragraph. This helps to visually separate paragraphs from one another. It's also possible to indent every line except the first line, which is known as a hanging indent. To indent using the Tab key: A quick way to indent is to use the Tab key. This will create a first-line indent of 1/2 inch. 1.Place the insertion point at the very beginning of the paragraph you want to indent.

3
2.Press the Tab key. On the ruler, you should see the first-line indent marker move to the right by 1/2 inch. If you can't see the ruler, click the View Ruler icon over the scrollbar to display it. To create or adjust a first-line indent or hanging indent: 1.Place the insertion point anywhere in the paragraph you want to indent, or select one or more paragraphs. 2.To adjust the first-line indent, drag the first-line indent marker on the ruler. 3.To adjust the hanging indent, drag the hanging indent marker. 4.To move both markers at the same time, drag the left indent marker. This will indent all lines in the paragraph.

4
To use the Indent commands: If you want to indent all lines in a paragraph, you can use the Indent commands on the Home tab. 1.Select the text you want to indent. 2.Make sure you are on the Home tab. 3.Click the Increase Indent command to increase the indent by increments of 1/2 inch.

5
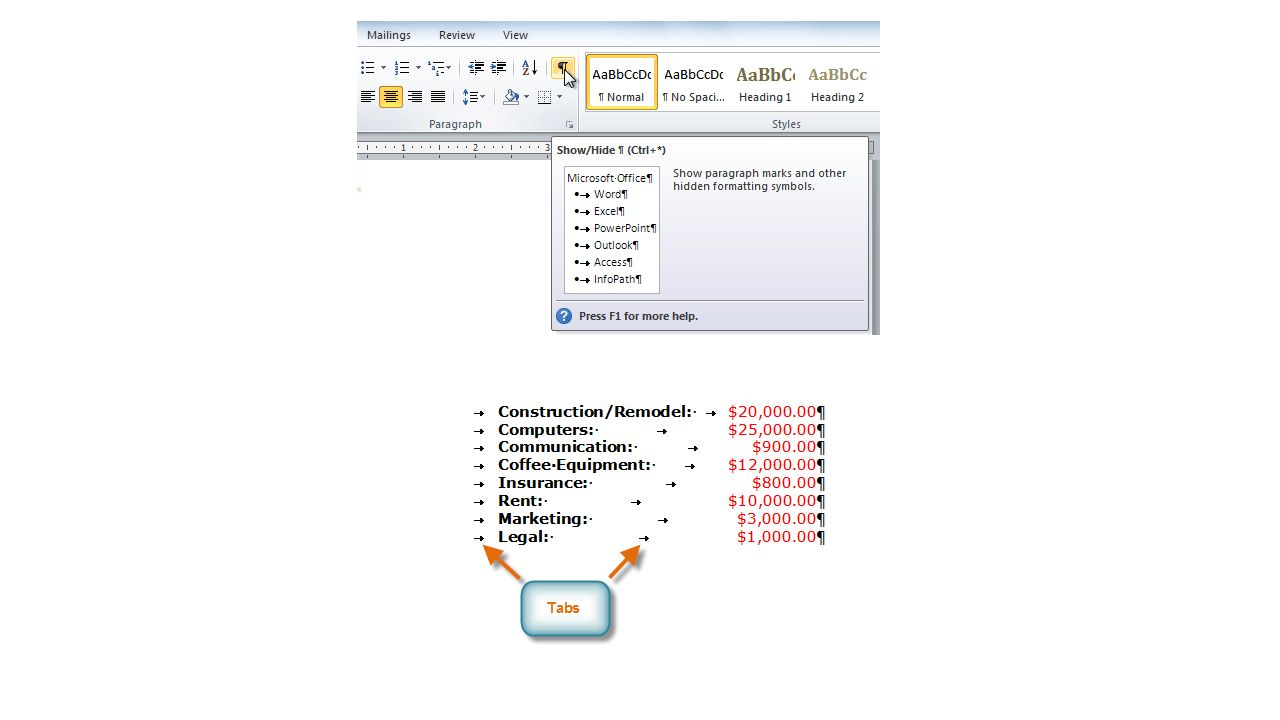
4.Click the Decrease Indent command to decrease the indent by increments of 1/2 inch. If you would prefer to type your indent amounts, you can use the Indent fields on the Page Layout tab. Click the Show/Hide ¶ command on the Home tab in the Paragraph group. This will allow you to see nonprinting characters such as the spacebar, paragraph (¶), and Tab key markings.
, and Tab key markings..")
7
Paragraph spacing Just as you can format spacing between lines in your document, you can choose spacing options between each paragraph. Typically, extra spaces are added between paragraphs, headings, or subheadings. Extra spacing between paragraphs can make a document easier to read. To format paragraph spacing: 1.Click the Line and Paragraph Spacing command on the Home tab. 2.Select Add Space Before Paragraph or Remove Space After Paragraph from the drop-down menu.

8
3.From the drop-down menu, you can also select Line Spacing Options to open the Paragraph dialog box. From here, you can control exactly how much space there is before and after the paragraph.

9
Word has several different types of breaks you can add to your document to change the layout and pagination. Each type of break serves a different purpose and will affect the document in different ways. Page breaks move text to a new page before reaching the end of a page, while section breaks create a barrier between parts of the document for formatting purposes. Column breaks split text in columns at a specific point. In this lesson, you'll learn how to insert and delete breaks. Breaks Breaks allow you to have more control over the layout of your document. You might use a page break if you're writing a paper that has a bibliography to ensure the bibliography starts on a new page. You might use a column break if you are using columns and want them to be arranged in a particular way.

10
To insert a break: 1.Place the insertion point where you want the break to appear. 2.Select the Page Layout tab. 3.Click the Breaks command. A menu appears. 4.Click the desired break option to create a break in the document.

11
To delete a break: Breaks are hidden by default. If you want to delete a break, you'll probably want Word to show the breaks so you can find them for editing. 1.From the Home tab, click the Show/Hide ¶ command. 2.Double-click the break to select it.

12
3.Press the Backspace or Delete key to delete the break. Ctrl+Enter – Insert Page Break (New Page) Ctrl+Shift+Enter – Insert Column Break
 Ctrl+Shift+Enter – Insert Column Break.")
13
Columns are used in many types of documents, but they are most commonly used in newspapers, magazines, academic journals, and newsletters. In this lesson, you will learn how to insert columns into a document and create column breaks. Inserting columns Columns and column breaks can improve your document's organization and increase its readability. They also allow you to utilize all of the available space on the page.

14
To add columns to a document: 1.Select the text you want to format. 2.Click the Page Layout tab. 3.Click the Columns command. A drop-down menu will appear. 4.Select the number of columns you want to insert. The text will then format into columns. If you want to remove the columns, click the Columns command and select One for the number of columns.

15
Adding column breaks Once you've created columns, the text will automatically flow from one column to the next. Sometimes, though, you might want to control exactly where each column begins. You can do this by creating column breaks. To add column breaks: 1.Place the insertion point where you want to add the break. 2.Click the Page Layout tab. 3.Click the Breaks command in the Page Setup group. A drop-down menu will appear. 4.Select Column from the list of break types.

16
5.The text will shift to reflect the column break.

17
When you're online, you use hyperlinks to navigate from one webpage to another. Sometimes a hyperlink will link to a different section of the same page. If you want to include a web address or email address in your Word document, you can format it as a hyperlink for someone else to click. In this lesson, you will learn the basics of working with hyperlinks, including how to insert and remove them from your Word document. Adding hyperlinks to your document can help readers quickly access contact information, other parts of the document, and any additional information online that you want to share. Hyperlinks have two basic parts: the address of the webpage, email address, or other location they are linking to; and the display text (or image). For example, the address could be http://www.youtube.com, and the display text could be YouTube. In some cases, the display text might be the same as the address. When you're creating a hyperlink in Word, you'll be able to choose both the address and the display text or image. To follow a hyperlink in Word, hold down the Control key and click the hyperlink.
. For example, the address could be and the display text could be YouTube. In some cases, the display text might be the same as the address. When you re creating a hyperlink in Word, you ll be able to choose both the address and the display text or image. To follow a hyperlink in Word, hold down the Control key and click the hyperlink..")
18
To insert a hyperlink: 1.Select the text or image you want to make a hyperlink. 2.Right-click the selected text or image, then click Hyperlink. You can also right- click in a blank area of the document and click Hyperlink. 3.The Insert Hyperlink dialog box will open. You can also get to this dialog box from the Insert tab by clicking Hyperlink. 4.If you selected text, the words will appear in the Text to display: field at the top. You can change this text if you want. 5.Type the address you want to link to in the Address: field.

19
6.Click OK. The text or image you selected will now be a hyperlink. You can also insert a hyperlink that links to another portion of the same document by selecting Place in This Document from the Insert Hyperlink dialog box. To make an email address a hyperlink: 1.Right-click the selected text or image, then click Hyperlink. 2.The Insert Hyperlink dialog box will open. 3.On the left side of the dialog box, click Email Address.

20
4.Type the email address you want to connect to in the Email Address box, then click OK. Word often recognizes email and web addresses as you type and will format them as hyperlinks automatically after you press the Enter key or the spacebar. To remove a hyperlink: 1.Right-click the hyperlink. 2.Click Remove Hyperlink.

21
After you create a hyperlink, you should test it. If you have linked to a website, your web browser should automatically open and display the site. If it doesn't work, check the hyperlink address for misspellings.

Similar presentations