Download presentation
Presentation is loading. Please wait.

1
Instructor: Craig Duckett Lecture 09: Thursday, October 29 th, 2015 CASE, ORDER BY, GROUP BY, HAVING, Subqueries 1 BIT275: Database Design (Fall 2015)
")
2
2 Assignment 2 is due LECTURE 11, Thursday, November 5 th, in StudentTracker by MIDNIGHT NEXT MID-TERM EXAM is NEXT Tuesday, November 3 rd ! It will cover everything discussed through today's lecture, Lecture 9, including any chapter reading from The DATABASE DESIGN FOR MERE MORTALS and THE LANGUAGE OF SQL books. You’re allowed to use one large index card for crib notes during the mid-term. I’ll post a Mid-Term Study Guide on the BIT275 website sometime on Friday, October 30 th.

3
3 Thursday (LECTURE 8) Database Design for Mere Mortals: Chapter 6 Thursday (LECTURE 9) The Language of SQL: Chapters 7, 8
 Database Design for Mere Mortals: Chapter 6 Thursday (LECTURE 9) The Language of SQL: Chapters 7, 8")
4
4 CASE ORDER BY GROUP BY HAVING Subqueries

5
SQL: The CASE Expression The CASE expression and its shorthand equivalents, COALESCE() and NULLIF(), let you take actions based on a condition’s truth value (true, false, or unknown). The CASE expression’ important characteristics are: If you’ve programmed before, you’ll recognize that CASE provides SQL the equivalent of the if- then-else, case, or switch statements used in procedural languages, except that CASE is an expression, not a statement. * CASE is used to evaluate several conditions and return a single value for the first true condition. CASE allows you to display an alternative value to the actual value in a column. CASE makes no changes to the underlying data. * An expression can be evaluated, and as such returns a single value. It is only one possible part of a statement. A statement is a collection of elements such as identifiers, reserved keywords, data types, functions, expressions, operators and comments, to make the smallest possible unit of code. A statement can be executed.

6
SQL: The CASE Expression A common use of CASE is to replace codes or abbreviations with more-readable values. EXAMPLE: If the column marital status contains the integer codes 1, 2, 3, or 4—meaning single, married, divorced, or widowed—your human readers will prefer to see explanatory text rather than cryptic codes. (Some database designers prefer to use codes, because it’s more efficient to store and manage abbreviated codes than explanatory text.) CASE has two formats: simple and searched. The simple CASE expression compares an expression to a set of simple expressions to determine the result. The searched CASE expression evaluates a set of logical (Boolean) expressions to determine the result. CASE returns an optional ELSE result as the default value if no test condition is true.
 CASE has two formats: simple and searched. The simple CASE expression compares an expression to a set of simple expressions to determine the result. The searched CASE expression evaluates a set of logical (Boolean) expressions to determine the result. CASE returns an optional ELSE result as the default value if no test condition is true..")
7
SQL: The CASE Expression To use a simple case expression: value1, value2,..., valueN are expressions. result1, result2,..., resultN are expressions returned when the corresponding value matches the expression comparison_value. All expressions must be of the same type or must be implicitly convertible to the same type. Each value is compared to comparison_ value in order. First, value1 is compared. If it matches comparison value, then result1 is returned; otherwise, value2 is compared to comparison_value. If value2 matches comparison_value, then result2 is returned, and so on. If no matches occur, default_ result is returned. If ELSE default_result is omitted, ELSE NULL is assumed.

8
SQL: The CASE Expression We get many questions asking whether it's possible to use an IF clause inside a SELECT statement. Well, not exactly. But you can use CASE to do the exact same thing. Let's look at what a simple CASE statement in a query looks like: If the field contains 'CA' then the CASE statement returns 'California'. 'KS' returns 'Kansas' and 'TN' returns 'Tennessee'. If the value of state does not match any of the WHEN expressions, the expression in the ELSE clause is returned, 'Some Other State'. The AS StateName aliases the column name to StateName. This query will return three columns. The third column, StateName, is constructed using the CASE statement. The CASE statement is enclosed by the keywords CASE and END. The CASE statement evaluates the state field.

9
SQL: The CASE Expression Another simple case expression example:

10
SQL: The CASE Expression condition1, condition2,..., conditionN are search conditions. (Search conditions have one or more logical expressions, with multiple expressions linked by AND or OR. result1, result2,..., resultN are expressions returned when the corresponding condition evaluates to true. All expressions must be of the same type or must be implicitly convertible to the same type. Each condition is evaluated in order. First, condition1 is evaluated. If it’s true, result1 is returned; otherwise, condition2 is evaluated. If condition2 is true, result2 is returned, and so on. If no conditions are true, default_result is returned. If ELSE default_result is omitted, ELSE NULL is assumed. To use a searched CASE expression :

11
SQL: The CASE Expression This CASE statement will run through each WHEN clause until it finds a true one. If they all evaluate to false it will return the ELSE clause. In both cases if there is no ELSE clause it will return a NULL. In this second example, each boolean expression is independent of each other statement. I can actually compare different columns (e.g., state and city). Remember that it searches through the WHEN clauses from top to bottom so order them carefully. In the searched case expression, CASE is evaluating a series of boolean expressions. It returns the first expression that evaluates to true.
. Remember that it searches through the WHEN clauses from top to bottom so order them carefully. In the searched case expression, CASE is evaluating a series of boolean expressions. It returns the first expression that evaluates to true..")
12
SQL: The CASE Expression Another example of a searched case expression.

13
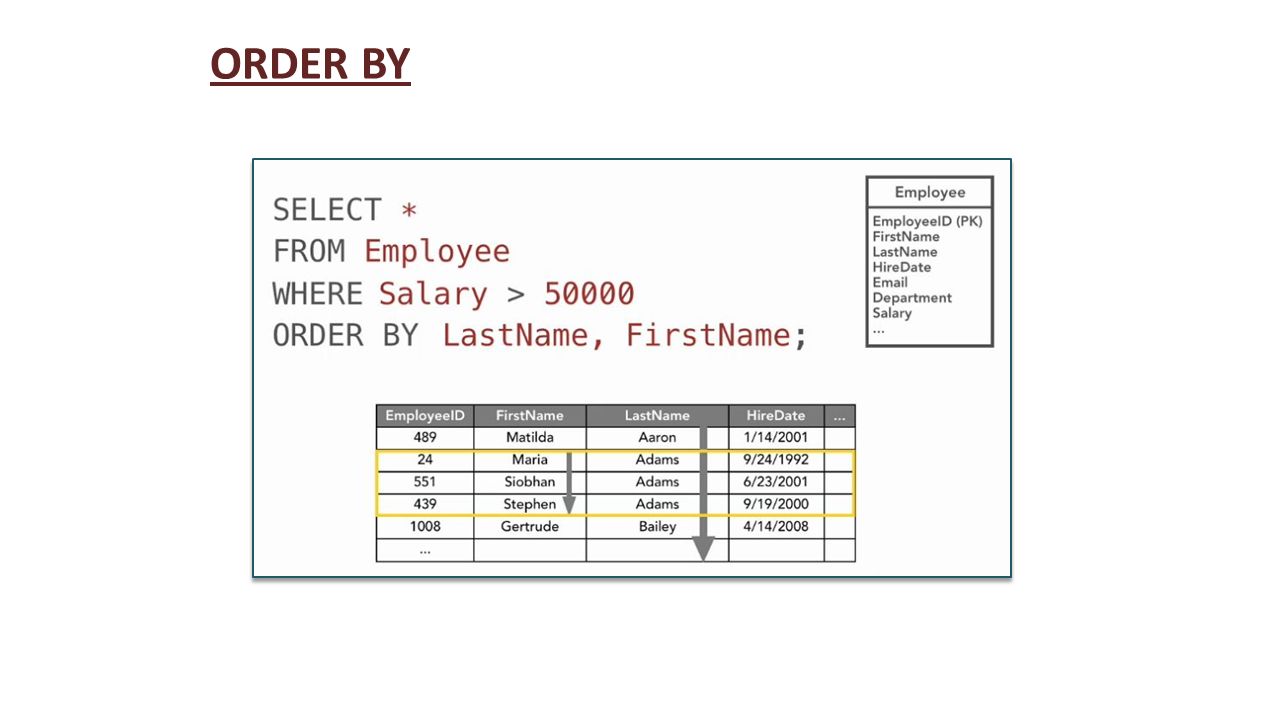
Difference between ORDER BY and GROUP BY The difference is exactly what the name implies: an ORDER BY sorts and a GROUP BY performs a grouping operation usually based on an aggregate of some sort. So what does this mean, exactly? ORDER BY is used to order the rows resulted from a SELECT statement. ORDER BY allows you to sort the result set according to different criteria, such as sort by name from a-z, then sort by price highest to lowest : ORDER BY name, price DESC GROUP BY is used to group rows in a SELECT, usually when aggregating rows (e.g. using SUM, or COUNT, or AVG for a set of rows with the same values for some fields). GROUP BY allows you to take your result set, group it into logical groups and then run aggregate queries on the groups. For example, you could select all employees, group them by their workplace location and calculate the average salary. This would give you the average salary of an employee at a given workplace location in your database.
. GROUP BY allows you to take your result set, group it into logical groups and then run aggregate queries on the groups. For example, you could select all employees, group them by their workplace location and calculate the average salary. This would give you the average salary of an employee at a given workplace location in your database..")
14
ORDER BY

16
GROUP BY

17
GROUP BY with ORDER BY

18
SQL: Filtering Groups with HAVING The HAVING clause sets conditions on the GROUP BY clause similar to the way that WHERE interacts with SELECT. The HAVING clause’s important characteristics are: The HAVING clause comes after the GROUP BY clause and before the ORDER BY clause. Just as WHERE limits the number of rows displayed by SELECT, HAVING limits the number of groups displayed by GROUP BY. The WHERE search condition is applied before grouping occurs, and the HAVING search condition is applied after. HAVING syntax is similar to the WHERE syntax, except that HAVING can contain aggregate functions. A HAVING clause can reference any of the items that appear in the SELECT list. The sequence in which the WHERE, GROUP BY, and HAVING clauses are applied is: 1.The WHERE clause filters the rows that result from the operations specified in the FROM and JOIN clauses. 2.The GROUP BY clause groups the output of the WHERE clause. 3.The HAVING clause filters rows from the grouped result.

19
SQL: Filtering Groups with HAVING List the number of books of each type for each publisher, for publishers with more than one title of a type.

20
SQL: Filtering Groups with HAVING List the number of titles and average revenue for the types with average revenue more than $1 million.

21
SQL: Filtering Groups with HAVING List the number of books of each type for each publisher, for publishers with more than one title of a type.

22
SQL: Subqueries A Subquery or Inner query or Nested query is a query within another SQL query, and embedded within the WHERE clause. A subquery is used to return data that will be used in the main query as a condition to further restrict the data to be retrieved. Subqueries can be used with the SELECT, INSERT, UPDATE, and DELETE statements along with the operators like =,, >=, <=, IN, BETWEEN etc. There are a few rules that subqueries must follow: Subqueries must be enclosed within parentheses ( ) A subquery can have only one column in the SELECT clause, unless multiple columns are in the main query for the subquery to compare its selected columns. An ORDER BY cannot be used in a subquery, although the main query can use an ORDER BY. The GROUP BY can be used to perform the same function as the ORDER BY in a subquery.
 A subquery can have only one column in the SELECT clause, unless multiple columns are in the main query for the subquery to compare its selected columns. An ORDER BY cannot be used in a subquery, although the main query can use an ORDER BY. The GROUP BY can be used to perform the same function as the ORDER BY in a subquery..")
23
SQL: Subqueries Example TO BE CONTINUED… WE WILL BE DEDICATING MORE TIME TO THIS TOPIC NEXT THURSDAY (MID-TERM ON TUESDAY)
")
24
24 MySQL Workbench OPTIONAL INFORMATION

25
MySQL Workbench While most MySQL tasks can be performed using command-line tools, many tasks can actually be made easier using the MySQL Workbench tool. This is a graphical user interface (GUI) tool that allows many tasks to be performed visually. The workbench also includes features for creating and modifying database models, and a SQL Editor environment for interactively executing SQL statements and creating SQL scripts. Getting and Installing MySQL Workbench The MySQL Workbench tool is not installed by default along with the standard MySQL server and client software, so it must be downloaded independently from the MySQL web site at: http://www.mysql.com/products/workbench/ The tool is provided pre-built for a number of platforms including Microsoft Windows, Mac OS X and popular Linux distributions including Red Hat, Fedora, Ubuntu and SuSE. The workbench is also available in source code form allowing the tool to be compiled on system for which pre-built binaries are not available.
 tool that allows many tasks to be performed visually. The workbench also includes features for creating and modifying database models, and a SQL Editor environment for interactively executing SQL statements and creating SQL scripts. Getting and Installing MySQL Workbench The MySQL Workbench tool is not installed by default along with the standard MySQL server and client software, so it must be downloaded independently from the MySQL web site at: The tool is provided pre-built for a number of platforms including Microsoft Windows, Mac OS X and popular Linux distributions including Red Hat, Fedora, Ubuntu and SuSE. The workbench is also available in source code form allowing the tool to be compiled on system for which pre-built binaries are not available..")
26
MySQL Workbench Creating a Server Instance Profile Once MySQL Workbench has been installed it is ready to be launched. On Windows system, look for MySQL Workbench within the Start menu structure. One Linux systems using the GNOME desktop, the application can usually be found in the Applications -> Programming menu. Once invoked, the initial screen will appear as illustrated in the following figure:

27
MySQL Workbench The workbench uses a “tabbed panel” approach to presenting information. On the initial startup, only the Home tab is displayed providing a range of options that may be performed such as creating and executing SQL queries and scripts and performing data modeling tasks. For the purposes of this chapter, however, we are interested solely in server administration. MySQL Workbench is able to administer both local and remote MySQL server instances. Before any administrative tasks can be performed, however, a connection to the target MySQL server must first be established. This is achieved by clicking on the New Server Instance option located in the Server Administration column of the home screen. Once selected, the Create New Server Instance Profile wizard will appear. The first screen provides the option to access either a local (i.e. a MySQL database server running on the same computer as the workbench tool) or remote database server.
 or remote database server..")
28
MySQL Workbench On the next screen, enter a descriptive name for the connection, indicate the connection type (TCP/IP, local socket or the more secure TCP/IP with SSH) and specify the name of the user and the port via which the database is to be accessed. Additional options are available by selecting the advanced tab: After clicking the Next button, the wizard will request the password required to access the database using the user name specified and then attempt to test the connection. If a connection is successfully established a message indicating this will be displayed. If the test fails, return to the previous screen and verify that the connections settings are correct.

29
MySQL Workbench On the next screen, select the operating system and database type that are installed on the target system. If the wizard successfully detected these settings during the connection test, these values will most likely already be accurately configured. On the next screen, the wizard will check the connection to the host machine on which the workbench is running. Once again, the Next button may be pressed to proceed if the test passes successfully. Finally, review the server instance name and click the Finish button to complete the instance creation process. The new server instance will now be listed in the Server Administration column of the home screen as illustrated in the following figure:

30
MySQL Workbench Connecting to a MySQL Database Server To connect to a database server to perform administrative tasks, simply double click on the server instance created in the previous section of this chapter. MySQL Workbench will prompt for the password associated with the user name contained in the profile and then display the Admin panel for the requested server instance: Note that the Home panel is accessible at any time simply by clicking on the Home tab located beneath the toolbar. In addition, multiple administrator sessions, connected to different servers, may be establish concurrently from the home panel. Each administration session will appear with its own tab in the main window.

31
MySQL Workbench A Tour of the MySQL Workbench Admin Panel The MySQL Workbench tool provides a wide range of monitoring and configuration options. For the remainder of this chapter we will provide an overview of the various options available. Server Status The topmost panel of the admin screen contains information about the server to which the workbench is currently connected: The Server Status panel is further divided into three subsections: INFO - Displays information about the server (hostname, MySQL server version and current operational status). SYSTEM – The current load and memory usage of the system that is hosting the MySQL server to which the workbench is currently connected. SERVER HEALTH – Four gauges indicating the number of connections to the database, volume of traffic, rate of hits to the query cache and the database key efficiency percentage.
. SYSTEM – The current load and memory usage of the system that is hosting the MySQL server to which the workbench is currently connected. SERVER HEALTH – Four gauges indicating the number of connections to the database, volume of traffic, rate of hits to the query cache and the database key efficiency percentage..")
32
MySQL Workbench Configuration The Configuration panel, illustrated in the following figure, occupies the remainder of the Admin panel and provides a range of categories for accessing information and making configuration changes:

33
MySQL Workbench Configuration categories provided by the workbench are as follows: Startup – Allows the target database server to be stopped and started from within the administration panel. The startup message log also displays information about the success or otherwise of the most recent server startup. Configuration – Allows the settings contained in the my.cnf configuration file to be modified. Settings are categorized in this panel into related groups. Accounts – Allows user accounts to be added and deleted, and the privileges of existing accounts to be modified. Connections – Lists the current connections to the database server. To kill a connection or terminate a query, select the corresponding connection and click on the appropriate button at the bottom of the list. Variables – Provides access to a number of internal MySQL Server variables, such as the number of active connections, the number of failed connections and the number of SQL statements of a particular type that have been executed. Data Dump – Allows the data from specific databases and tables to be dump to or restored from file. Logs – Provides access to the log files of the MySQL server to which the workbench is connected. Note that for logs to be visible, the log-output configuration option must be set to TABLE. To make this change, select Configuration followed by the Log Files tab. Scroll down the list of options to log-output. If the check box next to this item is not selected, select it and change the value from File to Table and click the Apply button. Enter appropriate passwords when prompted to do so. After making the change, select the Startup panel and stop and restart the MySQL database server. Once restarted, the log files should be visible on the Logs tab.

34
MySQL Workbench Using the MySQL Workbench SQL Editor As outlined in the previous section, the MySQL Workbench tool fulfills a number of different roles in terms of presenting a user friendly graphical interface to the MySQL database management system. One of those roles involves the creation and execution of SQL statements and scripts. The goal of this sectionis to cover this aspect of the workbench tool.

35
MySQL Workbench Connecting to a MySQL Database Server Before any SQL statements can be executed on a database, the MySQL Workbench tool must first establish a connection to the target database server. This may take the form of a local server that is running on the same host as the workbench, or a server running on a remote system. To establish such a connection, begin by launching the workbench tool. Once running, the home screen should appear as shown in the following figure:

36
MySQL Workbench If the required connection is already listed in the SQL Development column of the workbench home page, simply double click on it to establish the connection and enter the corresponding password. Alternatively, click on New Connection to display the new connection dialog: On the this screen, enter a descriptive name for the connection, indicate the connection type (TCP/IP, local socket or the more secure TCP/IP with SSH) and specify the name of the user and the port via which the database is to be accessed. Additional options are available by selecting the Advanced tab. Once the appropriate information has been provided, click on the Test Connection button to verify the information is correct and the database server is accessible. Assuming a successful test, click on OK to establish the connection profile.
 and specify the name of the user and the port via which the database is to be accessed. Additional options are available by selecting the Advanced tab. Once the appropriate information has been provided, click on the Test Connection button to verify the information is correct and the database server is accessible. Assuming a successful test, click on OK to establish the connection profile..")
37
MySQL Workbench To connect to the server, simply double click on the connection and enter the password for the specified user.

38
MySQL Workbench The MySQL Workbench SQL Editor Once a connection has been established to a database server, the SQL Editor panel will appear: It is possible to return to the workbench home screen at any time simply by selecting the Home tab. Multiple SQL Editor sessions to multiple servers may be established from the home screen, each with its own tab located beneath the toolbar. The SQL Query panel allows SQL commands to be entered. These may then be executed using the buttons in the toolbar displaying lightning bolts. The leftmost “lightning” button is provided to execute the entire script contained within the SQL Query panel, whilst the second button executes only the currently selected statement.

39
MySQL Workbench Output from SQL statement execution appears in a Results panel located beneath the SQL Query panel. In the following figure, a SQL SHOW DATABASES; statement has just been executed: The sequence of SQL statements entered into the SQL Query panel may be saved in the form of a script by selecting the File -> Save Script menu option or clicking on the corresponding toolbar button. Saved scripts may similarly be loaded into the SQL Editor using the File -> Open SQL Script… menu option or the Open a SQL Script toolbar button.

40
MySQL Workbench Using MySQL Workbench to Create a Database Model Perhaps the most powerful feature of the MySQL Workbench tool is the ability to design and manage models. In this section we will work through the steps necessary to design a simple schema using MySQL Workbench and then generate a SQL script and feed it through to a database server to create the corresponding physical database. In addition to allowing new models to be designed, the workbench tool also includes reverse engineering capabilities, enabling a model to be generated from an existing database.

41
MySQL Workbench Creating a New Model To create a new model, start the MySQL Workbench tool and click on the Create New EER Model option located in the Data Modeling column of the home screen. A new panel will be added to the workbench labeled Model:

42
MySQL Workbench Begin the modeling process by double clicking on the tab labeled mydb MySQL Schema. In the resulting properties panel change the name of the schema to mySample:

43
MySQL Workbench Close the schema property panel by clicking on the small “x” next in the Schema tab. Having given our schema a name, we can now add a table to the model. This is achieved by double clicking on the Add Table button in the Tables panel:

44
MySQL Workbench Change the table name to inventory and then select the Columns tab to begin the process of adding columns to the table:

45
MySQL Workbench By default, the workbench will create a non-null primary key named idinventory. For the purposes of this exercise we will keep this column, though in practice this can be changed. Select the second line, double click in the Column Name field and name the column product. Accept the default value of VARCHAR for the datatype. Repeat these steps to add a price column of type FLOAT and a quantity column of type INTEGER. Each of these should be declared as non-null by checking the boxes in the NN column: Before proceeding, save the model using the File -> Save Model menu item, or using the appropriate toolbar button.

46
MySQL Workbench Generating a Model Diagram To generate an EER diagram of our model, select the Model -> Create Diagram from Catalog Objects menu option. The diagram illustrated in the following figure will then be generated:

47
MySQL Workbench Generating a Script and Creating a Database Having created a model, the next step is to generate a SQL script from the model and feed it through to a database server where it will be executed to create the physical database and table. To achieve this, select the Database -> Forward Engineer… menu option. In the resulting dialog, a range of selections are available to filter and modify the script that will ultimately be generated. Unless you have specific requirements, leave the default selections unchanged. In addition, the objects that are to be generated may also be selected. Since this is a very simple example, and all we have to generate is table information, select only the Export MySQL Table Objects option and click Next to review the generated SQL script:

48
MySQL Workbench Assuming the script appears as expected given the initial model from which it has been generated, click Next to specify the server to which the script is to be sent (or save the script if it is to be used later, perhaps within the SQL Editor or mysql client):
:")
49
MySQL Workbench Reverse Engineering an Existing Database In addition to aiding in the design of new models, a model may also be generated from an existing database (a concept referred to as reverse engineering). To reverse engineer an existing database, select the Create EER Model from Existing Database link from the Database Modeling column of the MySQL Workbench home screen and configure the connection to the desired database server in the resulting dialog. Having connected successfully and fetched the database information proceed to the next screen to select the schemata to be reverse engineered. A good example here if you do not have any existing databases is to reverse engineer the mysql database (the database used internally by MySQL). After the wizard has finished fetching additional information, select the Import MySQL table objects option on the Select objects to reverse engineer screen and click Execute. Upon completion of execution, two new tabs labeled Model and EER diagram respectively will appear in the workbench. The model provides access to the schema for the database and tables:
. After the wizard has finished fetching additional information, select the Import MySQL table objects option on the Select objects to reverse engineer screen and click Execute. Upon completion of execution, two new tabs labeled Model and EER diagram respectively will appear in the workbench. The model provides access to the schema for the database and tables:.")
50
MySQL Workbench

51
Similarly, the EER Diagram tab may be used to view the model of the reverse engineered model:

52
52 BIT 275 ICE 9

Similar presentations


>")


>")


