Download presentation
Presentation is loading. Please wait.

1
Signs, Signals, and Road Markings Chapter 2

2
Traffic Signs Page 1

3
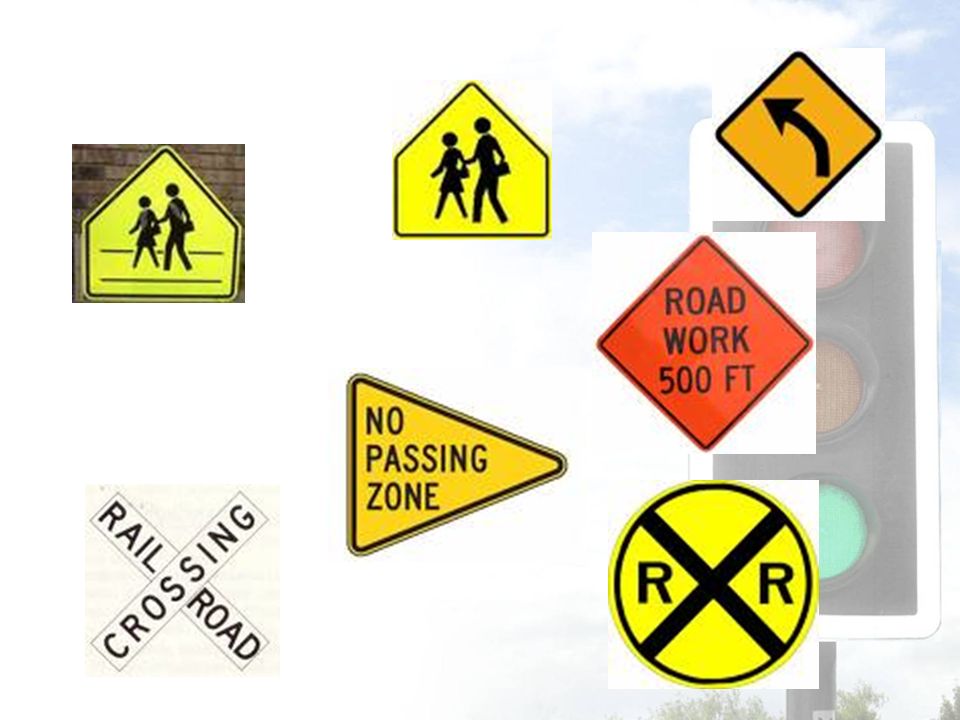
Traffic Sign Types

4
Traffic Signs- Regulatory Stop Sign Full stop Yield to pedestrians or other cars Right of way- immediately using the roadway without causing others to slow or stop for you. 4-way or all-way stops Yield Sign Always give the right of way to traffic Go only if you do not affect the flow of traffic Speed Limit Set to manage traffic at safe speeds Basic speed law Minimum speed law Advisory speed limits Special speed limits (set for certain hours of the day)
.")
5
Traffic Signs- Warning Diamond warn danger is ahead School School zone School crossing No-Passing Zone where you cannot pass another vehicle Used with a single solid yellow line Construction On a construction vehicle Drive cautiously in a construction zone Railroad Railroad crossing is before the tracks Crossbuck and flashing lights are at the tracks Take them as a yield and a stop sign respectively

7
Traffic Signs- Guide and International Route Local, state, U.S., interstate All vary by state accept interstate which will always look like the picture Numbering system Other Green: Destinations ahead, distances to be traveled Blue: highway services. Food, fuel, lodging, hospital Brown: recreation areas and cultural points of interest International symbols (In most cases) no words=no language barrier
 no words=no language barrier.")
8
Traffic Signals

9
Traffic Signals-Traffic Lights Traffic Lights Green: Bottom or on the right, check traffic at intersection by looking around, go if clear Yellow: Middle, Proceed with caution, go only if you are too close to stop safely Red: Top or on the left, full stop behind a stop line or crosswalk Computerized Traffic Lights Controls traffic flow with sensors Right-Turn-on-Red Unless a sign prohibits, vehicles may eye-up the intersection and make a right turn with caution while the light is red Left-Turn-on-Red Usually from a one-way street to another one-way Intersection must be safe and clear

10
Traffic Signals-Flashing Signals/Arrows Flashing Signals Alerts drivers to dangerous conditions or to stop Yellow: slow down, Red: full stop Arrows Must follow the arrow’s direction Used with and like a traffic light Green, yellow, red

11
Traffic Signals- Lane/Pedestrian/Officer signals Lane Signals Used when lanes of traffic need to go in one direction for a period of time and then switch Tunnels Pedestrian Signal Used near heavy traffic at intersections Can use to tell when the traffic light will change Officer’s Signal Must obey signals given by an officer Palm up: Stop, Waving hand: Go

12
Roadway Markings

13
Roadway Markings- Yellow Line Markings Broken Separates two way traffic Driver may pass only when no traffic is coming from the opposite direction Solid or double solid Passing is not allowed Making a left through solid after yielding to traffic is allowed Shared left-turn lane Both solid and broken lines make up the lane Make it easier for drivers to make left turns

14
Roadway Markings-White Line Markings Broken Separate lanes of traffic that are moving in the same direction Allowed to pass other vehicles by changing lanes Solid No lane switching Edge of the roadway Pedestrian crosswalks Stop lines White arrows Must obey what is posted

15
Roadway Markings- Rumble Strips and Raised Roadway Markers Rumble Strips Short sections of grooved roadway Warning for: a major or dangerous intersection, a toll plaza, unexpected need to stop or reduce speed, you are too close to the edge of the roadway Raised Roadway Markers Used for drivers to see where the lane is at night. Reflectors in the road White: Edge of roadway, between lanes Yellow: Left edge of an expressway Red: Indicate you are driving on the wrong side of the road

16
Roadway Markers- Other White lines by exit ramps Indicate where the exit ramp starts X and R’s Indicate railroad markings SCHOOL A school crossing is coming up Painted Curbs Usually indicate a no-parking zone Red, yellow, white Fire hydrants, curves, and intersections Handicap spots The handicap symbol is painted into the spot and means only if you have a tag is parking permitted

17
Review 1. What actions do you take at a STOP, YIELD, and speed limit signs? 2. How do lane signals, flashing signals, and arrows help you when driving? 3. What are the different types of yellow and white line markings and what do they mean? 4. Draw an interstate, a warning, a round, and a school sign.

18
Chapter 3 Basic Vehicle Control

19
Chapter 3: Basic Vehicle Control Instruments, Controls, and Devices Speedometer: Tells you the speed you are traveling in both mph and kmph. Tachometer: Indicates the engine revolutions per minute. (stick) Odometer: Measures the amount of miles traveled. Temp Light or Gauge: warning for coolant temp in engine. Oil Light or Gauge: warning if the oil isn’t circulating at the proper pressure. Alternator Warning Light or Gauge: indicates vehicle electrical trouble. Usually lights if the battery is being drained. Brake system warning light: reminds to release the parking brake, light comes on if the braking system is not working properly. Page 19
 Odometer: Measures the amount of miles traveled. Temp Light or Gauge: warning for coolant temp in engine. Oil Light or Gauge: warning if the oil isn’t circulating at the proper pressure. Alternator Warning Light or Gauge: indicates vehicle electrical trouble. Usually lights if the battery is being drained. Brake system warning light: reminds to release the parking brake, light comes on if the braking system is not working properly. Page 19.")
20
3.1 Cont Antli-lock Brake Lights: Keeps the wheels from locking. Light indicates if the brakes are not working properly. Safety Belt Light: reminds you to fasten your seatbelt. Air Bag Warning Light: Indicates if the are in proper working condition. Turn Signal Indicators: indicates the direction you have signaled to turn. High Beam Indicator: Indicates if the high beam lights have been turned on. Vehicle Controls: Steering Wheel: Turns the car Steering Wheel Adjustment Lever: Moves the Steering Wheel into the drivers optimum position. Page 20

21
3.1 cont Selector Lever: Automatic transmition (forward or reverse) Console: Compartment between the two seats. Gear-Shift Lever: Manual Transmition (alternates gears) Ignition and Starter Switch: Starts the car engine. Cruise Control: allows you to maintain a desired speed on the road. Parking Brake: Keeps the vehicle in place when the car is parked. Clutch Pedal: Manual Transmition, is the pedal that allows you to switch gears. Foot Brake: Applies brakes to stop. Accelerator Pedal: increases speed. Page 21
 Ignition and Starter Switch: Starts the car engine. Cruise Control: allows you to maintain a desired speed on the road. Parking Brake: Keeps the vehicle in place when the car is parked. Clutch Pedal: Manual Transmition, is the pedal that allows you to switch gears. Foot Brake: Applies brakes to stop. Accelerator Pedal: increases speed. Page 21.")
22
3.1 Cont Safety/Communication Seat Belts: Secure driver and passenger Head Restraints: Reduces whiplash injuries in collision. Rearview Mirrors inside/outside: Allows vision to back and sides of car while facing front. Horn: Signal to other cars. Hazard Flasher: Warns other vehicles that your car is a hazard. Turn Signal Lever: Move lever to signal turn Windshield Wiper and Washer Light Switch Hood Release Lever: Unlocks the hood, usually located on bottom of driver seating compartment. Page 22

23
3.1 cont Heater, Air Conditioner, and Defroster: Sun Visor: Keeps sun out of eyes. Seat Adjustment Lever: Adjusts seat to meet the drivers needs. Page 23

24
3.2 Getting Ready to Drive Outside Checks: Look around the outside of the car (oil marks, objects, water marks) Check Tires Wheel direction Windshield, headlights, and taillights are clear. Check back window for loose objects. Check for unwarented passengers. Getting into the Vehicle: Unlock the Vehicle Check oncoming traffic Get in quickly, lock, and start Page 24

25
3.2 Cont Inside Checks Lock all doors Adjust the seat to your needs, check distance to foot pedals, make sure you 10 inches away from wheel for collision safety. Hands should be balanced and comfortable, knees should be slightly bent. Adjust head restraint to the middle/back of head. Adjust inside mirror and outside mirrors. Fasten Seatbelt and ask all passengers too. Page 25

26
3.3 Driving a Automatic Vehicle Selector Lever Postions; P: Park R: Reverse, back up lights will activate when backing up. N: Nuetral, engine running but car isnt moving. D: Drive L1, L2 or 1,2. Positions that send more power to the wheels at lower speeds. Starting the Engine: Parking Brake is set Car must be in park Keep foot off accelerator if engine is cold. Turn ignition switch to on, continue turning to start and release the key. Check all gauges, warning lights, and fuel supplies. Page 26

27
3.3 Cont Hand Positions for Controlled Steering Using proper grip is very important when driving a car. The ideal position to have your hands is in the 10-2 o’clock position or the 9 and 3 o’clock position. Imagine your wheel is a clock and place your hands on the desired time. Steering the Vehicle: Begin your practice with picking out a target far out in the distance. Target is the “aiming point” which is where you want your car to go. Slight steering keeps your car in a straight line. Putting the Vehicle in Motion; Press firmly on brake Selector to drive Release parking brake Check traffic, in-front and behind Use turn signal Once clear press slightly on accelerator Check over shoulder Reach desired speed and then ease on accelerator. (rest heel of foot on ground) Page 27
 Page 27.")
28
3.3 Cont Stopping the Vehicle: Check Traffic Let up on accelerator Gradually press down on foot brake (shift to park if you plan to park) Securing the Vehicle: Once stopped continue to step on brake. Shift to park or reverse in stick shift Set parking brake, turn off accessories, and close all windows. Turn off ignition switch, remove key, release foot brake Unfasten seatbelt Lock all doors Leaving the Vehicle: Check inside/outside mirrors Make sure you have your keys Glance over shoulder Open door when it is safe Make sure all doors are locked ad walk to the rear of vehicle. Page 28

29
3.4 Driving a Vehicle with Manual Transmission Selector-Lever Position: 4,5,6 speed shift patterns. Using Stickshift Gears: N-Nuetral 1: start the car 0-15 2: 15-25 3: 25-40 4: speeds above 35 5: over 45 or 50 R: Reverse Page 29

30
3.4 cont Using the clutch: Press clutch pedal to floor before starting, shifting, or before coming to a stop. Do not form a habit riding the clutch, which is keeping your foot on the clutch pedal while driving Page 30

31
Chapter 4 Managing Risk with the IPDE Process

32
The IPDE Process Risks: Can be contributed by the driver, by the vehicle, and by the roadway and environment. Adjusting the radio, being angry, having blurred vision, combing, hair, texting, talking on the phone, bad tires, dirty windshield, sharp curve, snow and ice. The IPDE Process: Identify, Predict, Decide, Execute Aim high in steering, keep eyes moving, get the big picture, Make sure others see you, leave yourself an “out.” Identify: Give meaning to what you see. Zones and Searching Ranges: Zone: one of the six areas of space around the vehicle that is the width of a lane and extends as far as the driver can see. Open Zone: space where you can drive without a restriction to your line of sight or to your intended path of travel. Line of Sight: is the distance you can see ahead in the direction you are looking. Target Area: section of the roadway where the target is located in the center of your intended path, and the area to its right and left. Closed Zone: space not open to you because of its restriction in your line of sight or intended path of travel. Target Area Zone: the space from your vehicle to the target area. 12-15 second range: the space you will travel in 12-15 seconds. 4-6 second range: the space you will travel in 4-6 seconds. Page 32

33
4.1 Cont Orderly Visual Search Pattern: Look ahead Evaluate your left-front, front, and right-front zones in 12- 15 second range. Glance in rearview mirror to check rear zones. 12-15 second range 4-6 second range Glance in rearview mirror Check gauges Where and how to look: Field of vision: area you can see around while looking forward. Central Vision: area seen clearly and sharply. Peripheral Vision: area you can see to the left and right of central vision. Page 33

34
4.2 Aim high in steering: means look 12-15 seconds ahead. Helps identify clues on the road. Keep your eyes moving: Try to develop the art of scanning. Scanning: glancing continually and quickly with very brief fixations through your orderly visual search pattern. Get the big picture: putting together the critical clues you have selected. Know what to look for: Look for open zones: look for clues that might cause an open zone to close. Search for intersections, parked cars, pedestrians, traffic. (city) Look for crossroads, slow-moving vehicles, and animals. Look for other users: People that may affect your path of travel. Ground viewing: making quick glances to the roadway infront of you. Always be on the lookout out for problem drivers, speeders/illegal passing. Change from multilane to single lane: Identify signs that warn for this change, don’t wait for the last instant allow yourself time to check your zones. Roadway surface: identify the roadway surface and the condition ecah time you drive Page 34
 Look for crossroads, slow-moving vehicles, and animals. Look for other users: People that may affect your path of travel. Ground viewing: making quick glances to the roadway infront of you. Always be on the lookout out for problem drivers, speeders/illegal passing. Change from multilane to single lane: Identify signs that warn for this change, don’t wait for the last instant allow yourself time to check your zones. Roadway surface: identify the roadway surface and the condition ecah time you drive Page 34.")
35
4.2 cont Roadside Hazard: Scan for bicycles, pedestrians, parked cars, animals, other drivers. Look for traffic controls: stop lights, etc. Predict: how the hazard may affect you path. How to: Knowledge: driving knowledge, study of traffic laws and driver education material. Judgement: involves measuring, comparing, and evaluation. Experience: helps you improve your ability to predict accuratly. What to Predict: The actions of other roadway users. Control of your vehicle and consequences of your actions. Predicting Actions of Others: Watch for clues to what they might do to alter zone conditions. Path: What path they might follow Action: What action will the other drivers take Space: Will I have an open zone? Point of Conflict: Where might conflict occur? Page 35

36
4.3 Decide and Execute Decide: Decide to change speed: Any decision will be influenced by the speed of your vehicle as well as the speed of the other drivers. Decide the change direction: Use a space cushion: an open space to aviod conflict. Decide to communicate: Headlights, horn, turn signals, back up lights. Traffic Flow: Safest place is where there are fewer cars surrounding you. Minimize a hazard: Change you speed to deal with one change. Compromise Space: give as much space possible to the greater hazard. Page 36

37
4.3 Cont Execute: Carrying out your decision. Control Speed: Maintain the speed you are going. Steer: Execute just the right amount of speeding needed. Communicate: Use your lights and other devices as you execute. (hazards, turns, back-up, horn) Combine Actions: At times you may need to combine a few actions at the same time to execute your desired task. Page 37
 Combine Actions: At times you may need to combine a few actions at the same time to execute your desired task. Page 37.")
38
The Smith System -organized method to help drivers develop good seeing habits by using 5 rules for driver safety. Aim high steering Keep your eyes moving Get the big picture Make sure others see you Leave yourself and “out” Page 38

39
The Zone Control System An organized method for managing 6 zones of space surrounding your vehicle. See a zone change Check the other zones Create time and space by getting the best speed control, lane position, and communication Page 39

40
Using the IPDE IPDE Takes Practice: Commentary Driving: “thinking out loud,” verbalizing what you identify, predict, decide, and execute. Putting IPDE Into Practice: Conditions may change in one way or more zones so the process need not be completed. You may at one time need to change or start a new cycle before finishing another. Page 40

41
Chapter 5,6

42
Gravity and Energy of Motion 5.1 Gravity: The force that pulls all things to earth. Center of Gravity: The point around which an objects weight is evenly distributed. Energy of Motion: or kinetic energy. The force in which moves. The faster you vehicle moves, to more energy of motion it has. Its also affected by weight. Friction and Traction Friction: The force that keeps each tire from sliding on the road. Traction: The friction created by the tire on the road. Traction makes it possible for your car to grip the road. When you press the brake, braking friction slows you down Page 42

43
5.2 Friction and Traction Tires: Thread and Traction: Thread: The grooved surface of a tire that grips the road. Tires ability to grip the road will increase if there is more tread on the tire. Blowout: when all air escapes the tire at once. This is usually due to a worn out tire. Inflation and Traction: Underinflation: When the tire in underinflated you only have the outside edges touching the ground. This means those areas will wear out first. Overinflation: The tire has too much pressure and only the middle of the tire is touch the ground. Split Traction: The use of traction and turning needs to be estimated. You must ease on the brake to prevent skidding and create more traction. Checking Traction: Check rear zone Brake gently If care doesn’t slow brake slightly harder. Page 43

44
5.2 cont Vehicle Control in Curves: Speed: You can only control the speed not the curve so when you come to a curve press slightly on the brake to create more friction. Sharpness of Curve: Sharper the curve the more traction is need to make the turn. Banked Curves: a curve that is higher that it is on the inside. Load: The driver must slow down around a curve if they have a heavy load. Page 44

45
5.3 Stopping Distance Total Stopping Distance The distance you car travels when trying to make a stop. Perception Time and Distance: Perception Time: The length of time you take to identify, predict, and decide how slow for a hazard. Perception Distance: The distance your vehicle travels during this time. Reaction Time: The length of time you take to execute your action. Reaction Distance: The distance your vehicle travels while you react. Estimating Stopping Pick a fixed checkpoint where you Count off 4 seconds Check your vehicles position Page 45

46
5.3 cont Factors That Affect Braking Distance: Speed: higher = longer braking distance. Vehicle Condition: bad tires, shock absorbers, and brakes = longer braking distance. Roadway Surface: snow, ice, rain, etc Driver Ability: distracted or impaired Antilock Braking system: better control in braking Hills: increases when driving downhill Loads. Heavier load = long braking distance Page 46

47
5.4 Controlling Force of Impact Forces of Impact: The force at which a moving object hits another object. Speed: The force of impact is in proportion to the square of the increase or decrease in the vehicles speed. Weight: The heavier the vehicle the more damage it will cause. Distance Between Impact and Stopping: Safety Belts: Restraint Devices Passive Restraint Devices: How to wear you belt: Adjust your seat to a comfortable and upright position. Snap the metal fitting on the end of the safety belt into the buckle. Low part across the hips, belt should touch your thighs. Shoulder art right across the chest Air Bags: A balloon like device that automatically inflates. You should be 10 inches away from the steering wheel to protect from impact of airbag. If you have tilted steering wheel. Tilt wheel towards chest. Page 47

48
5.4 cont: Other Protection Devices: Automatic Safety Belts Front and Rear Crush Areas Energy Absorbing bumpers Side door beams Reinforced windshield Energy absorbing steering wheel and column Padded dash Head restraints. Page 48

49
Chapter 6

50
Steering, Signaling, and Changing Lanes Steering Straight Forward: Oversteer Turn the steering wheel to much to make a turn. Understeer: Don’t turn the wheel enough to keep the vehicle in the planned path. Steering Straight Backward: Shift to Reverse Yurn your body to the right and look over shoulder. Put hand at 12 0’clock position. Release pressure on brake to allow car to move. Turn top of steering wheel in the direction you want to go. Stick Shift: Same but hold clutch Signaling: Right turn: Left hand pint up means turn right Left turn: Hand pointing straight out. Low or Stop: Hand pointing down. Page 50

51
6.2 Cont Making Turns and Turning the vehicle around. Hand-over-hand steering Push-pull steering Making left and right turns: Look for pedestrians and oncoming vehicles. Check zones, plan turns well in advance. Plan turns in well advance., obey all traffic signs, signals, and roadway markings. Procedures for Turning: Correct turning position Brake early Slow to about 10 mph before turning Page 51

52
Chapter 7 Negotiating Intersections

53
7.1 Searching Intersecions There are many clues to look for when coming to an intersecion: Street signs and lights. Roadway Markings Crossing Traffic Parked vehicles on cross street Turning traffic Rows of fences and mailboxes Traffic stopping Power lines. Approaching an Intersection: After identifying the intersection you will need to determine if you have an open zone. Search for changes in the zones that could close, Check your line of sight because that will change if a zone closes and your line-of-sight is restricted. When you have your line of sight, look at a 45 degree angle to the right or left. Page 53

54
7.1 Cont Continue Moving Ahead: Continue ahead if the traffic is green or if the intersection has no signals or signs, and the front, right-front, and left-front zones are open. If all is clear continue checking the left-front, right-front zone for a path-of-travel. The point of no return: The point beyond which you can no longer stop safely without entering the intersection. Usually that point is 2 seconds before the intersecion. If you so have a line of sight you want to change your lane position and reduce your speed. This will allow you to see what is hidden. This will also allow you to be seen by others. Deciding to stop: You stop at an intersection if you identify or predict a closed zone or a line of sight restriction. This will also allow you to easily check your zones. If the zone is closed you will have about a 10 second window of an available path of travel. Moving after the stop: After stopping search 90 degrees in both directions before moving again. When turning that last direction you should check is the direction of your intended path. The path must be open before you can travel to it. Page 54

55
7.2 Controlled Intersections Controlled Intersections with signs: full stop Blocked View at Stop Sign Crossing Traffic Search 45 degrees in both directions as you creep forward, check the rear zone. Check you intended path of travel, look for vehicles making turns into your path. Stop with your front bumper. Search 90 degrees in both directions. When you have an open front zone and clear gap to the left and/or right, proceed by accelerating at the proper speed and then check your rear zone. Joining Traffic (right): Search front zone for pedestrians and vehicles turning onto your street. Stop when bumper is even with curb and check 90 degrees. Evaluate the target, when there is a gap of 7 seconds begin to turn. If your line of sight isn’t clear at 90, creep forward slightly to improve your view. Page 55
: Search front zone for pedestrians and vehicles turning onto your street. Stop when bumper is even with curb and check 90 degrees. Evaluate the target, when there is a gap of 7 seconds begin to turn. If your line of sight isn’t clear at 90, creep forward slightly to improve your view. Page 55.")
56
7.2 Cont Joining Traffic (Left) Search Front zones for pedestrians and vehicles turning onto your street. Stop when bumper is even with the curb and evaluate your zones. When there is a clear line of sight and a gap of 7 seconds you may begin to turn. Accelerate to adjust to the traffic and check your rear zone. Controlled Intersections with Signals Signals: Stale Green Light: Long green, predict it will turn yellow so prepare to slow down. Fresh Green Light: Just turned green, check intersections incase another driver runs the red light. Yellow Light: Decide whether to stop or proceed Red Light: Stop and check rear zones. Unprotected Left Turns: A signal controlled intersection without a special-left turn light. You must yield to oncoming traffic Page 56

57
7.2 Cont Protected Left Turns: When there is a special turn signal. Left-Light Turn: provides a protected left turn. Green Arrow: When turned off means protected turn has ended. Others follow with a yellow arrow. Delayed Green Light: indicates that one side is able to turn while the other waits for their light to turn green. So not assume you can proceed when oncoming traffic proceeds. Turns on Red: Before turning right on red make sure you come to a full stop and check your turning zones. Left on Red: Some states permit a left on red. This is only from a one-way street to another one-way street. Controlled Railroad Crossings: Has lights along the crossing gates. Make a complete stop when the gate is down. Stay their until the gate comes up and the lights stop flashing. Page 57

58
Uncontrolled Intersecions IPDE Process 12-15 sec Check Roadway Conditoins, Check for closed zones in both directions. Check whether or not the intersection is controlled. Look for roadway users. Check 45 degree zone. Locate your point of no return. Check mirrors and slow vehicle. IPDE Process at 4-6 seconds from intersection. Recheck the path Search left and right front for open zone. Prepare to stop if vehicle is comng from both sides. Recheck traffic to the rear. IPDE Process at 2 seconds away. Pause your search for potential conflicts. Brake to stop if intersection closes. Search again. Proceed through intersection if path is clear. Page 58

59
Determining Right of Way and Judging Gaps What is Right of Way? Right of Way: privalege of having immediate use of a certain part of a roadway. Yield: Letting others go first. Situations when you must yeild. Traffic signs Other drivers. You yield the right of way. Judging the size of a gap. Gap: the distance between vehicles. Crossing and Joining Traffic. Crossing an intersection takes four to five seconds from a stop. You need a larger gap to join traffic. Left hand turn needs a larger gap due to on coming traffic from both directions. Page 59

60
Chapter 9

61
Chapter 9 Driving in Urban Traffic Adjusting to Urban Traffic: Traffic Complexity: Traffic is more dense in urban areas, There are more buses, cars, trucks, and pedestrians. City traffic hazards are closer to you than they are in rural areas. Those hazards can quickly block your path. Number of Hazards: City roads have the highest number and variety of hazards. Time, distance, and speed: will have to contend with many situations with closed zones and line of sight.. If you can not increase the distance between your vehicle and a hazard, you must change your lane position, slow, or stop to give yourself time to solve the conflict. Using the IPDE. IDENTIFY: be vigorous in using your visual skills. Aim high and look well ahead to your target area. PREDICT: Predict possible points of conflict quickly and gain valuable time to respond. DECIDE: Always be ready to communicate and adjust your vehicle position. Execute: Be ready to make smooth low rise maneuvers. Page 61

62
Following and Meeting Traffic Following Others: You can see further ahead “big picture.” Others can see you better More time for IPDE Better position to avoid the car ahead if stopped. 3-second Following Distance: Pick fixed checkpoints agaead 3-second count Check to see if your vehicle is still short of your fixed checkpoint. Looking Beyond the Vehicle Ahead: Look over, around, and through the vehicle ahead of you. Areas of Sudden Stop: Intersections where pedestrians cross. Lanes next to parked cars. Buissness driveways Page 62

63
Following and Meeting Traffic -Following Others: -3 Second Following Distance: -Pick a fixed checkpoint on the road ahead. -3 Second rule when vehicle passes you. -Check to see if vehicle is still short of your fixed checkpoint. -Looking Beyond the Vehicle Ahead: -Be alert for brake lights, including highmount brake lights -Areas of sudden stops -Intersections where drivers may have to stop for traffic or pedestrians. -Lanes next to parked vehicles -Business driveways with high-volume traffic. -When to Look Away: -Make sure the zone ahead is stable and open. -Lower your speed even further when you have line of sight restrictions. -Keep eyes moving Page 63

64
Following and Meeting Traffic Tailgaters are Hazards: Managing Tailgaters: Increase your following distance Move slightly to the right Signal Early for turns, stops, and lane changes. Change lanes in extreme situations Responding to oncoming traffic Reasons for Crossing the Center Lane Driver Impairment Poor Judgment Poor visibility Reduced Space Sudden moves by others Vehicle Failure Turning buses and trucks Double Parked Vehicles Avoiding Conflict: Slow down Turn on or flash headlights, blow horn Move to the right to avoid conflict Page 64

65
Special Urban Situations Driving on Two Way Street; Some intersection do and don’t have special turn signals Driving on One Way Street Identifying One-Way Street: One way signs are posted All parked and moving vehicles are pointing the same way Broken White lines are used to separate lanes Traffic signs facing the same direction Entering One Way Street To turn from your lane to the nearest lane If there are parked cars in nearest lane then go to next lane over. When leaving remember to cross over traffic to the nearest correct lane. Unexpected Situations on Crowded Streets: Slow and over your brake to maintain a safe path of travel. Always stop for pedestrians. Page 65

66
Driving on a Expressway Advantages of Expressways: Cross traffic is eliminated Expressways have a median or barrier between opposing lanes of traffic. Pedestrians, nonmotorized vehicles, and slow moving vehicles are not permitted on most expressways. Wide shoulders and extra wide underpasses provide good escape paths. Expressway signs are designed to help drivers anticipate conditions well ahead. Expressway Interchanges: Places where drivers can cross over or under as well as enter or leave the expressway. Cloverleaf Interchange (four leaf clover), allows drivers to proceed in either direction on either highway. Diamond Interchange: has little traffic crosses a busy expressway. Trumpet Interchange: forms a T intersection with an expressway Page 66
, allows drivers to proceed in either direction on either highway. Diamond Interchange: has little traffic crosses a busy expressway. Trumpet Interchange: forms a T intersection with an expressway Page 66.")
67
All directional interchange: Traffic is channeled in many different directions. Safe Driving Strategies: Prepare yourself and your vehicle Build Experience Gradually Concentrate on the Driving Task Entering the Expressway: Expressway Entrances: Entrance Ramp: gives you time evaluate zone conditions and determine the best speed as your prepare to enter. Acceleration Gap: long enough for you to search for a gap in which to merger and accelerate to the speed of traffic on the expressway. Merging Area: the part of an expressway entrance where vehicles blend into the expressway traffic. Stops for Entering; Make sure the entrance is what you want Check front and rear zones, signal. Take quick glances at your rear zone, find a gap, look for an entrance ramp signal. Once in acceleration lane increase speed, glance over shoulder, decide when to enter into the gap of traffic. Decide which vehicle to follow, adjust speed to match traffic, merge smoothly. Once in expressway adjust speed, keep space cushion around vehicle. Page 67

68
Possible Entrance Problems: Entrance Ramp Problems: Entrance Ramp Signal Lights Acceleration Lane Problems Merging Area Problems Entrance Ramp on Left Strategies on Driving on Expressways: Applying the IPDE Process: Identify: You need to identify the volume of traffic around you, as well as signs, signals, and roadway marings. Predict: search ahead of your target are to watch for sudden slowing of traffic or drivers changing lanes. Anticipate closed zones and points of conflict before they occur. Decide: Faster speeds demand that your make quicker decisions which means driving adjustments could change your safe travel path of travel into a closed zone or conflict. Execute: Execute all your decisions smoothly Page 68

69
Lanes Choice: Generally is it safer to drive in the right lane and pass in the left. Signs, signals, and other roadway markings: Know your destination Road signs and roadway markings Always think ahead Speed Limits: Minimum Speed Limit: A minimum speed limit is posted on many expressways to keep traffic from moving too slowly. This is the lowest legal speed you can travel under ideal conditions. Common Speed: the speed used by most drivers, you can better blend with expressway driving. Wolf Packs: a grouping of cars or vehicles on a expressway. Be a “loner” and try to keep a cushion from other cars. Following: High speeds demand that you follow a 3 second following distance. Continually scan traffic scene around you to be aware of any situation that may affect your safe path of travel. Increase your following distance: large vehicle, motorcyclist, bad conditions, heavy traffic, being tailgated, driving a heavy vehicle or towing, operating a motorcycle, entering or exiting a expressway. Page 69

70
Blind Spots: Remember there are blind spots on both your right and left sides. Being Followed: Vehicles that are tailgating or following you to closely can be dangerous. Encourage tailgaters to pass you by reducing your speed gradually. Lane Changing: Change Lanes one lane at a time. Signal every lane change. Check traffic in the outside and inside rearview mirrors Check Blind spots. If path is clear accelerate gently and move to the next lane. Cancel your signal after you have changed lanes. Establish your place in the lane before you continue to another lane change. Passing your being passed: Passing on the right is only permitted if the driver in the left lane is driving below the speed limit. If continually being passed on the right. Turn on signal and proceed with the lane change steps. Always make sure conditions are safe before beginning your manuever. Page 70

71
Exiting Expressways: Decceleration Lane: and added lane in which to slow your vehicle without blocking the vehicles behind. Exit Ramp: the ramp leading off the expressway. Applying the IPDE Process: Identify the green expressway guide signs showing the distance to your exit. Predict actions of other drivers who might be using the same exit. Decide on the safe speed for exiting. Execute your maneuver smoothly and blend with slower traffic. Possible Exiting Problems: Crossing Paths: Exiting traffic should merge behind entering traffic. Ramp Overflow: Pass exit and use next exit if ramp is full, if you must use exit then proceed to exit early. Short Deceleration Lane: Judge the lanes length Identify the exit ramp speed Check speed while braking Check traffic in rear zones. Page 71

Similar presentations