Download presentation
Presentation is loading. Please wait.

1
Drawing in Windows

2
To help with drawing on the Windows operating system, Microsoft created the Graphical Device Interface, abbreviated as GDI. – It is a set of classes, functions, variables, and constants that group all or most of everything you need to draw on an application. – The GDI is provided as a library called Gdi.dll and is already installed on your computer. In order to draw, you need at least two things: – a platform and – a tool. The platform allows you to know what type of object you are drawing on and how you can draw on it. On a Windows application, you get this platform by creating a device context. A device context is actually a whole class that provides the necessary drawing tools to perform the job. – For example, it provides functions for selecting the tool to use when drawing. – It also provides functions to draw text, lines, shapes etc. – To select the platform on which to draw, that is, to create a device context, the MFC provides various classes:

3
CDC This is the most fundamental class to draw in MFC. It provides all of the primary functions used to perform the basic drawing steps. – Do all drawing through the member functions of a CDC object. – The class provides member functions for device-context operations, working with drawing tools, (GDI) object selection, and working with colors and palettes. It also provides member functions for getting and setting drawing attributes, mapping, working with the viewport, working with the window extent, converting coordinates, working with regions, clipping, drawing lines, and drawing simple shapes, ellipses, and polygons. Member functions are also provided for drawing text, working with fonts, using printer escapes, scrolling, and playing metafiles.
 object selection, and working with colors and palettes. It also provides member functions for getting and setting drawing attributes, mapping, working with the viewport, working with the window extent, converting coordinates, working with regions, clipping, drawing lines, and drawing simple shapes, ellipses, and polygons. Member functions are also provided for drawing text, working with fonts, using printer escapes, scrolling, and playing metafiles..")
4
To use a CDC object, construct it, and then call its member. For specific uses, the Microsoft Foundation Class Library provides several classes derived from CDC. – CPaintDC encapsulates calls to BeginPaint and EndPaint. – CClientDC manages a display context associated with a window's client area. – CWindowDC manages a display context associated with an entire window, including its frame and controls. – CMetaFileDC associates a device context with a metafile. A metafile is a series of instructions used to draw one or a group of graphics on a device context.

5
The table below shows the available classes and the equivalent Windows graphics device interface (GDI) handle types.
 handle types.")
6
To Create A Graphic Object In A Device Context Define a graphic object. Initialize the object with the type-specific create function, such as CreatePen. – Alternatively, initialize the object in the constructor. Select the object into the current device context, saving the old graphic object that was selected before. When done with the current graphic object, select the old graphic object back into the device context to restore its state. Allow the frame-allocated graphic object to be deleted automatically when the scope is exited.

7
One & Two-stage construction You have a choice between two techniques for creating graphic objects, such as pens and brushes: – One-stage construction: Construct and initialize the object in one stage, all with the constructor. – Two-stage construction: Construct and initialize the object in two separate stages. The constructor creates the object and an initialization function initializes it.

8
Example of Both Construction Techniques The following brief example shows both methods of constructing a pen object: void CMyView::OnDraw( CDC* pDC ) { // One-stage CPen myPen1( PS_DOT, 5, RGB(0,0,0) ); // Two-stage: first construct the pen CPen myPen2; // Then initialize it if( myPen2.CreatePen( PS_DOT, 5, RGB(0,0,0) ) ) // Use the pen }
 { // One-stage CPen myPen1( PS_DOT, 5, RGB(0,0,0) ); // Two-stage: first construct the pen CPen myPen2; // Then initialize it if( myPen2.CreatePen( PS_DOT, 5, RGB(0,0,0) ) ) // Use the pen }")
9
Selecting A Graphic Object Into A Device Context After you create a drawing object, you must select it into the device context in place of the default object stored there: void CMyView::OnDraw( CDC* pDC ) { CPen penBlack; // Construct it, then initialize if( newPen.CreatePen( PS_SOLID, 2, RGB(0,0,0) ) ) { // Select it into the device context // Save the old pen at the same time CPen* pOldPen = pDC->SelectObject( &penBlack ); // Draw with the pen pDC->MoveTo(...); pDC->LineTo(...); // Restore the old pen to the device context pDC->SelectObject( pOldPen ); } else { // Alert the user that resources are low } }
 { CPen penBlack; // Construct it, then initialize if( newPen.CreatePen( PS_SOLID, 2, RGB(0,0,0) ) ) { // Select it into the device context // Save the old pen at the same time CPen* pOldPen = pDC->SelectObject( &penBlack ); // Draw with the pen pDC->MoveTo(...); pDC->LineTo(...); // Restore the old pen to the device context pDC->SelectObject( pOldPen ); } else { // Alert the user that resources are low } }")
10
The View Class The MFC Application Wizard generated the class CSketcherView to display information from a document in the client area of a document window. The class definition includes the function OnDraw(). – Called whenever the client area of the document window needs to be redrawn i.e. when a WM_PAINT message is received in your program.
. – Called whenever the client area of the document window needs to be redrawn i.e. when a WM_PAINT message is received in your program..")
11
void CSketcherView::OnDraw(CDC* pDC) { CSketcherDoc* pDoc = GetDocument(); ASSERT_VALID(pDoc); // TODO: add draw code for native data here } A pointer to an object of the class CDC is passed to the OnDraw() member of the view class.. It provides a device context, plus the tools we need to write graphics and text to it This object has member functions that call the Windows API functions which allow you to draw in a device context. the AppWizard has included a declaration for the pointer pDoc and initialized it using the function GetDocument(), which returns the address of the document object related to the current view pDoc will be used to access the data that you've stored in the document object when you want to draw it. ASSERT_VALID(pDoc); just makes sure that the pointer pDoc contains a valid address.
, which returns the address of the document object related to the current view pDoc will be used to access the data that you ve stored in the document object when you want to draw it. ASSERT_VALID(pDoc); just makes sure that the pointer pDoc contains a valid address..")
12
Displaying Graphics A device context represents only the client area of a window In a device context, you draw entities such as lines, circles and text relative to a current position. – A current position is a point in the client area that was set either by the previous entity that was drawn, or by calling a function to set it. pDC->MoveTo(50, 50); This member function simply sets the current position to the x and y coordinates specified as arguments. the current position will be set to a point 50 pixels from the inside left border of the window, and 50 pixels down from the top of the client area. CPoint MoveTo(int x, int y); // Move to position x,y CPoint MoveTo(POINT aPoint); // Move to position defined by aPoint The second accepts one argument of type POINT, which is a structure defi ned as follows: typedef struct tagPOINT { LONG x; LONG y; } POINT; The return value from the MoveTo() function is a CPoint object that specifies the current position as it was before the move.
; This member function simply sets the current position to the x and y coordinates specified as arguments. the current position will be set to a point 50 pixels from the inside left border of the window, and 50 pixels down from the top of the client area. CPoint MoveTo(int x, int y); // Move to position x,y CPoint MoveTo(POINT aPoint); // Move to position defined by aPoint The second accepts one argument of type POINT, which is a structure defi ned as follows: typedef struct tagPOINT { LONG x; LONG y; } POINT; The return value from the MoveTo() function is a CPoint object that specifies the current position as it was before the move..")
13
Drawing in Color MFC provides you with the facility of creating your pen, with your choice of color and pen thickness. All closed shapes are filled with a brush. MFC also facilitates you by allowing you to create a brush of your choice. Creating a Pen The simplest way to create a pen object is first to declare an object of the CPen class: CPen aPen; This object now needs to be initialized with the properties of your choice by using the CreatePen member function (), which is declared in the CPen class as: BOOL CreatePen (int aPenStyle, int aWidth, COLORREF aColor); The function returns TRUE as long as the pen is successfully initialized, and FALSE otherwise.
, which is declared in the CPen class as: BOOL CreatePen (int aPenStyle, int aWidth, COLORREF aColor); The function returns TRUE as long as the pen is successfully initialized, and FALSE otherwise..")
14
The second argument to the CreatePen() function defines the line width. – If aWidth has the value 0, the line drawn will be 1 pixel wide. The last argument specifies the color to be used when drawing with the pen, so we could initialize a pen with the statement: aPen.CreatePen(PS_SOLID, 2, RGB(255,0,0)); // Create a red solid pen
); // Create a red solid pen.")
15
Using Pen In order to use a pen, you must select it into the device context in which you are drawing by using the CDC class member function SelectObject(). The function returns a pointer to the previous pen object being used, so that you can save it and restore the old pen when you have finished drawing. CPen* pOldPen = pDC->SelectObject (&aPen); // Select aPen as the pen To restore the old pen when you're done, you simply call the function again, passing the pointer returned from the original call: pDC->SelectObject(pOldPen); // Restore the old pen
; // Select aPen as the pen To restore the old pen when you re done, you simply call the function again, passing the pointer returned from the original call: pDC->SelectObject(pOldPen); // Restore the old pen.")
16
Creating a Brush An object of the CBrush class encapsulates a Windows brush. You can define a brush to be solid, hatched, or patterned. A brush is actually an 8x8 block of pixels that's repeated over the region to be filled. CBrush( ); CBrush( COLORREF crColor ); CBrush( int nIndex, COLORREF crColor ); explicit CBrush( CBitmap* pBitmap );
; CBrush( COLORREF crColor ); CBrush( int nIndex, COLORREF crColor ); explicit CBrush( CBitmap* pBitmap );.")
17
CBrush has four overloaded constructors. – The constructor with no arguments constructs an uninitialized CBrush object that must be initialized before it can be used. – If you use the constructor with no arguments, you must initialize the resulting CBrush object with CreateSolidBrush, CreateHatchBrush, CreateBrushIndirect, CreatePatternBrush, CreateDIBPatternBrush or CreateStockObject.CreateSolidBrushCreateHatchBrush CreateBrushIndirectCreatePatternBrushCreateDIBPatternBrush If you use one of the constructors that takes arguments, then no further initialization is necessary. The constructors with arguments can throw an exception if errors are encountered, while the constructor with no arguments will always succeed. – The constructor with a single COLORREF parameter constructs a solid brush with the specified color.COLORREF – The constructor with two parameters constructs a hatch brush. The nIndex parameter specifies the index of a hatched pattern. The crColor parameter specifies the color. – The constructor with a CBitmap parameter constructs a patterned brush. The parameter identifies a bitmap. The bitmap is assumed to have been created by using CBitmap::CreateBitmap, CBitmap::CreateBitmapIndirect, CBitmap::LoadBitmap, or CBitmap::CreateCompatibleBitmap. CBitmap::CreateBitmapCBitmap::CreateBitmapIndirectCBitmap::LoadBitmap CBitmap::CreateCompatibleBitmap The minimum size for a bitmap to be used in a fill pattern is 8 pixels by 8 pixels.

18
crColor Specifies the foreground color of the brush as an RGB color. nIndex Specifies the hatch style of the brush. It can be any one of the following values: – HS_BDIAGONAL Downward hatch (left to right) at 45 degrees – HS_CROSS Horizontal and vertical crosshatch – HS_DIAGCROSS Crosshatch at 45 degrees – HS_FDIAGONAL Upward hatch (left to right) at 45 degrees – HS_HORIZONTAL Horizontal hatch – HS_VERTICAL Vertical hatch pBitmap Points to a CBitmap object that specifies a bitmap with which the brush paints.
 at 45 degrees – HS_CROSS Horizontal and vertical crosshatch – HS_DIAGCROSS Crosshatch at 45 degrees – HS_FDIAGONAL Upward hatch (left to right) at 45 degrees – HS_HORIZONTAL Horizontal hatch – HS_VERTICAL Vertical hatch pBitmap Points to a CBitmap object that specifies a bitmap with which the brush paints..")
19
There are a number of standard brushes available. Each of the standard brushes is identified by a predefined symbolic constant, and there are seven that you can use. – GRAY_BRUSH – BLACK_BRUSH – HOLLOW_BRUSH – LTGRAY_BRUSH – WHITE_BRUSH – NULL_BRUSH – DKGRAY_BRUSH To use one, you call the SelectStockObject() member of the CDC class, passing the symbolic name for the brush that you want to use as an argument. – To select the null brush, which will leave the interior of a closed shape unfilled, you could write: CBrush* pOldBrush = static_cast (pDC->SelectStockObject(NULL_ BRUSH)); // draw something pDC->SelectObject(pOldBrush); // Restore the old brush
 member of the CDC class, passing the symbolic name for the brush that you want to use as an argument. – To select the null brush, which will leave the interior of a closed shape unfilled, you could write: CBrush* pOldBrush = static_cast (pDC->SelectStockObject(NULL_ BRUSH)); // draw something pDC->SelectObject(pOldBrush); // Restore the old brush.")
20
MOUSE

21
Most common input device while working with windows. An application receives mouse input in the form of messages that are sent or posted to its windows. When mouse messages are posted faster than a thread can process them, the system discards all but the most recent mouse message. There are about 20 messages which window uses to report events that involve the mouse. These messages can be classified as – client_area mouse message: Reports events that occur in a windows client area – Non client_area mouse message: Reports events that occur in a windows non-client area

22
Usually the non-client area mouse messages are ignored by an application and hence are handled by windows itself. Most common client-area mouse messages – Pressing the mouse keys – Releasing them – Double clicking a mouse button – Moving the mouse`

23
Client Area Mouse Messages A window receives a client area mouse message when a mouse event occurs within the window's client area. It posts one of the following messages when the user presses or releases a mouse button while the cursor is within the client area.

24
Non client Area Mouse Messages A window receives a non client area mouse message when a mouse event occurs in any part of a window except the client area. A window's non client area consists of its border, menu bar, title bar, scroll bar, window menu, minimize button, and maximize button. There is a corresponding nonclient area mouse message for each client area mouse message. – The names of these messages are similar except that the named constants for the nonclient area messages include the letters NC. For example, moving the cursor in the nonclient area generates a WM_NCMOUSEMOVE message, and pressing the left mouse button while the cursor is in the nonclient area generates a WM_NCLBUTTONDOWN message.

25
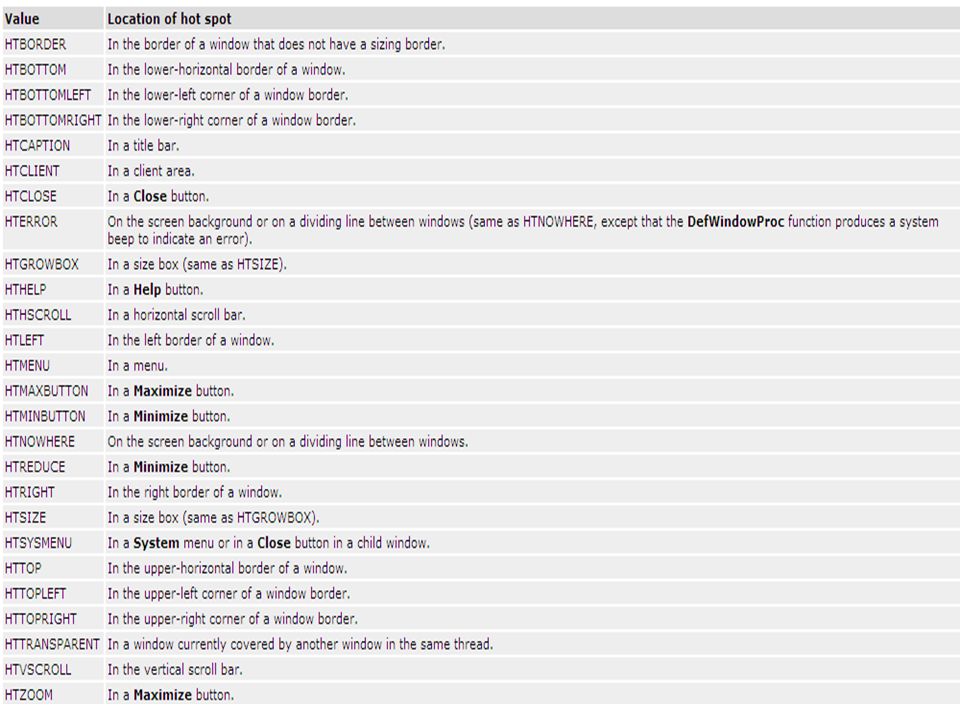
The WM_NCHITTEST Message Whenever a mouse event occurs, the system sends a WM_NCHITTEST message to either the window that contains the cursor hot spot or the window that has captured the mouse. The system uses this message to determine whether to send a client area or nonclient area mouse message. An application that must receive mouse movement and mouse button messages must pass the WM_NCHITTEST message to the DefWindowProc function. The lParam parameter of the WM_NCHITTEST message contains the screen coordinates of the cursor hot spot. The DefWindowProc function examines the coordinates and returns a hit-test value that indicates the location of the hot spot. The hit-test value can be one of the following values.

Similar presentations


 with boxes into.>")


