Download presentation
Presentation is loading. Please wait.

1
Part A. Remote Viewing IP Surveillance Camera Application Guide

2
Agenda Typical topology Remote view via web browser (Through IP/DDNS) Remote view via IP surveillance software Remote view via MSN Remote view via VLC player Remote view via Mobile Phone
 Remote view via IP surveillance software Remote view via MSN Remote view via VLC player Remote view via Mobile Phone")
3
Typical Topology In a typical topology, the camera is connected to a router with Internet access. *Please make sure DHCP function is enabled on your router.

4
Case 1: Remote view via web browser In this case, we’re showing you how to view the camera using a web browser such as IE, Firefox, Chrome or Safari.

5
Step 1 Change the browser’s security settings (Operation On Local PC)
")
6
If you are using IE, you will need to change some security settings to install a ActiveX plug-in. Open IE Browser, click tools->Internet Options->Security->Custom Level and select Prompt Download signed ActiveX controls. After you install the ActiveX control, you can Disable the option above.

7
Step 2 Using Intelligent IP Installer to search for the camera (Operation On Local PC)
")
8
Install Intelligent IP Installer and run it. The main page will show the active camera on the LAN. Select the relevant camera and click Link to IE.

9
Step 3 Log on to the camera and install ActiveX (Operation On Local PC)
")
10
IE will open automatically and a window will pop up asking you to enter the user name and password. They are both admin in lower case as default.

11
When accessing the IP Camera for the first time, a prompt information bar appears below the address bar: “This website might require the following ActiveX control: ‘AxMediaControl.cab’ from ‘TP-LINK TECHNOLOGIES CO LTD’ ……..” Just click Install ActiveX Control.

12
Click and install ActiveX plug-in.

13
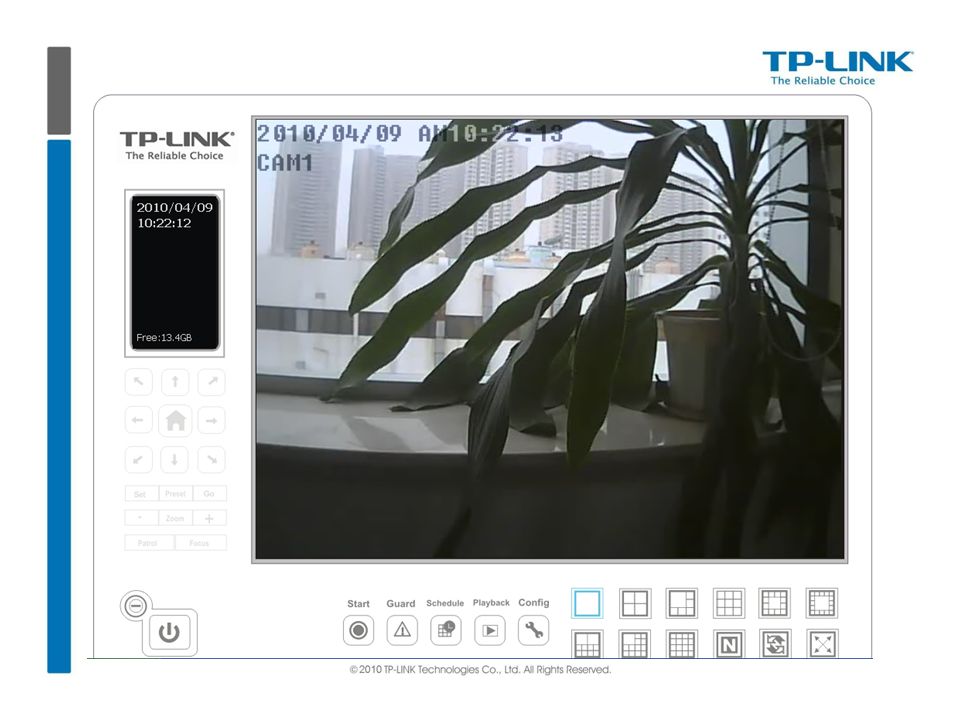
Live video displays in the center of the web browser.

14
Step 4 Change the camera’s HTTP port (Operation on Local PC) This is not an essential step, however some ISP (PCCW for example) blocks port 80, so you may need to change the http port to accommodate it.
 This is not an essential step, however some ISP (PCCW for example) blocks port 80, so you may need to change the http port to accommodate it.")
15
By default, the camera is set to obtain IP address automatically, so please make sure the DHCP server is enabled on your router. Here we change the port to 1234.

16
After changing the port you need to reboot the camera to make the configuration take effect.

17
The reboot will take about 1 min, please wait a while!

18
After rebooting you should use http://192.168.1.100:1234 to access the camera.http://192.168.1.100:1234

19
Step 5 Open port on the router (Operation on Local PC) You should set the camera as virtual server or DMZ host on the router to allow the camera to be accessed from the Internet. The settings depend on the router you use, but they are quite similar. Here we use TP-LINK wireless router TL-WR741ND for example, and just set the camera as virtual server.

20
Log on to the router. Go to Forwarding->Virtual Servers and click Add New to add new virtual server items.

21
In Service Port field, type in the port which is used by the camera. In IP Address field, type in the IP address of the camera. As for protocol we suggested you select ALL. For other routers, you may find TCP / UDP option.

22
Now port 1234 is opened for 192.168.1.100 on the router.

23
Now, please go to the status page to check the WAN IP address of the router.

24
Step 6 Remote view via web browser using IP address (On remote PC)
")
25
On remote PC, use http://113.91.36.101:1234 (WAN IP address : camera’s port number) to access the camera.http://113.91.36.101:1234 Please note: if it’s the first time to use the PC to view the camera, just as on local PC, you need to check your security settings to install the ActiveX lug-in.
 to access the camera. Please note: if it’s the first time to use the PC to view the camera, just as on local PC, you need to check your security settings to install the ActiveX lug-in.")
26
Step 7 Setting up DDNS for remote view (Operation on Local PC) You may find that it’s not easy to remember the meaningless IP address value when you log in the camera remotely. Here’s another method: you can use the camera’s DDNS (Dynamic Domain Name Server) feature, which allows you to access the camera with a domain name, such as www.tplink_ipcamera.com. It’s much easier to remember.www.tplink_ipcamera.com
 feature, which allows you to access the camera with a domain name, such as It’s much easier to remember.")
27
On your local PC, log on to the camera. Check On to enable the DDNS function.

28
You have to firstly register an account and a domain name from a DDNS service provider such as DynDNS, and type the account information into the blank above.

29
When you see “DDNS:successful” in the system log, it means that the DDNS function is now working.

30
Step 8 Remote view with Domain name (Operation on Remote PC)
")
31
On a remote PC, use the domain name you’ve applied for, e.g. http://luke2009.homeip.net:1234 to access the camera. http://luke2009.homeip.net:1234 Also, you need to ensure the ActiveX plug-in is already installed.

32
Case 2: Remote view via IP Surveillance Software In this case, we’re showing you how to use the bundled video management software. The software is powerful to support the surveillance of up to 16 cameras simultaneously. You can use this software on both local and remote PCs, here we just take remote view for example.

33
On the remote PC, run main console and click Config->Setting.

34
Select the Camera tab and click Insert to add a new camera. Click OK to finish the configuration.

35
You can also use your DDNS account to view the camera.

38
Case 3: Remote view via MSN messenger Now we’re introducing you an innovative remote viewing way even easier than the DDNS method ----- viewing the video right through MSN chatting window.

39
On local PC, go to SETTING->BASIC->Network->Messenger and check ‘On’ to enable Messenger function.

40
Camera’s MSN ID The MSN account that the camera will sign in with. So it can’t be used by any other person. Viewer’s MSN ID The MSN account that viewer is using.

41
Login Account: Enter the MSN account you registered for you IP Camera. Privacy: When this feature is enabled, the MSN stream will be secured, then only users whose MSN IDs are in the Allow List can add the camera's MSN account as friend and view the camera video. When it's disabled, any user can add the camera's MSN ID and see it. Allow list: Enter the Viewer’s MSN account in the “User” field. You just sign in with this ID, then you can add the camera as friend Click Add button and the account will be added to the “Allow list”. Choose an account in the “Allow list” and click the Remove button to delete it. Alias: Give an alias for the account of your IP Camera. Here we take “TP-LINK test” for example. IP Notification: When this feature is enabled, the IP camera will notify "friends" on MSN about its IP address when it logs into the MSN account or when its IP address is changed.

42
Please Note: The UPnP function of the camera is enabled as factory default. If the UPnP is enable on the router as well, no other settings are required. While if your router doesn’t support UPnP or you can’t confirm it, you may open port 20000-21000 on your router. For this “opening port” settings, you can refer to Case 1 Step 5.

43
If you see Messenger is Ready in the log, the function is working, the camera has signed in with the given account.

44
To successfully watch the live video, please make sure that 1)you’re using the latest MSN version and 2)the Intelligent IP installer is installed on your remote PC. The software can be downloaded here.here Sign in with your MSN ID(viewer’s ID) and add the ID registered for the camera. Then check the status of the camera’s ID. Normally it should be online.
 and add the ID registered for the camera. Then check the status of the camera’s ID. Normally it should be online..")
45
Click the video chat icon and select View this contact’s webcam.

46
Wait a short while and you will see the picture. * Now if you send “ping” to the camera, it tells you its ip address.

47
Case 4: Remote view via VLC player In this case, we’re showing you how to view the camera with a media player which supports RTSP protocol. You can use VLC player or QuickTime. Here we use VLC for example.

48
Run VLC media player, click Media menu and select Open Network Stream.

49
Choose RTSP as protocol, and type in the RTSP URL address. The URL is rtsp://ip:port/video.mp4, another URL is rtsp://ip:port/video.3gp

50
Now you can view RTSP stream using VLC media player.

51
Case 5: Remote view via mobile phone In this case, we’re showing you how to view the camera with a mobile phone which has GPRS/EDGE/3G connection.

52
Method 1: Mobile view via web browser on your phone Here we give you an example of viewing the camera via Web on iPhone 3G.

53
Step 1: Select Safari

54
Step 2: Enter http:// : in the address bar. For example: http://113.91.36.101:1234

55
Step 3: Enter username and password. Both are admin in lower case as default. Then click Log In to log on to the camera.

56
Now you can view the camera in the middle of the screen.

57
Method 2: Mobile view via media player First of all, please make sure your mobile phone has a media player which support RTSP such as RealPlayer. In order to view the video smoothly, you had better have 3G connection. Here we take Nokia for example.

58
Step 1: Click Function and select Gallery. (For some models, Gallery may be found in the menu of Media.)
.")
59
Step 2: Click Streaming links.

60
Step 3: Click Options and add a New link.

61
Step 4: Type the new link Name and Web address. (The address is Public IP or domain name), Ex: rtsp://luke2009.homeip.net/video.mp4.
, Ex: rtsp://luke2009.homeip.net/video.mp4..")
62
Step 5: Click Options and select Open.

63
Step 6: Real Player will open, click Yes to connect.

Similar presentations