Download presentation
Presentation is loading. Please wait.

1
Cones

2
Cones are shapes that have a circular base and come to one point at the top.

3
The Plan of a full cone is a circle while the Elevation and End Elevation are triangles. Plan ElevationEnd Elevation

4
In your exam it is very rare for you to be asked to draw a cone that has not been cut. The problems we face are similar to those of a cylinder. We have to construct edges in order to project the cut across the different views. We will now work through an example to show how this is done.

5
This is an executive brass desk tidy. It is made of a cone shape with the top cut off. You will be given the elevation of the desk tidy. From it you have to draw the end elevation, plan and the development of it.

6
Elevation This is the elevation. You have to draw the plan from it.

7
We know that the base of a cone is circular so we can draw the base of the cone on the plan first. Elevation Extend the centre line from the elevation vertically up the page

8
Elevation Now we need to construct a clockface on the plan.

9
To do this we use a 30/60 set square and draw a clockface on the circle. Plan Elevation Now we need to construct a clockface on the plan.

10
To do this we use a 30/60 set square and draw a clockface on the circle. Plan Elevation Now we need to construct a clockface on the plan.

11
To do this we use a 30/60 set square and draw a clockface on the circle. 9 8 6 5 4 3 2 1 12 10 11 7 Plan Elevation Now we need to construct a clockface on the plan.

12
Make sure you number these projection lines on the elevation. 9 8 5 4 3 2 1 12 10 11 7 Plan Now project these points down onto the elevation. 8 10 7 11 9 6 6 12 5 1 4 2 3

13
Project the base of the cone up to the centre line to form an imaginary top of the cone. 9 8 5 4 3 2 1 12 10 11 7 Plan 8 10 7 11 9 6 6 12 5 1 4 2 3

14
9 8 5 4 3 2 1 10 11 7 Plan 8 10 7 11 9 6 6 12 5 1 4 2 3 Make sure you have drawn in the projection lines from the clockface to the centre of the plan. Project the base of the cone up to the centre line to form an imaginary top of the cone. Now project these points on the elevation to this imaginary top.

15
From where these blue projection lines cross the cut surface, project up vertically onto the plan. 9 8 5 4 3 2 1 12 10 11 7 Plan 8 10 7 11 9 6 6 12 5 1 4 2 3 You will find that you cannot find where lines 6 and 12 cross the projection lines on the plan. The next few slides will show you how you find these lines.

16
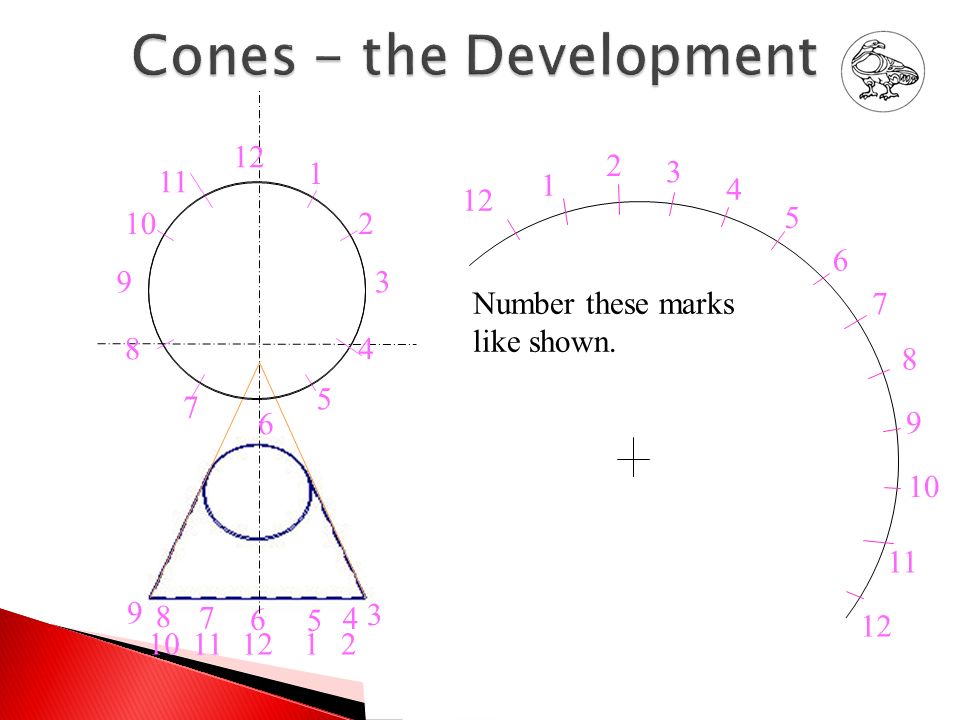
9 8 5 4 3 2 1 12 10 11 7 Plan 8 10 7 11 9 6 6 12 5 1 4 2 3 Project the elevation across to construct the end elevation. The base of the end elevation is the same width as the elevation and the 2 views are also the same height.

17
9 8 5 4 3 2 1 12 10 11 7 Plan 8 10 7 11 9 6 6 12 5 1 4 2 3 Now project horizontally across to the end elevation where the lines 6 and 12 cross the cut.

18
9 8 5 4 3 2 1 12 10 11 7 Plan 8 10 7 11 9 6 6 12 5 1 4 2 3 Add the centre line to the end elevation.

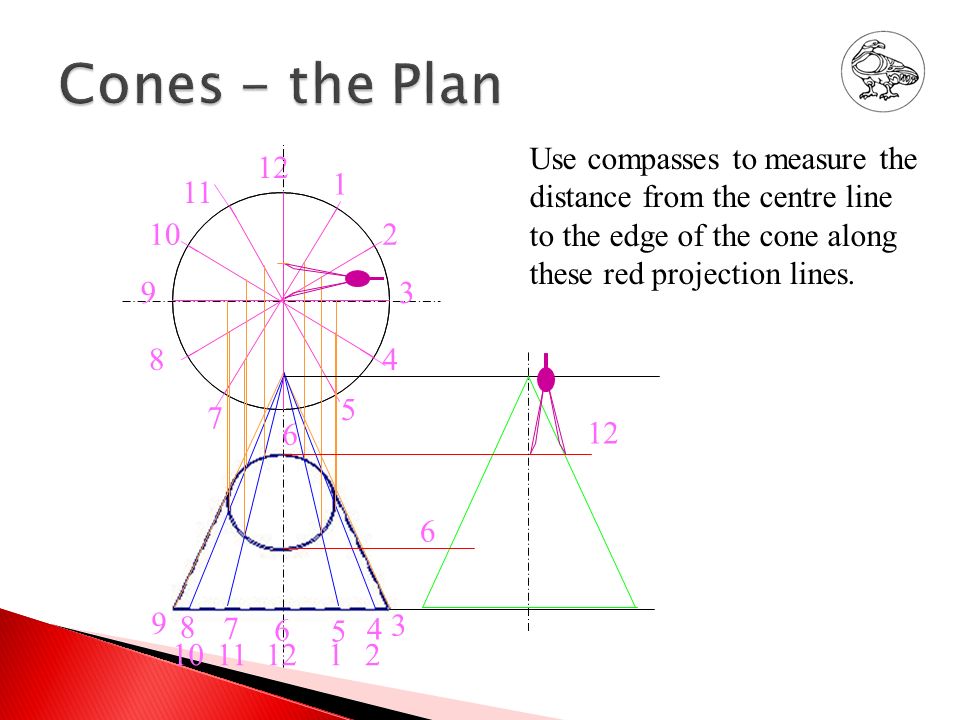
19
9 8 5 4 3 2 1 12 10 11 7 Plan 8 10 7 11 9 6 6 12 5 1 4 2 3 Use compasses to measure the distance from the centre line to the edge of the cone along these red projection lines. 12 6
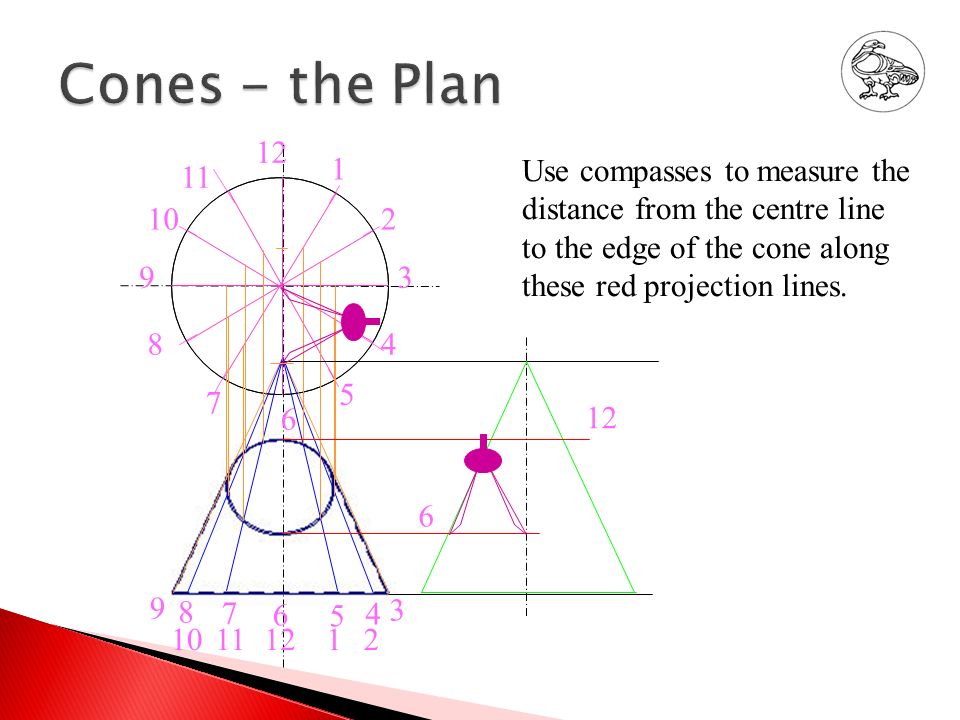
20
9 8 5 4 3 2 1 10 11 7 Plan 8 10 7 11 9 6 6 12 5 1 4 2 3 Use compasses to measure the distance from the centre line to the edge of the cone along these red projection lines. 12 6
21
9 8 5 4 3 2 1 10 11 7 8 10 7 11 9 6 6 12 5 1 4 2 3 Now you can draw the curve of the cut on the plan by joining these orange points. This is done using a smooth freehand curve.

22
Elevation This is the finished view of the plan without any construction lines showing. Plan

23
9 8 5 4 3 2 1 12 10 11 7 Plan 8 10 7 11 9 6 6 12 5 1 4 2 3 To draw the end elevation use the shape you have projected for drawing the plan.

24
9 8 5 4 3 2 1 12 10 11 7 Plan 8 10 7 11 9 6 6 12 5 1 4 2 3 Draw a centre line and the clockface points onto this triangle.

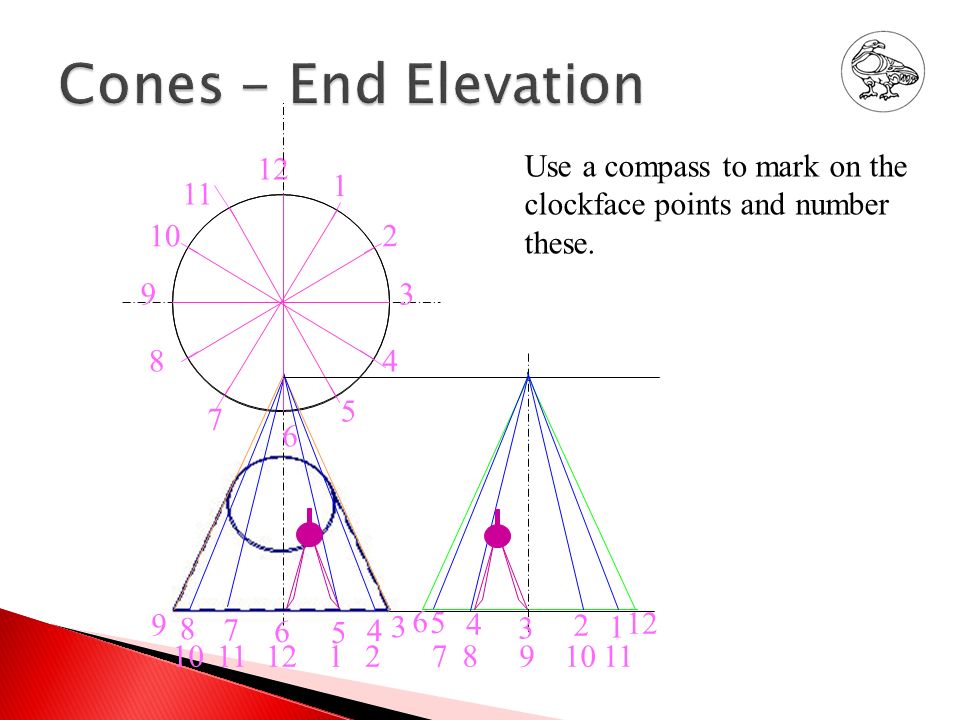
25
9 8 5 4 3 2 1 12 10 11 7 Plan 8 10 7 11 9 6 6 12 5 1 4 2 3 Use a compass to mark on the clockface points and number these. 98 3 2 4 5 1 6 12 71110
26
9 8 5 4 3 2 1 12 10 11 7 Plan 8 10 7 11 9 6 6 12 5 1 4 2 3 Now project across horizontally where the cut intersects each of the projection lines. 98 3 2 4 5 1 6 12 71110

27
9 8 5 4 3 2 1 12 10 11 7 Plan 8 10 7 11 9 6 6 12 5 1 4 2 3 Joint these points up. 98 3 2 4 5 1 6 12 71110

28
This is the Elevation, End Elevation and the Plan without any construction lines shown.

29
Now we will draw the development of the cone. A development is a flat drawing of a shape that folds up to make a 3D model of it.

30
9 8 5 4 3 2 1 12 10 11 7 Plan 8 10 7 11 9 6 6 12 5 1 4 2 3 Set the compasses to the length of a side of the elevation of the cone.

31
9 8 5 4 3 2 1 12 10 11 7 Plan 8 10 7 11 9 6 6 12 5 1 4 2 3 Now draw a curve at this radius.

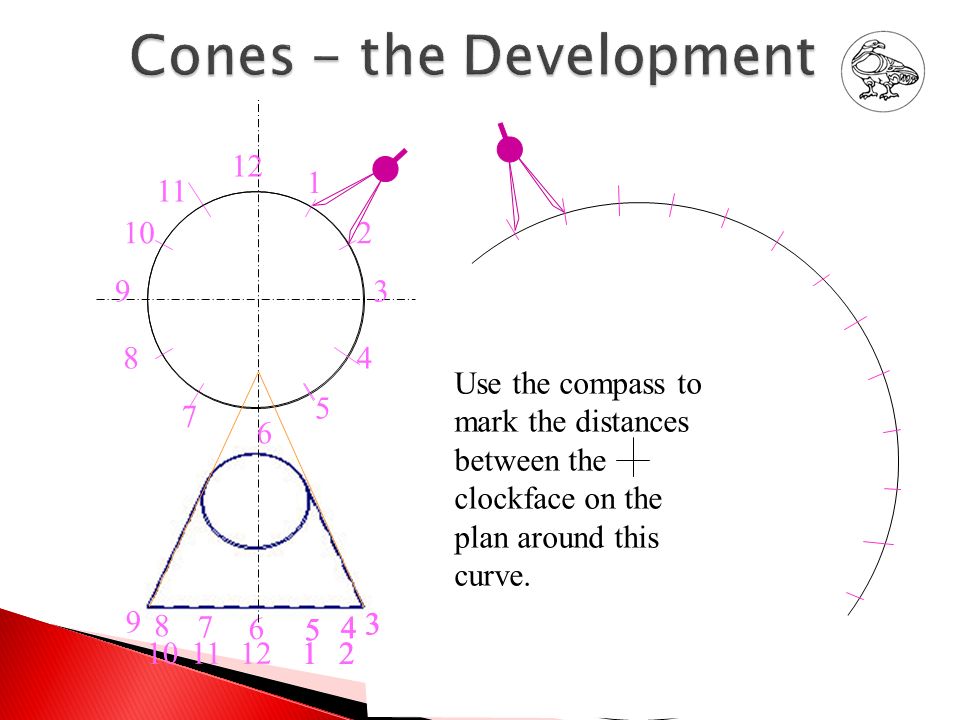
32
9 8 5 4 3 2 1 12 10 11 7 Plan 8 10 7 11 9 6 6 12 5 1 4 2 3 Use the compass to mark the distances between the clockface on the plan around this curve. 5 1 4 2 3
33
Plan 8 10 7 11 9 6 12 5 1 4 2 3 1 3 2 7 6 9 8 5 4 10 11 Number these marks like shown. 9 8 5 4 3 2 1 12 10 11 7 6
34
9 8 5 4 3 2 1 12 10 11 7 Plan 8 10 7 11 9 6 6 12 5 1 4 2 3 1 3 2 7 6 9 8 5 4 10 11 Draw straight lines from these marks to the centre of the curve.

35
9 8 5 4 3 2 1 12 10 11 7 Plan 8 10 7 11 9 6 6 12 5 1 4 2 3 1 3 2 7 6 9 8 5 4 10 11 Use your compass to mark on each line the distance from the centre to the cut.

36
9 8 5 4 3 2 1 12 10 11 7 Plan 8 10 7 11 9 6 6 12 5 1 4 2 3 1 3 2 7 6 9 8 5 4 10 11 To find the length you have to project from the cut across to the edge of the cone on the correctly numbered construction lines.

37
9 8 5 4 3 2 1 12 10 11 7 Plan 8 10 7 11 9 6 6 12 5 1 4 2 3 1 3 2 7 6 9 8 5 4 10 11 You have to do this to see the true length of each of these measurements.

38
9 8 5 4 3 2 1 12 10 11 7 Plan 8 10 7 11 9 6 6 12 5 1 4 2 3 1 3 2 7 6 9 8 5 4 10 11 Once you have marked all the lengths onto the development, draw a smooth freehand curve to get the finished shape of the cut.

39
9 8 5 4 3 2 1 12 10 11 7 Plan 8 10 7 11 9 6 6 12 5 1 4 2 3 1 3 2 7 6 9 8 5 4 10 11 Draw in the edges of the development

40
Plan This is the finished development and plan without any construction lines.

Similar presentations


. Cut Square Pyramid - Problem The given views show the Front Elevation and unfinished Plan of a cut square pyramid. Draw the following.>")

