Download presentation
Presentation is loading. Please wait.

1
California Physical Fitness Test Coordinator Training 2014-15

2
Pertains also to 2014-15 since there are no changes in PFT

3
CA Physical Fitness Test Overview
January 21, 2015 Memo to PFT Coordinators PFT Coordinator Checklist and Important Dates Data Entry Protocol for Physical Fitness Testing in Aeries FitnessGram Test Administration manual (also used in ) FitnessGram Performance Standards (Yellow Chart) PACER Look-Up and Goal Setting Table (Blue Chart) FitnessGram Get Fit Exercises Handout
 FitnessGram Performance Standards (Yellow Chart) PACER Look-Up and Goal Setting Table (Blue Chart) FitnessGram Get Fit Exercises Handout.")
4
CA Physical Fitness Test Overview
Test window = February 2, 2015 to March 31, 2015 A battery of 6 tests are administered to students in Grades 5, 7 and 9 Mile Run or PACER Push Up Curl Up Sit and Reach or Shoulder Stretch Trunk Lift BMI (Body Mass Index)
")
5
CA Physical Fitness Test Overview
Administration protocols provided for the tests must be followed Data entry deadline = April 10, 2015 Student scoresheet and award certificate files will be provided to sites to print by RAE Other PFT student awards are encouraged. Results are posted on the Calif. Dept. of Education website (Fall)
")
6
PFT Coordinator Responsibilities
Schedule/train teachers administering PFT Assure PFT administration for students at the site in 5th, 7th, and/or 9th grades Assure the entry of PFT scores for students in Aeries (via ABI) by teachers administering PFT By April 10, confirm the completion of the site’s PFT administration and required data entry See “Site Coordinator Checklist and Important Dates” and “Data Entry Protocol for PFT in Aeries”
 by teachers administering PFT. By April 10, confirm the completion of the site’s PFT administration and required data entry See Site Coordinator Checklist and Important Dates and Data Entry Protocol for PFT in Aeries")
7
PFT Teacher Responsibilities
Follow test administration protocols Test all assigned students in appropriate PFT grades Complete PFT data entry in ABI and provide a copy of data to site coordinator Communicate with the site’s PFT coordinator to confirm completion of test administration and data entry

8
PFT Data Entry Use “Data Entry Protocol for PFT in Aeries”
Please remember to click “Submit” in ABI to save data entry The Curl-Up, Push-Up, and Modified Pull Up have a minimum value of “1” for a student attempting to complete at least one repetition Do not entry data in the VO2 Max Field Teacher should provide a copy of the PFT report to the site’s PFT coordinator by April 10 to confirm data entry. Site PFT coordinator needs to a confirmation of the site’s PFT data entry by April 10 to

9
PFT Data Entry REMINDER: Sites are responsible for assessing student’s height and weight. This data is required for Aerobic Capacity and Body Mass Index calculations.

10
PFT Data Entry For a student who does not take any portion of the PFT, under the “Issues” column, click the down arrow and select a reason from the following: For a student who takes at least one of the 6 tests but not all 6, under the “Issues” column, click the down arrow and select a reason from the following: Do not enter any data in the VO2Max field. Aeries will calculate this after the data is saved. Please use the BMI or VO2Max “look up” tables in the meantime. (See handouts.)
")
11
PFT Report in ABI Log into ABI, then click on the Resources tab, then click on Reports: Then click on Multi-Data Profile: They will then choose their report options, highlight the PFT MDP and click on submit:

12
PFT Report in ABI The PFT report will appear like the below with student’s listed with their scores. The columns are numbered and the legend for the columns is at the bottom of the report. You may have a download option which would allow you to open the report in Excel like the below:

13
PFT Movements Mile Run or PACER Push Up Curl Up
Sit and Reach or Shoulder Stretch Trunk Lift BMI (Body Mass Index) Videos and audio cadences can be found in the FitnessGram testing manual DVD, the RUSD Physical Education Haiku site, and on the California Department of Education Physical Fitness Test site and.
 Videos and audio cadences can be found in the FitnessGram testing manual DVD, the RUSD Physical Education Haiku site, and on the California Department of Education Physical Fitness Test site and.")
14
Effective Testing Standards of Movement Form Breaks/Corrections
Testing Strategies

15
Mile Run

16
Mile Run Test Objective:
To run a mile at the fastest pace possible. If a student cannot run the total distance, walking is permitted. Equipment Needed: Flat running course, premeasured to a mile Stopwatch Score sheets and pencils Cones (optional)
")
17
Mile Run

18
Mile Run Scoring Testing Strategies
It is possible to test a large group by dividing the group in half and partnering students to count laps and record times for each other using the individual score sheet. Teacher is only one with a stopwatch, calling times as students cross the finish line Teacher should provide time updates as runners complete laps Give students opportunities to practice the run to ensure proper pacing Students should thoroughly warm up prior to running the mile and cool down after the test by walking for several minutes Scoring The Mile Run is scored in minutes and seconds A student not capable of finishing the run should receive a score of 59:59.

19
PACER

20
PACER Test Objective Equipment
To run as long as possible back and forth across a 20-meter space at a specified pace that gets faster each minute Equipment Flat, non-slippery surface at least 20 meters long Cones and tape to mark ends of the course 40-60 inch wide lane for each student to run Score sheets PACER audio recording is located on the PFT Haiku site and on the FitnessGram DVD found in the manual

21
PACER – Test Administration
Students will begin on one end of the course listening for the countdown to begin the PACER test Their objective is to run to the opposite end before the beep signals At the sound of the beep they will turn around and run back to the other end A single beep will signal the end time for each lap. A triple beep at the end of each minute will alert the students that pace will begin to quicken. It will also serve the same purpose as the single beep.

22
PACER – Test Administration
Scoring The recorded score is the total number of laps completed by the student The first time a student does not reach the line by the beep, the student stops where he or she is and reverses direction immediately, attempting to get back on pace. The test is completed for a student the next time (second time) he or she fails to reach the line by the beep (the two misses do not have to be consecutive; the test is over after two total misses). The first missed lap is counted in their total score
 he or she fails to reach the line by the beep (the two misses do not have to be consecutive; the test is over after two total misses). The first missed lap is counted in their total score.")
23
PACER – Test Administration
Students can be used to help count laps but should not determine whether the testing student completes a lap in the allotted time Ample opportunities to practice the PACER should be given so students understand the importance of pacing during the test as well as how the test is administered

24
Push Up

25
Push Up Test Objective Equipment
To complete as many 90° push-ups as possible at specified, rhythmic pace Equipment Recorded cadence is found in the FitnessGram DVD in the manual or on the PFT Haiku site The correct cadence is 20 push ups per minute

26
Push Up – Movement Standards
Students begin in the prone position with hands placed under or slightly wider than shoulders, legs straight out feet slightly apart. On the teacher’s signal the student extends arms prior to beginning the test Body must remain in a straight line throughout the movement with a straight line through the ankle, knee, hip, and shoulder joints Top Position At the top position, the elbow must be fully extended for the repetition to count At the bottom position, the elbow angle must reach 90 degrees Bottom Position

27
Push Up – Movement Standards
Scoring The data recorded is the number of push ups completed before the second form break There should be no zero scores as the 1st push up attempted, even though not “completed” (1st “form break) is counted as one push up Form Break / Correction Stopping to rest or not maintaining a rhythmic pace Not achieving a 90 degree angle with the elbow on each repetition Not maintaining a correct body position with a straight back Not extending arms fully
 is counted as one push up. Form Break / Correction. Stopping to rest or not maintaining a rhythmic pace. Not achieving a 90 degree angle with the elbow on each repetition. Not maintaining a correct body position with a straight back. Not extending arms fully.")
28
Push Up – Test Administration
Teacher should be positioned near the students head and shoulders in order to observe both the 90 degree elbow bend and correct body alignment Student partner should be positioned at the testing student’s feet Students should be given the opportunity to practice push ups to both improve strength and fully understand testing standards and procedures Reliability of test administration will depend on how test is administered Student partners should be used to assist in score keeping, not in determining whether the tested student has met testing standard The number of students tested at one time will be determined by the number that you can effectively judge movement

29
Curl Up

30
Curl Up Test Objectives Equipment
To complete as many curl-ups as possible up to a maximum of 75 at a specified/rhythmic pace Equipment Gym mats/carpeted surface and a measuring strip for every two students are needed. The measuring strip may be made of cardboard, rubber, smooth wood, or any similar thin, flat material and should be 30 to 35 inches long and 4.5 inches wide. The measuring strip should be thick enough for students to feel with their fingertips while performing the curl up. Recorded cadence is located on the PFT Haiku site.

31
Curl Up – Movement Standards
Student lies in a supine position on the mat, knees bent at an angle of approximately 140°, feet flat on the floor, legs slightly apart, arms straight and parallel to the trunk with palms of hands resting on the mat, shoulders relaxed. The fingers are stretched out and the head is in contact with the mat. To complete the curl up, keeping heels in contact with the mat, student curls up slowly, sliding fingers across the measuring strip until fingertips reach the other side, and returns to starting position.

32
Curl Up – Movement Standards
Fingers should remain in contact with the measuring strip throughout the movement Down position Up position

33
Curl Up – Movement Standards
Scoring The number of completed curl ups completed before the second form break There should be no zero scores as the 1st curl up standard the student cannot meet would be the 1st allowed form break, thus a completed curl up Form Break / Correction Stopping to rest or not maintaining the specified rhythmic pace Heels coming off the mat Head not returning to mat to complete repetition Fingertips not touching far side of measuring strip

34
Curl Up – Test Administration
Reliability of test administration will depend on how test is administered Student partners should be used to assist in score keeping, not in determining whether the tested student has met testing standard The number of students tested at one time will be determined by the number that you can effectively judge movement Teacher should be positioned near the students feet to observe the finger reaching the far side of the measuring strip and feet remaining in contact with the mat Student partner should be positioned at the testing student’s head Students should be given the opportunity to practice curl ups to both improve abdominal strength and fully understand testing standards and procedures

35
Sit and Reach Saver%20Sit%20and%20Reach

36
Sit and Reach Test Objective Equipment
To be able to reach the specified distance on the right and left sides of the body. The distance required to achieve Healthy Fitness Zone is adjusted for age and gender. Equipment A sturdy box approximately 12 inches high. A measuring scale is placed on top of the box with the 9-inch mark parallel to the face of the box against which the student’s foot will rest. The “zero” end of the ruler is nearest the student.

37
Sit and Reach – Movement Standards
The student removes his or her shoes and sits down at the test apparatus. One leg is fully extended with the foot flat against the face of the box. The other knee is bent with the sole of the foot flat on the floor. The instep is placed in line with, and 2 to 3 inches to the side of, the straight knee. The arms are extended forward over the measuring scale with the hands placed one on top of the other.

38
Sit and Reach – Movement Standards
With palms down, the student reaches directly forward (keeping back straight and the head up) with both hands along the scale four times and holds the position of the fourth reach for at least 1 second. After one side has been measured, the student switches the position of the legs and reaches again. The student may allow the bent knee to move to the side as the body moves forward if necessary, but the sole of the foot must remain on the floor.
 with both hands along the scale four times and holds the position of the fourth reach for at least 1 second. After one side has been measured, the student switches the position of the legs and reaches again. The student may allow the bent knee to move to the side as the body moves forward if necessary, but the sole of the foot must remain on the floor.")
39
Sit and Reach – Test Administration
Scoring Record the number of inches on each side to the nearest 1/2 inch reached, to a maximum score of 12 inches Test Administration The bent knee moves to the side, allowing the body to move past it, but the sole of the foot must remain on the floor. Keep the back straight and the head up during the forward flexion movement. The knee of the extended leg should remain straight. The teacher may place one hand above the student’s knee to help keep the knee straight. Hands must reach forward evenly The test should be repeated if the hands reach unevenly or the knee bends Hips must remain square to the box. Do not allow the student to turn hips away from box while reaching

40
Shoulder Stretch

41
Shoulder Stretch Test Objective Scoring
To be able to touch the fingertips together behind the back by reaching over the shoulder and under the elbow. This is an alternative test to the Sit and Reach to determine flexibility Scoring The student receives either a “yes” or “no” for each the left and right shoulders. To achieve the Healthy Fitness Zone, students must receive a “yes” on both the right and left side

42
Shoulder Stretch – Movement Standards
Student begins with the left hand reaching over their shoulder as if to pull up a zipper or scratch between their shoulder blades. At the same time, student reaches behind the back with the right hand and reach up trying to touch the fingertips of the left hand. The process is repeated for the right shoulder. Student receives a “yes” if they are able to touch their fingertips together.

43
Trunk Lift

44
Trunk Lift Test Objective Equipment Scoring
To lift the upper body off the floor using the muscles of the back and hold the position to allow for the measurement Equipment Gym mat/carpeted surface Measuring device A yardstick or 15 inch ruler is preferred; however a 12 inch ruler can be used if care is taken to make certain that the ruler is not placed directly under the student’s chin during test administration. Scoring The score is recorded in inches. Distances above 12 inches should be recorded as 12 inches.

45
Trunk Lift – Movement Standards
The student being tested lies on the mat in a prone position (facedown). Toes are pointed and hands are placed under the thighs. Place a coin or other marker on the floor in line with the student’s eyes. During the movement, the student’s focus should not move from the coin or marker to ensure head is in the proper/safest position.
. Toes are pointed and hands are placed under the thighs. Place a coin or other marker on the floor in line with the student’s eyes. During the movement, the student’s focus should not move from the coin or marker to ensure head is in the proper/safest position.")
46
Trunk Lift – Movement Standards
The student lifts the upper body off the floor, in a very slow and controlled manner, to a maximum height of 12 inches. The head should be maintained in a neutral (straight) alignment with the spine. The position is held long enough to allow the tester to place the ruler on the floor in front of the student and determine the distance from the floor to the student’s chin. The ruler should be placed at least an inch to the front of the student’s chin and not directly under the chin. Allow two trials, recording the highest score.
 alignment with the spine. The position is held long enough to allow the tester to place the ruler on the floor in front of the student and determine the distance from the floor to the student’s chin. The ruler should be placed at least an inch to the front of the student’s chin and not directly under the chin. Allow two trials, recording the highest score.")
47
Trunk Lift – Movement Standards
Movement Breaks/Corrections Do not allow students to do ballistic, bouncing movements. Do not encourage students to raise higher than 12 inches. Excessive arching of the back may cause compression of the spinal discs. Maintaining focus on the spot on the floor should assist in maintaining the head in a neutral position. Testing Strategies Teacher should make the reading at eye level and, therefore, should assume a squat or lying down position.

48
Body Mass Index (BMI)
 v=Body%20Mass%20Index")
49
weight (kg) / height2 (m)
Body Mass Index (BMI) The BMI provides an indication of the appropriateness of a child’s weight relative to height. Body mass index is determined by the following formula weight (kg) / height2 (m) Testing Protocol Students should remove their shoes prior to having their height and/or weight measured In measuring height and weight, drop any fractions and record the last whole number ex. a height of 5 feet 5 1/2 inches would be recorded as 5 feet 5 inches, and a weight of pounds would be recorded as 112 pounds
 The BMI provides an indication of the appropriateness of a child’s weight relative to height. Body mass index is determined by the following formula. weight (kg) / height2 (m) Testing Protocol. Students should remove their shoes prior to having their height and/or weight measured. In measuring height and weight, drop any fractions and record the last whole number. ex. a height of 5 feet 5 1/2 inches would be recorded as 5 feet 5 inches, and a weight of pounds would be recorded as 112 pounds.")
50
Resources California Physical Fitness Test (PFT)
")
51
Resources RUSD PFT Resource Page
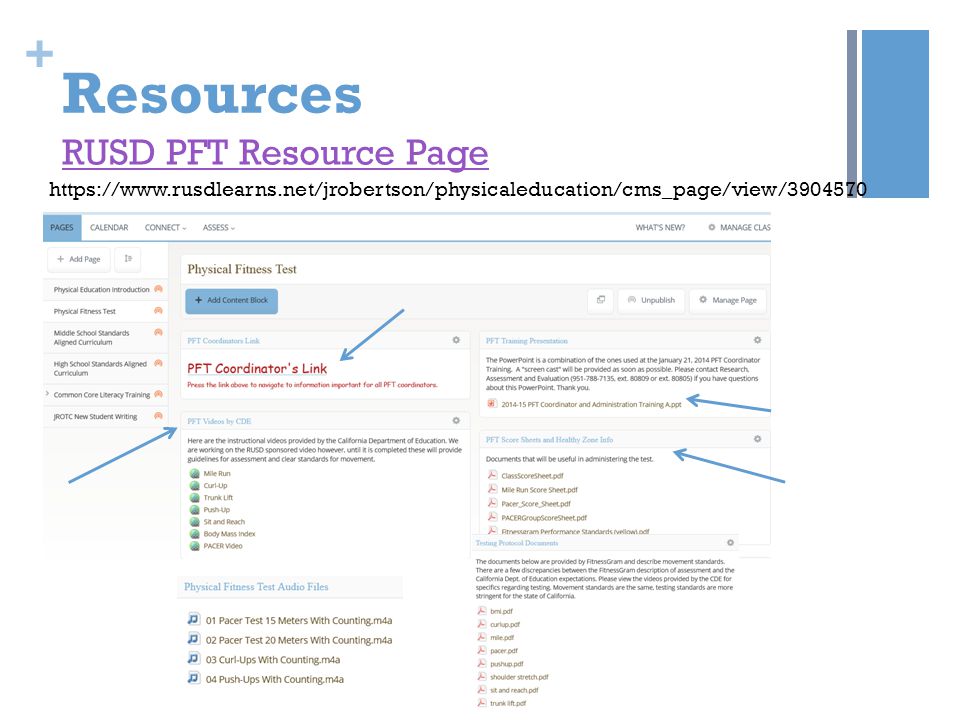
52
Resources https://PFT Coordinator and Data Entry Info

Similar presentations


 To assist with the conduct of the Strength Training Circuit, print off these slides and place them in page protectors.>")


