Download presentation
Presentation is loading. Please wait.

1
KX-TD500 Technical Training Seminar

2
Table of Contents Introduction 1-7
KX-TD500 Basic and Expansion Shelf 8-19 Configuration CPU Card KX-TD TSW Card KX-TD KX-TD500 Cards Activity One 60 System Startup Activity Two 66 Hardware Addresses Port Status Maintenance Console Software

3
Table of Contents Activity Three 91 Activity Four 92-98
Activity Five 99 Activity Six Activity Seven T Activity Eight Activity Nine

4
KX-TD500

5
Course Outline Day 1 Introduction KX-TD500 Hardware and Configuration
System Specifications System Installation System Installation Lab System Startup System Startup Lab Hardware Addressing and Port Status Maintenance Consoles Software Maintenance Consoles Software Lab

6
Course Outline Day 2 KX-TD500 Features Basic Programming Lab
Toll Restriction Lab ARS Lab Voice Processing Integration Lab

7
Course Outline Day 3 T1 T1 Lab Remote Programming
Remote Programming Lab Final Exam

8
KX-TD500 Digital Super Hybrid
This TD-based system will offer a smooth upgrade path for 2-cabinet TD1232 users as well as a starter system for the medium-sized businesses or high-end residential users

9
KX-TD500 Digital Super Hybrid
The system will provide the TD dealers with a larger system size, but offer a similar programming and user interface as currently offered by the TD308/816/1232. The major differences between the existing TD line of systems and the KX-TD500 includes a new Windows-based programming tool, and the universal slot design.

10
KX-TD500 System Outline The KX-TD500 consists of a basic shelf and up to two expansion shelves. The systems features a universal slot design enabling station, CO, and other function cards to be installed into free slots in the cabinets.

11
Basic Shelf KX-TD500 The Basic Shelf is the initial building-block of the KX-TD500 system allowing a single-cabinet system to be configured with up to a maximum of 192 ports. The Basic Shelf then provides the foundation on which the system can be expanded by use of expansion shelves to configure a system up a maximum of 512 ports.

12
Basic Shelf KX-TD500 The Basic Shelf houses the system’s common control cards including the Central Processing Unit (CPU) card and the Time Switch (TSW) card. Only the TSW card is included with the Basic Shelf which includes the DOHCA and TSW-CONF cards The CPU card is available separately.
 card and the Time Switch (TSW) card. Only the TSW card is included with the Basic Shelf which includes the DOHCA and TSW-CONF cards. The CPU card is available separately.")
13
Basic Shelf KX-TD500 12 Free Slots (FS1-FS12) are available in the Basic Shelf and can be carded with CO, station, or other function cards as required by the installations application. If the installation location requires more than the 12 slot configuration supports, the system can be expanded by attaching 2 additional Expansion Shelves to the upper portion of the Basic Shelf
 are available in the Basic Shelf and can be carded with CO, station, or other function cards as required by the installations application. If the installation location requires more than the 12 slot configuration supports, the system can be expanded by attaching 2 additional Expansion Shelves to the upper portion of the Basic Shelf.")
14
Basic Shelf Includes: Top panel with 3 LED indicators (Run, Offline, Alarm) 2 Female RS-232C connectors One for Programming One for SMDR An AC Power connector

15
Basic Shelf Includes: Primary AC Power Supply with:
Main Power Switch Grounding Terminal AC outputs for Expansion Shelves Shelf Power Supply with: Power Switch Power LED Indicator Fuse KX-A46 interface connector

16
Basic Shelf Includes: Shelf Cooling Fan SLT Ring Generator
Mounting Brackets Side Panels Lower Panel Front Door with Lock

17
Expansion Shelf KX-TD520 The KX-TD520 Expansion Shelf can be installed onto the Basic Shelf adding on a maximum of 224 additional ports. This provides a two-cabinet system with a maximum configuration of 416 ports. A second Expansion Shelf could then be added bring the system up to its maximum port configuration of 512 ports.

18
Expansion Shelves Include:
14 Free Slots (FS1-FS14) A Shelf Power Supply with: Power Switch Power LED Indicator Fuse KX-A46 Interface Connector Shelf Cooling Fan SLT Ring Generator
 A Shelf Power Supply with: Power Switch. Power LED Indicator. Fuse. KX-A46 Interface Connector. Shelf Cooling Fan. SLT Ring Generator.")
19
Expansion Shelves Include:
Side Panels Front Door with Lock Data and Power Connecting Cables Mounting Hardware

20
Maximum System Configurations
Although the systems model number is the KX-TD500, the actual maximum system configuration can be 512 ports. This port configuration cannot be exceeded.

21
Maximum System Configurations
Things to remember about system configuration 512 ports/system is the maximum allowed 448 extensions/system is the maximum allowed 192 CO Lines/system is the maximum allowed 216 PT, SLT, & CO ports/expansion shelf 192 PT and SLT ext./shelf is the max. allowed 128 PT/Shelf is the maximum allowed 160 SLT/Shelf is the maximum allowed

22
System Configuration Example 1
Final system configuration of (48) CO lines and (448) extensions (320 DPT & (128) SLT) = (496) Total
 CO lines and (448) extensions (320 DPT & (128) SLT) = (496) Total.")
23
System Configuration Example 1
CO = 6 LCOT (ELCOT) DPT = 20 DLC SLT = 8 ESLC 34 out of 40 Free Slots used 496 out of 512 ports used (16 avail.) XDP, Parallel Telephones or APT require DHLC
 DPT = 20 DLC SLT = 8 ESLC. 34 out of 40 Free Slots used. 496 out of 512 ports used (16 avail.) XDP, Parallel Telephones or APT require DHLC.")
24
System Configuration Example 2
Final system configuration of 192 T1 channels and 256 DPT extensions 448 Total

25
System Configuration Example 2
T1 Channels = 8 T1 DPT = 16 DLC 32 out of 40 Free Slots used 448 out of 512 ports used (64 avail.)
")
26
KX-TD50101 CPU Card 386-based Main Central Processing Unit Card residing in the Basic Shelf This card provides control and call processing data for all system functions including TSW control, power down and system clock alarms Main components include CPU, RAM, ROM, memory backup lithium battery

27
KX-TD50101 CPU Card CPU card also includes circuitry for the RS-232C connectors “System” and “Mode” switches are 10 position rotary switches located on the front edge of the CPU card along with the push reset switch. The “System” switch is not used in the US version.

28
KX-TD50101 CPU Card The “Mode” switch is used to determine the startup condition of the system. Although it is a 10 position switch, only 4 position are utilized for normal operations.

29
KX-TD50101 CPU Card Mode switch positions are:
Position 1 On-line while holding current data Position 0,2,3,9 On-line Same function as 1 Position 4 Off-line holding current data Position 5 Off-line while defaulting system Position 6 ON-LINE with “backdoor” password Position 7 Off-line factory finished product testing Position 8 Off-line factory finished product testing

30
KX-TD50102 TSW Card The Time Switch (TSW) card provides the systems voice switching matrix including party conferencing circuits The TSW card generates all audible call progress tones, including dial tone, busy tone, reorder and ringback tones

31
KX-TD50102 TSW Card The TSW card also provides an interface for 2 Music on Hold inputs (9/64” mini-plug) and 2 External Paging output jacks (RCA plugs) with volume adjustments Two daughter boards are attached to the TSW card KX-TD50104 KX-TD50105
 and 2 External Paging output jacks (RCA plugs) with volume adjustments. Two daughter boards are attached to the TSW card. KX-TD KX-TD")
32
TSW Cards The KX-TD50104 TSW-CONF Expansion Card adds an additional 64 3-party conference circuit to the basic 8 provided by the TSW card The KX-TD50105 DOHCA card allows for OHCA for Digital Proprietary station cards Both of these cards play an important role in Digital Voice Mail integration

33
TSW Card The KX-TD50104 TSW-CONF card provides 3-party conferencing capability. This includes the three DPITS integration features Two-way Record, Two-way Transfer, and Live Call Screening. Each of these features requires the use of conference circuit

34
TSW Card The KX-TD50105 DOHCA card provides for DPT OHCA by providing TSW circuitry to support the second “B” channel for DPT telephones and DPITS integrated voice mail ports The KX-TD50105 DOHCA card must be installed for DPITS voice mail integration to work

35
New KX-TD500 Cards include:
These cards will only operate in a KX-TD500 KX-TD50170-Digital Hybrid Line Card (DHLC) KX-TD50172-Digital Line Card (DLC) KX-TD50175-Enhanced Single Line Card (ESLC) KX-TD50180-Enhanced Loop Central Office Trunk (ELCOT) KX-TD50197-Enhanced Remote Card (ERMT)
 KX-TD50172-Digital Line Card (DLC) KX-TD50175-Enhanced Single Line Card (ESLC) KX-TD50180-Enhanced Loop Central Office Trunk (ELCOT) KX-TD50197-Enhanced Remote Card (ERMT)")
36
KX-TD50170 Digital Hybrid Line Card
The DHLC supports 8 analog proprietary telephones or 8 digital proprietary and 8 SLT telephones (XDP or parallel) This card supports 7000 and 7400 series telephones as well as SLT’s See right side of page 2-41 in Installation Manual for block wiring
 This card supports 7000 and 7400 series telephones as well as SLT’s. See right side of page 2-41 in Installation Manual for block wiring.")
37
KX-TD50170 Digital Hybrid Line Card
OHCA using the KX-T7436/7130 is supported without any additional cards installed on the station card. (The KX-TD50105 card must be installed on the TSW card for OCHA to the KX-T7436)
")
38
KX-TD50172 Digital Line Card
The DLC supports 16 digital proprietary telephones (7400 series) and DSS consoles No SLT’s are will operate on this card See right side of page 2-44 in Installation Manual for block wiring
 and DSS consoles. No SLT’s are will operate on this card. See right side of page 2-44 in Installation Manual for block wiring.")
39
KX-TD50175 Enhanced Single Line Card
The ESLC supports 16 single line telephones with Message Waiting Lamp compatibility No proprietary telephones will operate on this card ESLC has 4 DTMF receivers See right side of page 2-42 in Installation Manual for block wiring

40
KX-TD50180 Enhanced Loop CO Trunk
The ELCOT card supports 8 Loop Start Central Office lines When two optional KX-TD193 Caller ID cards are installed, Central Office Caller ID is provided to proprietary display telephones See page 2-55 in Installation Manual for block wiring

41
KX-TD50197 Enhanced Remote Card
The ERMT card is a modem card (V.34) used for remote administration.
 used for remote administration.")
42
Other Cards Supported by the KX-TD500
The following cards were previously supported by the KX-T336, and in the case of the KX-TD193, the KX-TD816/1232, and provide the same functions and capabilities. Refer to KX-TD500 optional card compatibility chart for more information

43
Other Cards Supported by the KX-TD500
KX-T Station Hybrid Line Card (HLC) KX-T Station Proprietary Line Card (PLC) KX-T Station Single Line Card (SLC) KX-T Station Single Line Card with Message Waiting Lamp compatibility (SLCM) KX-T Loop Start Central Office Trunk card (LCOT) KX-T Ground Start Central Office Trunk card (GCOT)
 KX-T Station Proprietary Line Card (PLC) KX-T Station Single Line Card (SLC) KX-T Station Single Line Card with Message Waiting Lamp compatibility (SLCM) KX-T Loop Start Central Office Trunk card (LCOT) KX-T Ground Start Central Office Trunk card (GCOT)")
44
Other Cards Supported by the KX-TD500
KX-T DID Trunk card (DID) KX-T Station Off-Premise extension card (OPX) KX-T Off Premise Extension Power Unit KX-T T1 card (T1) KX-T Doorphone card (DPH) KX-T DISA card (DISA) KX-T Automatic Gain Control card (AGC)
 KX-T Station Off-Premise extension card (OPX) KX-T Off Premise Extension Power Unit. KX-T T1 card (T1) KX-T Doorphone card (DPH) KX-T DISA card (DISA) KX-T Automatic Gain Control card (AGC)")
45
Other Cards Supported by the KX-TD500
KX-T bps Remote card (RMT) KX-T OHCA card for HLC and PLC cards (OHCA) KX-TD193 - Caller ID card for ELCOT card (CID)
 KX-T OHCA card for HLC and PLC cards (OHCA) KX-TD193 - Caller ID card for ELCOT card (CID)")
46
KX-T96170 Hybrid Line Card (HLC)
Each card provides 8 Hybrid extension ports Either a Analog Proprietary Telephones (7000 series) or a single line telephones can be connected to this card See right side of page 2-41 in Installation Manual for block wiring
 or a single line telephones can be connected to this card. See right side of page 2-41 in Installation Manual for block wiring.")
47
KX-T96172 Proprietary Line Card (PLC)
Each card provides 8 proprietary extension ports Only Analog Proprietary Telephones (7000 Series) can be connected to this card See right side of page 2-41 in Installation Manual for block wiring
 can be connected to this card. See right side of page 2-41 in Installation Manual for block wiring.")
48
KX-T96174 Single Line Telephone card (SLC)
Each card provides 8 single line extension ports Only single line telephones can be connected to this card See right side of page 2-41 in Installation Manual for block wiring

49
KX-T96175 Single Line Card with Message Waiting (SLC-M)
Each card supports 8 single line extensions with Message Waiting lamps See right side of page 2-41 in Installation Manual for block wiring

50
KX-T96180 Loop Start Central Office Card (LCOT)
Each card allows 8 Loop Start Central Office lines to be connected to the system See page 2-55 in Installation Manual for block wiring

51
KX-T96181 Ground Start Central Office Card (GCOT)
Each card allows 8 Ground Start Central Office lines to be connected to the system See page 2-55 in Installation Manual for block wiring

52
KX-T96182 Direct Inward Dialing Trunk Card (DID)
Each card allows 4 DID Central Office lines to be connected to the system This card will accept pulse signaling only System interface is modular (RJ-11C)
")
53
KX-T96185 and KX-T96186 KX-T96185--Off Premise EXtension Card (OPX)
KX-T Off Premise Extension Power Supply An OPX card and Power Supply provides 4 OPX single line telephones only Both OPX units are required when a single line telephone must be placed in another building or location System interface is modular (RJ-11C)
")
54
KX-T96187 T-1 Card Up to 8 T1 cards can be installed in the KX-TD500
Frame Formats D4/SF or ESF Line Coding AMI or B8ZS Channel Types LCO/GCO/DID/OPX/TIE System interface is RJ-48C (See page 2-53 in Installation Manual for cable configuration)
")
55
KX-T96187 The T1 card can only be installed in slots 1 (2), 5 (6), and 9 (10). The slot immediately adjacent to the right of each T1 card must be left empty as indicated above by the slot number that are parenthesized.

56
KX-T96161 Doorphone card Provides 4 Doorphones and 4 dry contact relays 2 card per system

57
KX-T96191 Direct Inward Station Access card (DISA)
Each DISA card can be programmed to provide one of three functions. Basic 4 port automated attendant or; Outgoing Message for Uniform Call Distribution Timed Reminder OGM 8 DISA cards can be installed in the system

58
KX-T96193 Automatic Gain Control card (AGC)
Each card provides 4 gain controlled CO to CO conference circuits 8 AGC cards can be installed in the system

59
KX-T96196 Remote Administration card
Allows remote system administration at 1200 baud 1 Remote card can be installed in the system

60
KX-T96136 KX-T96136 -- Off Hook Call Announce card
1 KX-T96136 card must be installed for every 2 KX-T7130 telephones that require OHCA A maximum of 4 KX-T96136 connects to either the PLC or HLC cards

61
KX-TD193 Caller ID Card 1 KX-TD193 will support 4 Caller ID compatible Central Office Lines connected to the KX-TD50180 card (ELCOT). For all eight lines to support Caller ID, a second KX-TD193 must be installed. The KX-TD193 supports both Single and Multi-Message formats
. For all eight lines to support Caller ID, a second KX-TD193 must be installed. The KX-TD193 supports both Single and Multi-Message formats.")
62
Activity One Shelf and Card Installation
Purpose: To assemble a shelf and install cards in a shelf 1. Install an Expansion Shelf on a Basic Shelf 2. Install all cards into the Basic Shelf leaving slots 09 and 10 empty. Also make sure that slot 01 has either a DLC or DHLC installed in it. This will be necessary for practice exercises at a later time.

63
System Startup Procedure
System startup or initialization must be executed for every system The purpose of this procedure is to default the system and to automatically assign installed hardware into their respective positions This procedure is accomplished using rotary switch labeled “Mode” on the CPU card

64
System Startup Procedure
1.Ensure that all cards that are to be initially installed are properly seated in the card slots and that the cabinets are properly assembled. 2.Connect the AC power cord to the Basic Shelf and then to a properly grounded and protected AC outlet 3.Connect a ground wire to the Ground terminal (Not necessary in training environment) 4.Turn On the Main Power Switch on the Basic Shelf 5.Turn On the Power Switch for each Expansion Shelf
 4.Turn On the Main Power Switch on the Basic Shelf. 5.Turn On the Power Switch for each Expansion Shelf.")
65
System Startup Procedure
6. Turn On the Power Switch for the Basic Shelf 7. Using a small flathead screwdriver, turn the Mode Switch on the CPU to position “5”. Note: Leave the System in position 0 8.Press and release the CPU Reset button 9.Wait 2 minutes. After 2 minutes, the Run light will be green and the Off-line light will slowly flash yellow.

66
System Startup Procedure
10.The system is now in the Off-line mode. Only system administration can be performed. 11.Turn the Mode Switch to position “1”. It is very important that the Mode Switch be placed in position ”1” at this time. If the system were to be reset, or if the AC power were to be lost momentarily, the system would re-initialize and return to the default condition. Any programming changes that you may have been made would have been lost.

67
System Startup Procedure
12.To place the system into the On-line Mode, press and release the CPU Reset button. 13.Wait 2 minutes. After the 2 minute waiting period, the system will be On-line. The Run light will be lit, and the Off-line and Alarm light will be off. Call processing can be accomplish as well as system administration in the On-line mode. Only the Upload to PBX function can not be performed

68
Activity Two System Startup
Purpose: To become familiar with the system startup procedure 1. Execute the system startup procedure

69
KX-TD500 Hardware Addresses
The KX-TD500, like most other universal free slot designed PBX’s, utilize a numbering system to identify ports, cards, and shelf locations. This is necessary when programming and maintaining the system

70
KX-TD500 Hardware Addresses
Generally hardware address will be either 3 digit or 5 digit numbers. Example: 10205 The first digit (1) indicates the shelf. In this example the 1 indicates the Basic Shelf. The first expansion shelf would be identified with a 2 and the second expansion shelf identified with a 3
 indicates the shelf. In this example the 1 indicates the Basic Shelf. The first expansion shelf would be identified with a 2 and the second expansion shelf identified with a 3.")
71
KX-TD500 Hardware Addresses
Example: 10205 The next two digits (02) indicate the slot number. In this example the card is located in the Basic Shelf in slot 2. In the Basic Shelf, valid entries would be In the Expansion Shelves, valid entries would be 01-14
 indicate the slot number. In this example the card is located in the Basic Shelf in slot 2. In the Basic Shelf, valid entries would be In the Expansion Shelves, valid entries would be")
72
KX-TD500 Hardware Addresses
Example: 10205 The next two digits (05) indicate the port number. Port number identifiers will vary based on the card type. Some will have up to 16 ports, others 8 or less. For example, a DLC is a 16 port card and would have valid entries of
 indicate the port number. Port number identifiers will vary based on the card type. Some will have up to 16 ports, others 8 or less. For example, a DLC is a 16 port card and would have valid entries of")
73
KX-TD500 Hardware Addresses
Example: 10205 A DHLC is slightly different. The first 8 port identifiers (01-08) are used to identify the 8 proprietary ports on this card. The second 8 port identifiers (09-16) are used to identify the XDP ports. For example, port identifier 09 is used to program the XDP single line extension for port 01.
 are used to identify the 8 proprietary ports on this card. The second 8 port identifiers (09-16) are used to identify the XDP ports. For example, port identifier 09 is used to program the XDP single line extension for port 01.")
74
KX-TD500 Hardware Addresses
A card with twenty-four port identifiers (01-24) is the T1 card Cards with sixteen port identifiers (01-16) include: DLC, DHLC and ESLC Cards with eight port identifiers (01-08) include: HLC, PLC, SLC, SLC-M, LCOT, GCOT & ELCOT
 is the T1 card. Cards with sixteen port identifiers (01-16) include: DLC, DHLC and ESLC. Cards with eight port identifiers (01-08) include: HLC, PLC, SLC, SLC-M, LCOT, GCOT & ELCOT.")
75
KX-TD500 Hardware Addresses
Cards with four port identifiers (01-04) include: OPX, DID, DISA, AGC & DPH Cards that only have no port identifier include: RMT and ERMT
 include: OPX, DID, DISA, AGC & DPH. Cards that only have no port identifier include: RMT and ERMT.")
76
Port Status Ports and cards can be in various states of service
Operational devices are usually In-Service or the abbreviation “INS” Disabled devices are usually Out-of-Service or the abbreviation “OUS” Another state is Fault. This can be caused by several things including configuration problems as well as hardware failure

77
Port Status The final state of service is called Busy-out. This occurs on CO ports that have been placed in the Busy-out state by a system administrator. Generally the “INS” and “OUS” states are most common. Changing from one to another is accomplished by using different screens from within the KX-TD500 Maintenance Console programming tool

78
Port Status Within the Maintenance Console programming tool, the state of service can be identified and changed by clicking on the “Status” button. The text on the “Status” button indicates the current state, and the state can be toggled from one state, for example OUS, to the alternative state, in this case INS, by clicking on the “Status” button and then selecting OK.

80
Port Status

82
Maintenance Console Software
Proprietary PC programming software Operating Systems Windows® 3.1 Windows® 95/98 PC Requirements CPU: Mhz or better RAM: Minimum of 8 MB HDD: Minimum of 5 MB free plus 500 KB per user file

83
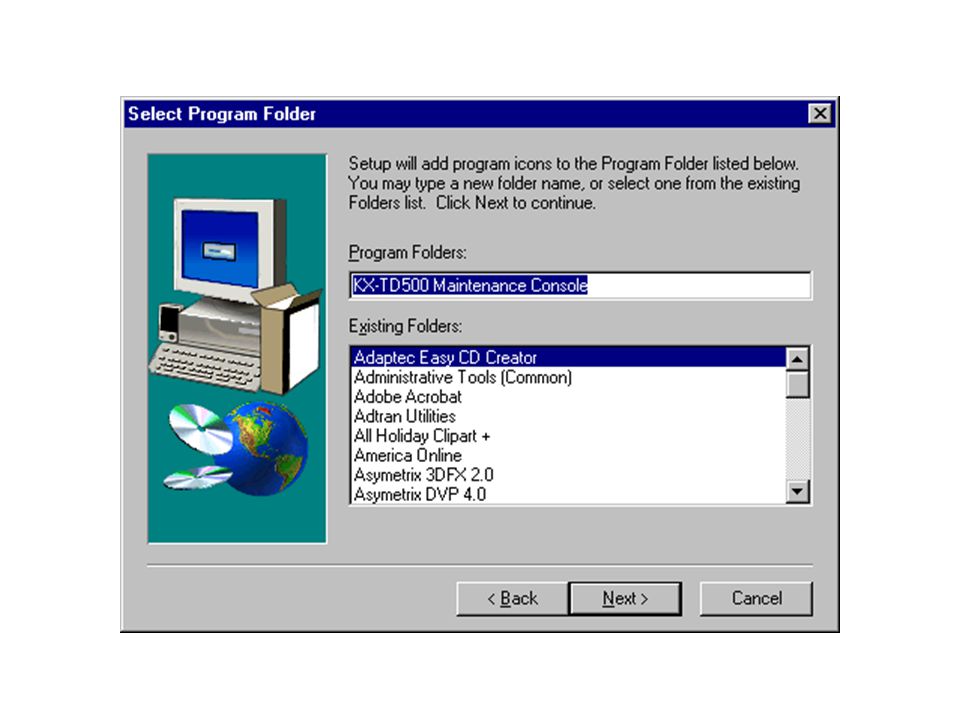
Maintenance Console Setup

84
InstallShield® Wizard

85
Maintenance Console Setup

90
Shortcut can be created

92
Maintenance Console Software

93
Activity Three Installing Software
Purpose: To become familiar with the process of installing the KX-TD500 Maintenance Console program in your PC 1. Install the KX-TD500 Maintenance Console software into your PC.

94
Activity Four Maintenance Console
Purpose: To become familiar with the Maintenance Console program by connecting and disconnecting, navigating, making basic programming changes and applying them. 1. Properly connect your serial cable and null modem connector to your PC and KX-TD500 programming RS-232C 2. Open the KX-TD500 Maintenance Console program 3. Establish a local connection using the default parameters of: Port Set according to your PC NL Code CR+LF Baud Rate 9600 bps Password 1234

95
Activity Four Maintenance Console
4. Enter Programming-Interactive and allow the software to upload programming parameters 5. Browse through all available programming screens but do not change any parameters at this time. 6. Now make your first programming changes. Ensure that a KX-T7436 is installed on the first port (ext.1001) of the DHLC or DLC installed in slot 01. In the Line-Extension Line screen, program and apply extension 1001 to have the following CO Keys: CO 1-6 PDN buttons CO 7-14 S-CO buttons for the 1st 8 CO’s CO Not Stored (for now)
 of the DHLC or DLC installed in slot 01. In the Line-Extension Line screen, program and apply extension 1001 to have the following CO Keys: CO 1-6 PDN buttons. CO 7-14 S-CO buttons for the 1st 8 CO’s. CO Not Stored (for now)")
96
Activity Four Maintenance Console
7. Next, program and apply another extension to have the following CO Keys: CO 1-8 Single-CO CO 9-18 Not Stored (for now) CO One-Touch buttons CO Not Stored (for now) 8. Now copy all parameters from the above extension to all other extension other than extension 1001 that was programmed in step 6. 9. Name the first 24 extensions 10. Set the Time and Date
 CO One-Touch buttons. CO Not Stored (for now) 8. Now copy all parameters from the above extension to all other extension other than extension 1001 that was programmed in step Name the first 24 extensions. 10. Set the Time and Date.")
97
Activity Four Maintenance Console
11. In the Line-Trunk Line screen, name the first 8 CO’s and assign the Day and Night Destination to be 1001 12. In the Features-System Speed Dialing screen, assign 20 System Speed Dialing names and numbers 13. In the System-System Options 4/4, change the FWD/DND lamp pattern to FWD:On, DND:Flash 14. Test the operation of all applicable programming to this point. This completes some of the basic programming changes in the interactive mode, now let’s save this configuration to the hard disk drive and make some additional changes to the file in the batch mode.

98
Activity Four Maintenance Console
15. Execute the File-Download from PBX menu option 16. When the Download from PBX is complete, save the file using the Save As menu option to your hard disk drive. 17. Disconnect from the PBX Now we will modify the file while not connected to the PBX. The changes that are made will be saved to the hard disk when complete. We will then Upload the changes to the KX-TD500 18. Using the File-Open menu option, open the file that you saved in step 16

99
Activity Four Maintenance Console
19. In the Configuration-Extension Port Assignment screen, set the XDP function for all extensions on the DHLC(s) 20. Select a port on a DLC installed in your system and assign it as a DSS in the Configuration-Extension Port Assignment screen. Pair the DSS with extension 1001 21. In the Line-DSS Console screen, assign 32 DSS keys to the DSS console Now let’s save the file again to the hard disk drive and then Upload the modified file back into the KX-TD500 22. Save the modified file to the hard disk drive once again
 20. Select a port on a DLC installed in your system and assign it as a DSS in the Configuration-Extension Port Assignment screen. Pair the DSS with extension In the Line-DSS Console screen, assign 32 DSS keys to the DSS console. Now let’s save the file again to the hard disk drive and then Upload the modified file back into the KX-TD Save the modified file to the hard disk drive once again.")
100
Activity Four Maintenance Console
23. Using the rotary Mode Switch on the CPU card, place the system in the Off-Line Mode 24. Establish a Local Connection once again 25. Open the saved file 26. Execute the File-Upload to PBX menu option 27. When Upload is complete, disconnect the local connection 28. Using the rotary Mode Switch on the CPU card, place the system in the On-Line Mode 29. Establish a Local Connection once again and enter Interactive programming 30. Confirm the programming that was completed in step 19-21

101
Activity Five Toll Restriction
Purpose: To understand the KX-TD500 toll restriction capabilities 1.Restrict extension 1001 and 1002 from dialing 1-900, 976, 1***976, 011 and Allow all other calls. 2. Allow extension 1003 to dial local calls and calls only.

102
Activity Six ARS Purpose: To understand the KX-TD500 Automatic Route Selection capabilities 1. Using ARS, route all outgoing CO calls over the LCOT in Trunk Group 1.

103
Activity Seven DPITS Voice Mail Integration
Purpose: To understand the programming involved in integrating a Panasonic Voice Processing System using DPITS integration. 1. Make the required physical connections between your KX-TD500 and the Voice Processing System for a 2 port DPITS integrated system. This will require that one data pair from an extension port of the KX-TD500 be wired into the input jacks of the VPS using a modular cord. 2. In the Configuration-Extension Port Assignment screen, assign the extension port selected in step 1 to be VPS(DPT)
")
104
Activity Seven DPITS Voice Mail Integration
3. In the Configuration-VPS(DPT) Port Assignment screen, assign the correct VPS Card, VPS Type, Port No. and DN and Group No. for Ext. No. 1 and 2. 4. Connect your PC to the VPS’ s RS-232C, start your communication software, and default the VPS 5. Run the VPS’s Quick Setup Utility 6. Confirm by dialing the VPS port DN that DPITS integration has been achieved.
 Port Assignment screen, assign the correct VPS Card, VPS Type, Port No. and DN and Group No. for Ext. No. 1 and Connect your PC to the VPS’ s RS-232C, start your communication software, and default the VPS. 5. Run the VPS’s Quick Setup Utility. 6. Confirm by dialing the VPS port DN that DPITS integration has been achieved.")
105
What is T1? T1 is the telephone companies infrastructure (copper wire, transmission equipment,…) that provides a high speed digital telephone circuit between two points. T1 circuits operate at a rate of Mbps or at what is referred to as DS1 A DS1 is comprised of Kbps* channels (DS0) plus framing overhead * Certain line code and frame selections can reduce the available bandwidth from 64 to 56 Kbps
 that provides a high speed digital telephone circuit between two points. T1 circuits operate at a rate of Mbps or at what is referred to as DS1. A DS1 is comprised of Kbps* channels (DS0) plus framing overhead. * Certain line code and frame selections can reduce the available bandwidth from 64 to 56 Kbps.")
106
T1 channels 24 bits per word x 8 bits 192 samples/sec x 8000
user data 1,536,000 bps frame bits line speed 1,544,000 bps

107
Digital Trunking T1 demarc at customer premise T1 Channel Service Unit
PSTN: Local Exchange Carrier (LEC) or Interexchange Carrier (IEC) TD500 equipped with KX-TD97187
 or. Interexchange Carrier (IEC) TD500 equipped with KX-TD")
108
T1 Channel Service Unit A T1 Channel Service Unit (CSU) is required for each T1 line that is to be connected to the KX-TD500 For a basic TD500 T1 installation, only a CSU is required. CSU’s come in a variety of configurations based on the application and prices will vary.

109
T1 Channel Service Unit CSU Functions:
It is the first piece of Customer Premise Equipment (CPE) after Telco’s demarcation point. Provides a 100 Ω circuit termination Provides FCC Part-68 protection Initiates and facilitates loopback testing Monitors line for errors and violations Maintain 0’s and 1’s density Supports Line Coding and Framing requirements
 after Telco’s demarcation point. Provides a 100 Ω circuit termination. Provides FCC Part-68 protection. Initiates and facilitates loopback testing. Monitors line for errors and violations. Maintain 0’s and 1’s density. Supports Line Coding and Framing requirements.")
110
Adtran ESF T1 CSU ACE Full featured T1 CSU suitable for wall or desktop use. Front panel LCD and four user keys provides easy configuration and unit monitoring Physical Interface RJ-48C Supports D4/SF or ESF Supports AMI or B8ZS

111
What is D4/SF and ESF? Superframe (SF) or D4, and Extended Superframe (ESF) are the two frame formats used in North America. Frame formats are used for frame synchronization and also for line management tasks The KX-TD500 supports either frame formats

112
D4/SF D4 or Superframe was introduced in The D4 was derived from the first Telco channel bank which utilized this type of frame formatting. D4/SF framing consists of a superframe made up of twelve individual frames The twelve framing bits within the superframe follow a pattern of

113
D4/SF Superframe Superframe Frame 1 Frame 2 Word F1 F2 F4 F3 F5 F6 F8
Ch1 Ch2 ……... Ch24 Frame 1 F Ch1 Ch2 ……... Ch24 Frame 2 1 1 1 1 Word Frame 2 framing bit

114
D4/SF D4 or SF framing uses an in-band call control method called “bit robbing” which robs the least significant bit from each of the 24 channels within the 6th and 12th frame. This call control information is used for dialing and other line maintenance functions. This frame format restricts the channel bandwidth to 56 Kbps rather than 64 Kbps and is used most often in voice applications.

115
Extended Superframe (ESF)
Extended Superframe is the preferred method of framing since it utilizes a larger number of frames (24 frames) and requires fewer framing bits to maintain synchronization Framing bits for frames 4, 8, 12, 16, 20, are set to the pattern of that the far end equipment synchronizes on.
 and requires fewer framing bits to maintain synchronization. Framing bits for frames 4, 8, 12, 16, 20, are set to the pattern of that the far end equipment synchronizes on.")
116
Extended Superframe (ESF)
Since fewer frames require framing bits, the excess framing bits for the other frames can be used for other functions such as Cyclic Redundancy Checks and for an Embedded Operations Channel The Embedded Operation Channel is an Out-of-Band call control method used for signaling, dialing, diagnostics as well as other functions.

117
Extended Superframe Extended Superframe C C C C F F F F E E E E E E E
E = Embedded Operations channel bit C = Cyclic Redundancy Check bit F = Framing bit Only 15 of the 24 frames are shown

118
Extended Superframe (ESF)
ESF should be used whenever possible since it has a more sophisticated diagnostic and maintenance capability and allows for a 64 Kbps channel bandwidth.

119
What is AMI and B8ZS? Alternate Mark Inversion and Binary 8 Zero Substitution are the two Line Coding formats used in North America for T1 lines The purpose of Line Coding is to maintains synchronization by ensuring that no more than 7 consecutive “0’s” are transmitted within a DS0.

120
Signaling Formats Unipolar Signaling Bipolar Alternate Mark Inversion
Used internally within most DTE equipment such as the KX-TD500 and computers Bipolar Alternate Mark Inversion T1 lines utilize this type of signaling format +5 v 0 v +3 v 0 v -3v

121
AMI Line Coding AMI get around the 1’s density requirement by forcing a 1 into the bit stream or what is called “bit stuffing.” The CSU accomplished this task by inserting a 1 into the least significant bit location. The draw back to this method is that it reduces the available user bandwidth to 56 Kbps

122
AMI Line Coding DTE Sends CSU set for AMI sends 0 0 0 0 0 0 0 0 +5 v
O v -5 v DTE Sends +5 v O v -5 v CSU set for AMI sends

123
B8ZS Line Coding Binary 8 Zero Substitution is the most popular Line Coding technique used in North America. B8ZS uses a method of inserting a particular bit pattern which includes intentional bipolar violations to replace a series of 8 “0’s” This is the preferred Line Coding technique since it allows for 64 Kbps

124
B8ZS Line Coding DTE Sends CSU set for B8ZS sends 1 0 0 0 0 0 0 0 0
+5 v O v -5 v DTE Sends Previous Word B B +5 v O v -5 v CSU set for B8ZS sends B = Bipoalar Violation

125
Activity Number Eight Installing T1 Lines
Purpose: To become familiar with the installation of a T1 cards in the KX-TD500 and to be able to program the system accordingly. One T1 line has been installed at your location with the following configuration: Line Coding B8ZS Framing ESF Channels LCO See workstation notes for numbers Channels GCO See workstation notes for numbers Channels DID (E&M Immediate with DID enabled) DID digits transferred = Last four See workstation notes for numbers
 DID digits transferred = Last four See workstation notes for numbers.")
126
Activity Number Eight Installing T1 Lines
1. Install a KX-T96187 card in slot 09. Refer to Installation Manual page 2-52, confirm SW5 (jumper) is in the correct position for the KX-TD500. 2. In the Configuration-Slot Assignment screen, assign a T1 card in slot 09 3. In the Configuration-Slot Assignment screen, click on slot 09 T1, and the Properties. Ensure the Line Coding and Frame Sequence is set to B8ZS and ESF. 4. In the Configuration-Slot Assignment screen, click on slot 14 TSW. Set the Clock Configuration Mode to External and Clock Configuration Priority to 109:T1
 is in the correct position for the KX-TD In the Configuration-Slot Assignment screen, assign a T1 card in slot In the Configuration-Slot Assignment screen, click on slot 09 T1, and the Properties. Ensure the Line Coding and Frame Sequence is set to B8ZS and ESF. 4. In the Configuration-Slot Assignment screen, click on slot 14 TSW. Set the Clock Configuration Mode to External and Clock Configuration Priority to 109:T1.")
127
Activity Number Eight Installing T1 Lines
5. Change the Status to INS 6. Connect the T1 line to the NET jack of the CSU. Connect the RJ-48C cable to the T1 card, the other end to the CPE jack of the CSU 7. Using the display and the four front panel buttons on the CSU, verify that in the CONFIG-NETWORK (NI) display that the Format and Code are set to ESF and B8ZS 8. The CSU Power LED should be lit and all other LED’s are off. The SYNC LED on the KX-TD96187 should flash slowly. If this is not the case, check the CSU and Configuration-Slot Assignment settings.
 display that the Format and Code are set to ESF and B8ZS. 8. The CSU Power LED should be lit and all other LED’s are off. The SYNC LED on the KX-TD96187 should flash slowly. If this is not the case, check the CSU and Configuration-Slot Assignment settings.")
128
Activity Number Eight Installing T1 Lines
9. Now, in the Configuration-T1 Port Assignment screen, assign the proper Channel Type Channels LCO Trunk Group 02 Channels GCO Trunk Group 03 Channels TIE (E&M) Trunk Group 04 10. Place each channel INS 11. On extension 1001, assign eight Single-CO buttons to CO Keys for Trunk Lines , and Verify that you are able to draw dial tone for each of these lines. 12. Set up a ringing pattern of your choice for each of these lines and test
 Trunk Group Place each channel INS. 11. On extension 1001, assign eight Single-CO buttons to CO Keys for Trunk Lines , and Verify that you are able to draw dial tone for each of these lines. 12. Set up a ringing pattern of your choice for each of these lines and test.")
129
Activity Number Eight Installing T1 Lines
13. In the Line-Trunk Line screens for , verify that the Incoming Type is set to “TIE”, the DID/TIE-Delete Digits is set to “O Digit”, Insert Dial is blank, and the Start Signal Type is “Immediate.” 14. Using the DID addresses provided at your work station, seize a Single-CO and make test calls to verify that the the extension that rings has the matching extension number of the last four digits of the number dialed. When other workstations are ready to receive test T1 DID type calls, make calls from workstation to workstation.

130
Activity Number Eight Installing T1 Lines
15. Change the ARS routing so that the T1 channels (Trunk Group 2) are seized as a first priority for outgoing calls, and the LCOT in trunk group 1 are seized as a second priority.
 are seized as a first priority for outgoing calls, and the LCOT in trunk group 1 are seized as a second priority.")
131
Activity Number Nine Utility and Diagnostics
Purpose: To become familiar with the process of running diagnostic tests and checking status and error logs 1. Run various diagnostic test 2. Check the error and status screens

Similar presentations


 Grants Chapter 6.>")

 Geometry (29%)>")