Download presentation
Presentation is loading. Please wait.

1
Photo: “Tulalip Bay” by Diane L. Wilson-Simon

2
BASIC ERGONOMICS Instructor: David Ellsworth Edmonds Community College
This course is being supported under grant number SH16637SH7 from the Occupational Safety and Health Administration, U.S. Department of Labor. It does not necessarily reflect the views or policies of the U.S. Department of Labor, nor does mention of trade names, commercial products, or organizations imply endorsement by the U.S. Government. With Thanks to & Cooperation of the Tulalip Occupational Safety & Health Administration (TOSHA)
")
3
INTRODUCTION

4
ERGONOMICS WHAT IS “ERGONOMICS”??” Ergos = work Nomos = laws
Ergonomics = the laws of work

5
ERGONOMICS What Does Ergonomics Mean?
Designing jobs, equipment, and work tasks to fit human physical characteristics and energy limitations It considers body dimensions, mobility, and the body’s stress behavior “Make the work fit the person, not the person fit the work”

6
ERGONOMICS Benefits of Ergonomics Include:
safer jobs with fewer injuries increased efficiency and productivity improved quality and fewer errors improved morale Ergonomics is a science that takes what we know about people’s capabilities and limitations, and applies that knowledge to the workplace. Ergonomics is a tool that employers can use to make jobs, workstations, and tools to fit the worker. Employers who have implemented ergonomics in their workplaces have found that it greatly reduces injury claims and costs. They’ve found other benefits as well, such as increased productivity and product quality, and improved morale among employees.

7
ERGONOMICS Ergonomic Goals:
Finding ways to make strenuous, often repetitive work, less likely to cause muscle and joint injuries -- and still get the job done. Keeping young bodies from wearing out prematurely, and mature bodies from giving out early.

8
ERGONOMICS Work-Related Musculoskeletal Disorders (WMSD) accounted for an average total of $410.3 million of worker’s compensation claims in the years
 accounted for an average total of $410.3 million of worker’s compensation claims in the years")
9
ERGONOMICS Enough People to Fill Safeco Field!!
This type of injury affects nearly 50,000 Washington workers each year Enough People to Fill Safeco Field!! It is estimated that the actual cost including lost taxes, wages, fringe benefits, administrative costs, etc. is close to $1.5 billion per year.

10
ERGONOMICS State Fund Claims - Statewide 1990-98*
Number of Claims Cost of Claims WMSDs All other claims WMSDs All other claims 26% 40% 74% 60% * Note: This data does not include lower extremity WMSDs. Source: SHARP Report No. 40-4a-2000

11
ERGONOMICS Nationally, almost 60% of all work-related illnesses are MSDs

12
The Problem is Widespread The Top 12 Standard Industrial Classifications (SIC)
Industry WMSDs per year 805 Nursing, Personal Care Facilities 2,177 421 Trucking and Courier Services (non-air) 1,591 541 Grocery Stores 1,486 152 General Bldg Contractors, Residential 1,361 174 Masonry, Tile, Plaster 703 445 836 Residential Care 242 Sawmills, Planing Mills 432 175 Carpentry, Floor Work 429 078 Landscape, Horticultural 420 451 Air Transportation, Air Courier 411 176 Roofing, Siding, Sheet Metal 388 177 Concrete Work 287 Total 10,130 These 12 SICs alone account for 20% of WMSDs Source: SHARP Report No. 40-4a-2000
 1, Grocery Stores. 1, General Bldg Contractors, Residential. 1, Masonry, Tile, Plaster Residential Care Sawmills, Planing Mills Carpentry, Floor Work Landscape, Horticultural Air Transportation, Air Courier Roofing, Siding, Sheet Metal Concrete Work Total. 10,130. These 12 SICs alone account for 20% of WMSDs. Source: SHARP Report No. 40-4a")
14
The Cost-Benefit Ratio Is Substantial
Statewide estimated annual costs saved by ergonomics prevention Statewide estimated annual costs to comply with the rule: $80 Million $340 Million The Estimated Savings to Business Is $4 for Every $1 Invested

15
REGULATIONS

16
ERGONOMICS Current Federal Law
OSHA: The federal law (OSHA Ergonomics Standard) was issued on November 14, and was scheduled to be effective on January 16, 2001
 was issued on November 14, 2000 and was scheduled to be effective on January 16,")
17
REGULATIONS Congress utilized the little known Congressional Review Act (CRA) to pass a joint resolution of disapproval of the new OSHA Ergonomics Standard with the Senate voting 56 to 44 on March 7 and the House voting 223 to 203 on March 8, 2001 President Bush signed the joint resolution on March 20, 2001
 to pass a joint resolution of disapproval of the new OSHA Ergonomics Standard with the Senate voting 56 to 44 on March 7 and the House voting 223 to 203 on March 8, President Bush signed the joint resolution on March 20,")
18
REGULATIONS The effect is that the OSHA Ergonomics Standard is REPEALED – There is no Federal Law!! NOTE: OSHA still has some regulatory “bite” in this area by virtue of the infamous “General Duty Clause” (OSHA Sec. 5(a)(1))
(1))")
19
OSHA General Duty Clause
REGULATIONS OSHA General Duty Clause Each employer “shall furnish to each of his employees employment and a place of employment which are free from recognized hazards that are causing or are likely to cause death or serious physical harm to his employees”

20
REGULATIONS What’s Next ?
Several interested parties including Labor Unions, Business and associations such as ASSE have been meeting with Secretary of Labor, Elaine Chao to formulate a new standard that will be acceptable to all stake-holders The federal ergonomics regulations are being proposed on an industry by industry basis

21
WORK-RELATED MUSCULOSKELETAL DISORDERS

22
ERGONOMICS Work-Related Musculoskeletal Disorders (WMSDs) are occupational disorders that involve soft tissues such as muscles, tendons, ligaments, joints, blood vessels and nerves
 are occupational disorders that involve soft tissues such as muscles, tendons, ligaments, joints, blood vessels and nerves.")
23
ERGONOMICS WMSDs are: Daily stress to anatomical structures that may occur when a person is exposed to certain high risk activities If the accumulating stress exceeds the body’s normal recuperative ability, inflammation of the tissue can follow Chronic inflammation may lead to the development of WMSDs May require weeks, months or years for development - and for recovery

24
ERGONOMICS What is The Musculoskeletal System?
The Musculoskeletal System includes the following: Bones – The load-bearing structure of the body Muscles- Tissue that contract to create movement Tendons – Tissues that connect muscles to bones Ligaments – Tissues that connect bones to bones Cartilage – Tissue that provides cushioning and reduces friction between bones Nerves – Communication system that links muscles, tendons and other tissue with the brain Blood Vessels – Tubes that circulate nutrients throughout the body

25
What Are Examples of WMSDs?
ERGONOMICS What Are Examples of WMSDs? Sprain – Overstretching or overexertion of a ligament that results in a tear or rupture of the ligament Strain – Overstretching or overexertion of a muscle or tendon Tendonitis – Inflammation of the tendon inside the sheath Tenosynovitis – Inflammation of the sheath around the tendon Carpal Tunnel Syndrome – Compression of the median nerve as it passes through the carpal tunnel in the heel of the hand

26
What are Examples of WMSDs?
ERGONOMICS What are Examples of WMSDs? Tennis elbow or Golfer’s elbow – Medical term is Epicondylitis – inflammation of the tendons at the elbow. Trigger Finger – Common term for tendonitis or tenosynovitis that causes painful locking of the finger(s) while flexing Pitcher’s Shoulder – Rotator cuff tendonitis – inflammation of one or more tendons at the shoulder White Finger – Medical term is Reynaud’s Phenomenon – constriction of the blood vessels in the hands and fingers Digital Neuritis – Compression of the nerves along the sides of the fingers or thumbs
 while flexing. Pitcher’s Shoulder – Rotator cuff tendonitis – inflammation of one or more tendons at the shoulder. White Finger – Medical term is Reynaud’s Phenomenon – constriction of the blood vessels in the hands and fingers. Digital Neuritis – Compression of the nerves along the sides of the fingers or thumbs.")
27
Injury in the making...

28
Ditto...

29
Anatomy of a Tendon

30
Tendonitis Tendon function: Micro tears of tendon occur daily
Transmit force from muscle to bone Micro tears of tendon occur daily Typically repair themselves With repeated loading repair is not adequate Pain / Inflammation

31
Anatomy of DeQuervain’s Tendonitis

32
What Causes DeQuervain’s?
Wringing washcloths, clothes Typing on the computer keyboard Cutting with scissors Sewing or pinching Stirring food for a long period of time Opening jars

33
Carpal Tunnel

34
Carpal Tunnel Best known MSD
Compression of the median nerve at the wrist Tunnel made up of nine flexor tendons and one peripheral nerve Numbness and tingling on the thumb side of the hand

37
Surgical Release of Tunnel

38
Tennis Elbow Syndrome

39
Micro-tearing at the Elbow

40
Overhead Lifting

41
Anatomy of the Shoulder

42
Reynaud’s Phenomenon or “White Finger”
Caused by operating vibrating machinery – especially in cold, damp weather

44
ERGONOMICS WMSDs are sometimes referred to using other unfamiliar terms such as : Cumulative Trauma Disorders – CTD Repetitive Trauma Disorders – RTD Repetitive Strain Injuries – RSI Repeated Motion Disorders – RMD Overuse Syndromes

45
Signs or Symptoms of WMSDs
ERGONOMICS Signs or Symptoms of WMSDs Painful joints Pain in wrists, shoulders, forearms, knees, etc. Pain, tingling or numbness in hands or feet Fingers or toes turning white Shooting or stabbing pains in arms or legs Back or neck pain Swelling or inflammation Stiffness Burning sensations Weakness or clumsiness in hands; dropping things

46
INCREASED RISK FACTORS

47
What is a “Caution Zone” job?

48
Look for These Indicators:
"Caution Zone" Look for These Indicators: Awkward Postures High Hand Force Highly Repetitive Motion Repeated Impact Heavy, Frequent or Awkward Lifting Moderate to High Hand-Arm Vibration Caution Zone

49
Awkward Postures "Caution Zone" Being in these work positions for
more than 2 hours total per day Hands above head Elbows above shoulder Back bent forward more than 30 degrees Neck bent more than 30 degrees Squatting Kneeling "Caution Zone"

50
Working with the Hands Above Head
For more than 2 hours per day "Caution Zone"

51
Working with the Elbows Above Shoulders
For more than 2 hours per day "Caution Zone"

52
Neck or Back Bent Forward More than 30º
For more than 2 hours per day Your head weighs 10 to 12 pounds, so it can be quite a strain to work with your neck bent. Neck posture is only covered by the rule if the worker is not able to vary his or her posture. Working with the neck bent like this is pretty common in inspection jobs, such as with this cherry sorter. It also is common in job such as: welding, microscope work, dental hygienists Your upper body is 60 percent of your total body weight, so like your neck holding up your head, it’s also a strain for your back to hold you in a bent over position for more than two hours per day, such as landscapers who work near ground level. Like neck posture, back posture is only covered if the worker is not able to vary his or her posture. "Caution Zone"

53
Neck or Back Bent Forward More than 30
For more than 2 hours per day "Caution Zone"

54
Neck or Back Bent Forward More than 30
For more than 2 hours per day "Caution Zone"

55
Squatting "Caution Zone" For more than 2 hours per day
Squatting is one alternative to bending at the back to get down low, and it’s fine to do for short periods of time. Unfortunately it creates a lot of pressure behind the knee cap and can cause knee injuries over time. Kneeling also is a risk factor for knee injuries, since it creates pressure both in front of and behind the knee cap. A lot of construction work requires kneeling for jobs like concrete finishing, carpentry, and carpet and floor laying. "Caution Zone"

56
Kneeling "Caution Zone" For more than 2 hours per day
Squatting is one alternative to bending at the back to get down low, and it’s fine to do for short periods of time. Unfortunately it creates a lot of pressure behind the knee cap and can cause knee injuries over time. Kneeling also is a risk factor for knee injuries, since it creates pressure both in front of and behind the knee cap. A lot of construction work requires kneeling for jobs like concrete finishing, carpentry, and carpet and floor laying. "Caution Zone"

57
High Hand Force "Caution Zone" More than 2 hours per day of:
Pinching 2 or more pounds weight or 4 or more pounds force Using a lot of hand force increases the risk for hand, wrist and elbow injuries, and in some cases shoulder injuries. Holding something between the tips of the fingers and the thumb is called a pinch grip. This type of grip uses very small muscles in the hand and wrist, so even holding something that weighs only 2 pounds can be a risk for injury if it’s done for more than 2 hours per day. Because you can’t get as good a grip with your fingertips as with your whole hand, you tend to use more force to hold onto something than just the weight of the object. For example, in order to hold onto a stack of paper that weighs two pounds, you actually have to use four pounds of grip force. Jobs involving pinch force of 4 pounds are also covered, even if the weight being handled is really low. An example would be an assembly job where one of the parts inserted are spring clips that require a pinch force of 4 pounds to open. When you grip something with your whole hand you’re able to use the larger muscles in your forearm, and this gives you a grip that’s five times stronger than a pinch grip. You’re also able to get a better grip so the amount of grip force you use is pretty much equal to the weight of the object you’re holding. Therefore, grip force only enters the caution zone if it’s 10 or more pounds of weight held or 10 or more pounds of force exerted, and it’s done for more than 2 hours per day. "Caution Zone"

58
High Hand Force "Caution Zone" More than 2 hours per day of:
Gripping 10 or more pounds weight or force Using a lot of hand force increases the risk for hand, wrist and elbow injuries, and in some cases shoulder injuries. Holding something between the tips of the fingers and the thumb is called a pinch grip. This type of grip uses very small muscles in the hand and wrist, so even holding something that weighs only 2 pounds can be a risk for injury if it’s done for more than 2 hours per day. Because you can’t get as good a grip with your fingertips as with your whole hand, you tend to use more force to hold onto something than just the weight of the object. For example, in order to hold onto a stack of paper that weighs two pounds, you actually have to use four pounds of grip force. Jobs involving pinch force of 4 pounds are also covered, even if the weight being handled is really low. An example would be an assembly job where one of the parts inserted are spring clips that require a pinch force of 4 pounds to open. When you grip something with your whole hand you’re able to use the larger muscles in your forearm, and this gives you a grip that’s five times stronger than a pinch grip. You’re also able to get a better grip so the amount of grip force you use is pretty much equal to the weight of the object you’re holding. Therefore, grip force only enters the caution zone if it’s 10 or more pounds of weight held or 10 or more pounds of force exerted, and it’s done for more than 2 hours per day. "Caution Zone"

59
Highly Repetitive Motion
Workers repeat same motion every few seconds for more than 2 hours per day with: neck shoulders elbows wrists hands "Caution Zone"

60
Highly Repetitive Motion
Intensive keying for more than 4 hours per day "Caution Zone"

61
Repeated Impact "Caution Zone" Using hands or knees as a hammer
more than 10 times per hour more than 2 hours per day "Caution Zone"

62
Repeated Impact "Caution Zone" Using hands or knees as a hammer
more than 10 times per hour more than 2 hours per day "Caution Zone"

63
Heavy, Frequent, or Awkward Lifting
Lifting objects more than: 75 lbs. once/day 55 lbs. more than ten times/day 10 lbs. more than twice/minute for more than 2 hours per day 25 lbs. above shoulders, below knees, or at arms length for more than 25 times/day Just about every job requires some lifting, but lifting only becomes a risk for injury if it’s heavy lifting, it the lifting is done frequently, or if it’s done in an awkward posture. For the caution zone, heavy lifting is any lift of 75 lbs or more once per day, or 55 lbs ten or more times per day. Frequent lifting is 10 lbs or more, more than twice per minute, for more than 2 hours per day. Awkward lifts are lifts of 25 lbs or more above the shoulders, below the knees, or out at arms’ length done more than 25 times per day. "Caution Zone"

64
Heavy, Frequent, or Awkward Lifting

65
Heavy, Frequent, or Awkward Lifting

66
Moderate to High Hand-Arm Vibration
Moderate Level more than 2 hours/day "Caution Zone"

67
Moderate to High Hand-Arm Vibration
High Level More than 30 Min/day "Caution Zone"

68
If the Employer Has “Caution Zone” Jobs, They Should:
Begin an employee awareness education program Analyze the workplace for hazards Reduce any hazards they find Employees in caution zone jobs (and their supervisors) need to be provided with general ergonomic awareness education. These jobs also need to be looked at in more depth to determine if they have hazards that require controls and to discover what is causing the hazards identified. If hazards are identified, they need to be reduced below the hazardous level, or to the degree feasible. We’ll talk more about hazard levels and feasibility later.
 need to be provided with general ergonomic awareness education. These jobs also need to be looked at in more depth to determine if they have hazards that require controls and to discover what is causing the hazards identified. If hazards are identified, they need to be reduced below the hazardous level, or to the degree feasible. We’ll talk more about hazard levels and feasibility later.")
69
Ergonomics Awareness Education Should:
Show the types, symptoms and impacts of WMSDs Show the importance of early reporting of symptoms Provide information on all “caution zone” risk factors Identify the hazards and measures to reduce them These are the specific elements listed in the rule that need to be covered in the ergonomics awareness education. Notice that information on all the caution zone risk factors is covered - this helps to make the education truly portable so that employees will be aware of different risk factors that may be present in any job they perform.

70
Hazard Zone Jobs

71
Analyzing Caution Zone Jobs for Hazards
Use a systematic method to look at: -physical demands -layout of work area -size, shape, and weight of objects handled The results will help to determine controls If you have employees whose jobs involve one or more of the risk factors we’ve talked about, then they are in the caution zone and they need to receive the awareness education. You also need to analyze these jobs to see if they are hazardous and need to be corrected. Your analysis needs to go beyond just whether or not there are risk factors, to try and find out what about the workplace or the job is creating the risk factors. Physical demands include the risk factors we’ve talked about, but also the pace of work, whether the tasks are all the same or if there’s variety, and how much recovery or rest time there is between tasks. Layout of the work area includes things like reaches, height of the workstation, chair, conveyor or whatever it is the employee works with or on to see if it is causing awkward postures. Things you need to analyze for lifting jobs are the size, shape and weight of objects being lifted. The point of this analysis is to see if a caution zone job is hazardous, and to help figure out the best way to control the hazard. For example, if the size and shape of a box requires workers to reach way out when lifting it, maybe a smaller box could be used. "Hazard"

72
Hazard Zone "Hazard" Risk factors become hazardous when:
-there is a longer duration of exposure -there is greater intensity -there is a combination of risk factors "Hazard"

73
FREQUENCY FORCE POSTURE The ERGONOMIC TRIANGLE "Hazard" THE GOAL IS
TO ELIMINATE AT LEAST ONE FROM EVERY TASK POSTURE "Hazard"

74
Awkward Postures "Hazard" Shoulders: Hands above Head
Elbows above shoulders For More Than 4 hrs/day "Hazard"

75
Awkward Postures "Hazard"
Shoulders Repetitive : raising >once/minute For More Than 4 hrs/day "Hazard"

76
Awkward Positions "Hazard" Neck
Bent >45° without support or ability to vary posture More than 4 hrs/day "Hazard"

77
Awkward Positions "Hazard" Back
Bent forward >30° Without support or ability to vary posture More than 4 hrs/day Bent forward >45° Without support or ability to vary posture More than 2 hrs/day "Hazard"

78
Awkward Positions Knees - Squatting More than 4 hrs/day "Hazard"

79
Awkward Positions Knees -kneeling More than 4 hrs/day "Hazard"

80
High Hand Force + "Hazard" Arms, Wrists, Hands
Pinching unsupported object 2 or more pounds/hand Or Pinching with force of 4 or more pounds/hand (1/2 ream of paper) + Highly repetitive motion More than 3 hrs/day "Hazard"
 + Highly repetitive motion. More than 3 hrs/day. Hazard")
81
High Hand Force + "Hazard" Arms, Wrists, Hands
Pinching unsupported object 2 or more pounds/hand Or Pinching with force of 4 or more pounds/hand (1/2 ream of paper) + Wrists bent in flexion 30° or more, or in extension 45° or more, or in ulnar deviation 30° or more More than 3 hrs/day "Hazard"
 + Wrists bent in flexion 30° or more, or in extension 45° or more, or in ulnar deviation 30° or more. More than 3 hrs/day. Hazard")
82
High Hand Force + "Hazard" Arms, Wrists, Hands
Pinching unsupported object 2 or more pounds/hand Or Pinching with force of 4 or more pounds/hand (1/2 ream of paper) + No other risk factors More than 4 hrs/day "Hazard"
 + No other risk factors. More than 4 hrs/day. Hazard")
83
High Hand Force + "Hazard" Arms, Wrists, Hands
Gripping an unsupported object 10 lbs or > per hand Or Gripping with force of 10 lbs or > per hand (clamping light duty jumper cables onto battery) + Highly repetitive motion More than 3 hrs/day High Hand Force "Hazard"
 + Highly repetitive motion. More than 3 hrs/day. High Hand Force. Hazard")
84
High Hand Force + "Hazard" Arms, Wrists, Hands
Gripping an unsupported object 10 lbs or > per hand Or Gripping with force of 10 lbs or > per hand (clamping light duty jumper cables onto battery) + Wrists bent in flexion 30° or more, or in extension 45° or more, or in ulnar deviation 30° or more More than 3 hrs/day "Hazard"
 + Wrists bent in flexion 30° or more, or in extension 45° or more, or in ulnar deviation 30° or more. More than 3 hrs/day. Hazard")
85
High Hand Force + "Hazard" Arms, Wrists, Hands
Gripping an unsupported object 10 lbs or > per hand Or Gripping with force of 10 lbs or > per hand (clamping light duty jumper cables onto battery) + No other Risk Factors More than 4 hrs/day "Hazard"
 + No other Risk Factors. More than 4 hrs/day. Hazard")
86
Wrists Bent Extension Ulnar Deviation Flexion

87
Tendonitis Risk Factors
Repetition Forceful exertion Awkward / sustained postures Mechanical Stress

88
Awkward / Sustained Postures
Neutral posture is the goal Built-up handles Avoid wrist deviation flexion / extension radial/ulnar deviation

89
Mechanical Stress

90
Highly Repetitive Motion
Neck, Shoulders, Elbows, Wrists, Hands Same motion every few seconds with little variation (Except Keying) + -No Other Risk Factors More than 6 hrs/day "Hazard"
 + -No Other Risk Factors. More than 6 hrs/day. Hazard")
91
Highly Repetitive Motion
Neck, Shoulders, Elbows, Wrists, Hands Same motion every few seconds with little variation (Except Keying) + -Wrists bent in flexion 30° or more, or in extension 45° or more, or in ulnar deviation 30° or more AND High, forceful exertions with the hands More than 2 hrs/day "Hazard"
 + -Wrists bent in flexion 30° or more, or in extension 45° or more, or in ulnar deviation 30° or more AND. High, forceful exertions with the hands. More than 2 hrs/day. Hazard")
92
Highly Repetitive Motion
Intensive Keying Awkward posture, including wrists bent in flexion 30 or more, or in extenson 45 or more, or in ulnar deviation 30° or more More than 4 hrs/day "Hazard"

93
Highly Repetitive Motion
Intensive Keying No Other Factors More than 7 hrs/day "Hazard"

94
Repeated Impact "Hazard" Hands More than 2 hrs /day
Using Hand (heel/base of palm) as a Hammer more than once per minute More than 2 hrs /day "Hazard"
 as a Hammer more than once per minute. More than 2 hrs /day. Hazard")
95
Repeated Impact "Hazard" Knees More than 2 hrs /day
Using Knee as Hammer more than once per minute More than 2 hrs /day "Hazard"

96
Heavy, Frequent, Awkward
Lifting "Hazard"

97
"Hazard"

98
Heavy, Frequent or Awkward Lifting
How many lifts For how many hours per day? per minute? hr. or less hr. to 2 hrs hrs. or more 1 lift every 2-5 mins lift every min lifts every min lifts every min lifts every min lifts every min lifts every min "Hazard"

99
Manual Handling "Hazard"
Manual handling is transporting or supporting a load by hands or bodily force - This includes: Lifting Carrying Putting down Pushing Pulling Moving Supporting "Hazard"

100
Hand-Arm Vibration "Hazard"

101
Hand-Arm Vibration "Hazard"
Step 1: Find the vibration value for the tool. (manufacturer or web site: or measure it yourself. The vibration value will be in units of meters per second squared (m/s²) - Using a hand-arm vibration graph find the point on the left side that is equal to the vibration value "Hazard"
 - Using a hand-arm vibration graph find the point on the left side that is equal to the vibration value. Hazard")
102
Hand-Arm Vibration "Hazard"
Step 2: Find out how many total hours per day the employee is using the tool and find that point on the bottom of the graph Step 3: Trace a line in from each of these two points until they cross "Hazard"

103
Hand-Arm Vibration "Hazard"
Example: An impact wrench with a vibration value of 12 m/s2 is used for 2½ hours total per day. Note: The caution limit curve (bottom) is based on an 8-hour vibration value of 2.5 m/s². The hazard limit curve (top) is based on an 8-hour vibration value of 5 m/s² "Hazard"
 is based on. an 8-hour vibration value of 2.5 m/s². The hazard limit. curve (top) is based on an 8-hour vibration value of 5 m/s². Hazard")
104
Hand-Arm Vibration "Hazard"
Step 4: If that point lies in the crosshatched “Hazard” area above the upper curve, then the vibration hazard should be reduced below the hazard level or to the degree technologically and economically feasible If the point lies between the two curves in the “Caution” area, then the job remains a “Caution Job” If it falls in the “OK” area below the bottom curve, then no further steps are necessary "Hazard"

105
Reducing Identified Hazards
Employers should reduce hazards to below hazard level, or to a degree technologically and economically feasible through: Engineering and administrative controls (preferred) and/or Individual work practices and PPE Employers might also consider reducing employee hours performing a particular task to lower the hazard of the job Hazards that are identified during the job analysis need to be reduced below the hazardous level or to the degree technologically and economically feasible. The hazardous level would be that level specified in the General Performance Approach method chosen or in Appendix B if the employer is using the Specific Performance Approach. We expect that in the large majority of situations there will be simple and affordable controls to reduce hazards, however the concept of feasibility recognizes there may be special situations where we may not yet know how to reduce the hazard below the hazardous level, or the control would not be economically possible for an employer. This feasibility issue is one we deal with in other safety and health rules too. Engineering or administrative controls such as changes to workstations and tools, process redesign to eliminate unnecessary steps, or job rotation are preferred hazard control methods. If these are not effective in reducing the hazards below the hazardous level, the employer needs to use individual work practices or personal protective equipment (if feasible) as interim measures to supplement the other hazard controls. The rule does not require an employer to replace full-time employees with part-time employees or otherwise reduce worker’s hours of employment to comply. "Hazard"
 and/or. Individual work practices and PPE. Employers might also consider reducing employee hours performing a particular task to lower the hazard of the job. Hazards that are identified during the job analysis need to be reduced below the hazardous level or to the degree technologically and economically feasible. The hazardous level would be that level specified in the General Performance Approach method chosen or in Appendix B if the employer is using the Specific Performance Approach. We expect that in the large majority of situations there will be simple and affordable controls to reduce hazards, however the concept of feasibility recognizes there may be special situations where we may not yet know how to reduce the hazard below the hazardous level, or the control would not be economically possible for an employer. This feasibility issue is one we deal with in other safety and health rules too. Engineering or administrative controls such as changes to workstations and tools, process redesign to eliminate unnecessary steps, or job rotation are preferred hazard control methods. If these are not effective in reducing the hazards below the hazardous level, the employer needs to use individual work practices or personal protective equipment (if feasible) as interim measures to supplement the other hazard controls. The rule does not require an employer to replace full-time employees with part-time employees or otherwise reduce worker’s hours of employment to comply. Hazard")
106
General ERGONOMIC SOLUTIONS

107
Illustrations from Ergonomic Checkpoints by the International Labour Organization (ILO), and Practical Ergonomics by the UAW-GM Ergonomics Task Force "Solutions"

108
ERGONOMICS Ergonomic hazards are prevented primarily by the effective design of a job or job-site and the tools or equipment used in that job Based on information gathered in the work-site analysis, procedures can be established to correct or control ergonomic hazards using either engineering controls or work practice controls

109
ERGONOMICS Thoughtful arrangements reduce stress and eliminate many potential injuries and disorders associated with the overuse of muscles, with bad posture, and with repetitive motion Some jobs expose workers to excessive vibration and noise, eyestrain, repetitive motion, and heavy lifting Machines, tools, and the work environment may be poorly designed, placing stress on workers' tendons, muscles, and nerves and in addition, workplace temperature extremes may aggravate or increase stress

110
ERGONOMICS Engineering Controls
Work stations should be ergonomically designed to accommodate the full range of required movements of a worker Sufficient space should be provided for the knees and feet Machine controls should be reachable and equally accessible by both right and left-handed operators Other factors to look at include hard or sharp edges, contact with thermally conducting work surfaces, proper seating, work piece orientation, and lay-out of the workstation

111
ERGONOMICS Engineering Controls
Attention must be given to the selection and designs of the tools used in the workplace to prevent the tools from having a negative effect Workers should be permitted to test tools in the actual work environment before purchasing new tools A variety of tool sizes should be available with consideration to handle sizes, right and left-handed workers, weight, center of gravity, and adequacy for gloved hands Engineering adaptations may be made to tools and tool handles

112
ERGONOMICS Work Practice Controls
Key elements of a good work practice program include instruction in proper work techniques, employee training and conditioning, regular monitoring, feedback, adjustments, modification, and maintenance After workers are trained in a particular work activity, such as proper lifting, they should be monitored to ensure that they continue to use the proper techniques Improper practices should be corrected to prevent injury

113
STAY FIT FOR THE JOB... "Solutions"
Abdominal muscles are most important muscles for preventing back strain/sprain/injury “C’mon! Keep those stomachs over the handle! Let the fat do the work!… That’s it!” "Solutions"

114
Stretching "Solutions" Prepares muscles to do work
Flexible muscles not easily injured Tight muscles easily injured Morning/After Lunch Stress Previous strain/sprain PRO ATHLETES RAILROAD MAJOR CONSTRUCTION CO. "Solutions"

115
Stretching PRO ATHLETES RAILROAD MAJOR CONSTRUCTION CO. "Solutions"

116
Stretching PRO ATHLETES RAILROAD MAJOR CONSTRUCTION CO. "Solutions"

117
"Solutions" 90-degree" posture:
Sit upright with your elbows, hips and knees bent at right angles and your feet flat on the floor or on a footrest This position is biomechanically correct, but it can fatigue your back muscles over time Fatigue can lead to slouching, even on a chair with lumbar support "Solutions"

118
"Solutions" Forward tilt posture:
Raise the height of your chair's seat a few inches and tilt the front of it downward about 8o This will open up your hip angle and allow you to support some of your weight using your legs rather than having it all rest on your hips and the backs of your thighs You may not find this posture comfortable if you have knee or foot problems, or if you feel like you are sliding off the front of the seat - A contoured chair seat can help to hold you in place "Solutions"

119
"Solutions" Reclining posture:
Lean back 10o - 20o into the chair's backrest and put your feet out in front of you to open up the angle at your hips and knees This helps relax your back muscles and promotes blood circulation Leaning back too far however, can result in an awkward neck posture when trying to keep your head upright "Solutions"

120
"Solutions" Standing posture:
Standing provides the biggest change in posture, and is a good alternative to prolonged sitting, which can aggravate low back injuries It can be fatiguing, however, so have a counter-height chair available at standing workstations, or use a height adjustable sit/stand workstation Also, prop one foot up on a low footrest occasionally to help shift your weight "Solutions"

121
ERGONOMIC INJURY FACTORS
Lesions to tendons of the neck, back, shoulders, arms, wrists or hands Primary causes: Repetitive movements over long periods of time Awkward postures Use of excessive forces "Solutions"

122
ERGONOMIC SOLUTIONS: POSTURE
NEUTRAL & COMFORTABLE: Wrists straight Shoulders relaxed with elbows close to body Head / shoulders & back in vertical alignment Frequent breaks when bent postures can’t be avoided "Solutions"

123
ERGONOMIC SOLUTIONS: REPETITION
Use automatic tools for repetitive tasks (screw and bolt tightening) Eliminate unnecessary tasks / movements by redesigning maintenance procedures and workstations Take short, frequent breaks Alternate tasks and processes to use different muscle groups "Solutions"
 Eliminate unnecessary tasks / movements by redesigning maintenance procedures and workstations. Take short, frequent breaks. Alternate tasks and processes to use different muscle groups. Solutions")
124
ERGONOMIC SOLUTIONS: HIGH REPETITION
Job Enlargement- More variety in tasks Mechanization –fit speed to safe work rate Work-to-Worker. Rather than lifting, turning, repositioning have work arrive at worker in right position. "Solutions"

125
ERGONOMIC SOLUTIONS: HIGH REPETITION
Job Enlargement Reduce Speeds Mechanical Assists / Positioning Jigs/vices to hold parts Move work to worker Voice-recognition software Macros Mini-Breaks Job Enlargement- More variety in tasks Mechanization –fit speed to safe work rate Work-to-Worker. Rather than lifting, turning, repositioning have work arrive at worker in right position. "Solutions"

126
ERGONOMIC SOLUTIONS: PROPER ALIGNMENT

127
Tools: Orientation to Work Surface
"Solutions"

128
Tools: Orientation to Work Surface
"Solutions"

129
JOB ANALYSIS "Solutions"

130
ERGONOMIC SOLUTIONS: HIGH HAND FORCE
Use clamps and fasteners Reduce weight of tool or object Redesign tool/user interface Look at Material Handling Alternatives Use Two Hands /Alternate Hands Sharp, well-maintained tools Alternate Positions/Tasks Idea is to reduce the force exerted. Look for ways to mechanically hold, lift, manipulate Remember drawbacks to weight reduction (increase vibration) Mat’l Handling alternatives. Rather than hand carrying items, use tool Hammer with either hand. Grip or pinch with both hands "Solutions"
 Mat’l Handling alternatives. Rather than hand carrying items, use tool. Hammer with either hand. Grip or pinch with both hands. Solutions")
131
Tool Handle Design

132
ERGONOMIC SOLUTIONS "Solutions"
Shoulder harness for landscaping tool to reduce hand forces "Solutions"

133
ERGONOMIC SOLUTIONS: REPEATED IMPACT
Use rubber mallets & padded tools Use levers Mechanical devices Mechanical devices – carpet stretcher rather than knee hammer "Solutions"

134
ERGONOMIC SOLUTIONS: HEAVY, FREQUENT, AWKWARD LIFTING
Reduce or Increase load weight, capacity Handholds, rigid containers Store objects 30” or more above floor Slides, gravity chutes Hoists, lifts, forklifts, Conveyors Reduce horizontal distance Handle items once Mobile racks, storage Arrange to avoid twist Increase weight – forces use of mechanical device, team lift, etc. Handholds – increase lifting capacity by 15% Horizontal distance – from pick-up point, to put down point, remove barriers, access obstacles "Solutions"

135
ERGONOMIC SOLUTIONS "Solutions"
Wallboard lifting system for installing drywall "Solutions"

136
ERGONOMIC SOLUTIONS "Solutions"
Lift assist device to eliminate heavy, awkward lifts in nursing homes and home health care "Solutions"

137
Smarter, Not Harder: Bend & Brace "Solutions" Repetitive Motion
Awkward Lifting Back Angle Gripping Smarter, Not Harder: Bend & Brace Common Work-Related Musculoskeletal Disorders Keep in mind, WMSDs are not diagnoses; they are work-related disorders with similar characteristics. Common WMSDs include: Tendonitis (also Tendinitis). This condition is an irritation (inflammation) of a tendon resulting from repeated force or stress on that muscle/tendon group. Lateral epicondylitis (tennis elbow). This condition is an irritation (inflammation) of the tendons attached on the outside of the elbow caused by activities that have jerky throwing motions or impact (e.g., turning a screwdriver). Medial epicondylitis (golfer's elbow).This condition is an irritation (inflammation) of the tendon attachments on the inside of the elbow resulting from activities that require repeated or forceful rotation of the forearm and bending of the wrist at the same time. Tenosynovitis. Tenosynovitis is an irritation (inflammation) of the tendon and the lining of the smooth sheath surrounding the tendon, resulting from repeated movement of the tendon in the sheath. Synovitis.Synovitis is an irritation (inflammation) of the inner lining of the membrane surrounding a joint or tendon. Stenosing tenosynovitis of the finger (trigger finger).This condition results from a tendon surface becoming irritated and rough. If the tendon sheath also becomes inflamed and presses on the tendon, a progressive constriction of the tendon can occur, resulting in a loss of free movement in that joint area. This disorder is commonly caused, for example, by repeated use of a staple gun or pair of pliers. de Quervain's disease.This "disease" is a stenosing tenosynovitis affecting the tendons on the radial side (e.g., thumb side) of the wrist. Constriction of these tendons pulls the thumb back away from the hand, causing severe pain and limited thumb movement or use. Raynaud's phenomenon (white finger or vibration syndrome).This "phenomenon" is caused by the reflexive constriction of the small arteries, which causes the fingers to become white (pale) and feel cold, numb, and tingly. This disorder may be caused, in part, by prolonged hand-arm vibration from powered hand tools. Thoracic outlet syndrome..This syndrome involves compression of the nerves and blood vessels between the neck and shoulder. Symptoms include numbness of the fingers and hand. Compression is due to various postures or activities, such as working with the arms above shoulder height and pulling the shoulders back and down. "Solutions"
. This condition is an irritation (inflammation) of a tendon resulting. from repeated force or stress on that muscle/tendon group. Lateral epicondylitis (tennis elbow). This condition is an irritation (inflammation) of the tendons. attached on the outside of the elbow caused by activities that have jerky throwing motions or. impact (e.g., turning a screwdriver). Medial epicondylitis (golfer s elbow).This condition is an irritation (inflammation) of the tendon. attachments on the inside of the elbow resulting from activities that require repeated or forceful. rotation of the forearm and bending of the wrist at the same time. Tenosynovitis. Tenosynovitis is an irritation (inflammation) of the tendon and the lining of the. smooth sheath surrounding the tendon, resulting from repeated movement of the tendon in the. sheath. Synovitis.Synovitis is an irritation (inflammation) of the inner lining of the membrane surrounding a. joint or tendon. Stenosing tenosynovitis of the finger (trigger finger).This condition results from a tendon. surface becoming irritated and rough. If the tendon sheath also becomes inflamed and presses on. the tendon, a progressive constriction of the tendon can occur, resulting in a loss of free movement. in that joint area. This disorder is commonly caused, for example, by repeated use of a staple gun. or pair of pliers. de Quervain s disease.This disease is a stenosing tenosynovitis affecting the tendons on the. radial side (e.g., thumb side) of the wrist. Constriction of these tendons pulls the thumb back away. from the hand, causing severe pain and limited thumb movement or use. Raynaud s phenomenon (white finger or vibration syndrome).This phenomenon is caused. by the reflexive constriction of the small arteries, which causes the fingers to become white (pale) and feel cold, numb, and tingly. This disorder may be caused, in part, by prolonged hand-arm. vibration from powered hand tools. Thoracic outlet syndrome..This syndrome involves compression of the nerves and blood. vessels between the neck and shoulder. Symptoms include numbness of the fingers and hand. Compression is due to various postures or activities, such as working with the arms above. shoulder height and pulling the shoulders back and down. Solutions")
138
JOB ANALYSIS "Solutions"

139
Manual Handling - Work Smarter Not Harder
Minimize the manual handling as much as possible. Plan your equipment/material drops Use hoists, carts, wheelbarrows Plan your lift. Check for: Ease of route, obstacles, adequate space "Solutions"

140
Choose the Right Tools "Solutions"

141
Harder, Not Smarter! Wrong Tool
"Solutions"

142
Choose the Right Tools "Solutions"

143
Choose the Right Tools "Solutions"

144
ERGONOMIC SOLUTIONS "Solutions" Using a carpet stretcher to
eliminate knee impacts "Solutions"

145
ERGONOMIC SOLUTIONS "Solutions" Redesign hand-tool
Reduce weight of tool Rotate jobs Use clamps or vises "Solutions"

146
ERGONOMIC SOLUTIONS: HAND TOOLS
The design of grips for hand tools can be crucial: Grip shape and size appropriate to the task and user Isolate cold temperature Keep wrist and elbow in a "neutral" position Eliminate sharp edges or pressure points Use two-handed grips (where possible) Attenuate vibration "Solutions"
 Attenuate vibration. Solutions")
147
Redesign the Work Station
"Solutions" Courtesy of UCDavis

148
Bring the load down or lift yourself
"Solutions"

149
Awkward Postures

150
Awkward Postures

151
Awkward Postures

152
Awkward Postures - Improvements

153
Awkward postures - Improvements

154
HAND-ARM VIBRATIONS (HAVS)
A disorder which affects the blood vessels, nerves and muscles of the hand, wrist and forearm Can be severely disabling Is better known as Vibration White Finger The term HAVS is used to describe any damage to the blood vessels, nerves or muscles that is caused by vibration. It is an encompassing title used to replace such terms as vibration white finger, drumstick finger and beat hand. Numbness in fingers is dangerous as dexterity is lost. Any injury to the finger may not be felt and the body is then much more susceptible to disease and infection as the blood circulation to the finger is lost and the bodies defence system cannot reach the affected area. "Solutions"

155
HAND-ARM VIBRATIONS "Solutions" Regular Maintenance
Balancers, isolators, damping material Tool Selection low-vibration tools Battery rather than pneumatic operated tools High power to weight ratio Low torque w/cutoff rather than slip-clutch Non-slip surface Contoured handles "Solutions"

156
Why talk about HAVS? "Solutions"
1 Million workers are exposed to high levels of vibration, of those 460,000 are estimated to be working in construction 242,000 cases of HAVS are reported every year Source HSE press release Press Release E218: November 1999. "Solutions"

157
What are the Symptoms? "Solutions"
Tingling and numbness in the fingers In the cold and wet, fingers go blue then red and are painful You can’t feel things with your fingers Pain or tingling in your forearms at night which stop you from sleeping Loss of strength in your arms and hands The symptoms are usually after exposure to vibration. When the fingers turn white blood flow is impaired and feeling is lost. As the blood returns the finger changes colour and becomes extremely painful. "Solutions"

158
What are the Symptoms? . Stage 1 is where the tips of the fingers turn white. This is the point where the operative should raise the issue with site management.

159
Who is at Risk? "Solutions"
Users of breakers and pokers, sanders and angle grinders Users of scabblers (to clean concrete) and needle guns Users of drills and jigsaws "Solutions"
 and needle guns. Users of drills and jigsaws. Solutions")
160
Who is at Risk? Those with a disease that reduces blood flow
Workers in cold and damp conditions "Solutions"

161
Who is at Risk? Workers using vibrating tools
Workers in contact with cold tools "Solutions"

162
How Can I Prevent it? "Solutions" Ask for low vibration tools
Try a different approach to your job Use the right tool for the job Keep blades and cutting edges sharp HAVS is such a big issue that many companies who manufacture tools now make them low vibration. It is also mandatory for information on vibration created by tools is made available by the supplier. The supplier has to provide the acceleration level of the tool expressed as m/sec2. The maximum exposure level is 2.8m/sec2 over 8 hours. An assessment should be carried out to ensure that staff are not exposed to high levels of vibration. This can be carried out by the safety department. "Solutions"

163
How can I Prevent it? "Solutions"
Check to ensure that the tool has been properly maintained Reduce the amount of time you use the tool Keep the handles warm Blunt blades and worn bearings can increase vibration in tools Machines that are defective or not working correctly should be changed or repaired. If possible reduce your exposure by job rotation, more or longer breaks ( not in the canteen, on different types of work!). Use tools with plastic handles, steel handles are cold and tend not to keep warm. Keep you hands warm to improve circulation, wear gloves and keep steel handles warm. "Solutions"
. Use tools with plastic handles, steel handles are cold and tend not to keep warm. Keep you hands warm to improve circulation, wear gloves and keep steel handles warm. Solutions")
164
How can I Prevent it? Improve your blood circulation by: "Solutions"
Keeping warm, wearing gloves etc. Giving up smoking - Smoking drastically impairs blood flow through the body Massaging and exercising fingers during work breaks Smoking significantly reduces the bloods ability to flow to the extremities of the body. In low temperatures the body attempts to keep the warm blood close the vital body organs such as the heart, lungs and kidneys etc. As a result the extremities of the body such as fingers and toes are starved of blood and sacrificed as part of the bodies defence mechanism. Keeping the whole body warm and the hands ensures better flow of blood to the extremities. Apparently placing your fingers in the warmest parts of your body when resting helps, such as your armpits and groin! "Solutions"

165
Prevention "Solutions" Low vibration tools
Use the right tool for the job Tool maintenance Reduce amount of time using the tool Keep hands & handles warm New approach to your job Anti-vibration gloves HAVS is such a big issue that many companies who manufacture tools now make them low vibration. It is also mandatory for information on vibration created by tools is made available by the supplier. The supplier has to provide the acceleration level of the tool expressed as m/sec2. The maximum exposure level is 2.8m/sec2 over 8 hours. An assessment should be carried out to ensure that staff are not exposed to high levels of vibration. This can be carried out by the safety department. Blunt blades and worn bearings can increase vibration in tools There are many styles and manufacturers of anti-vibration and impact gloves available on the market today -all with many different damping materials. Only gloves that are full finger in design should be considered “anti-vibration.” How do you know what to recommend to your employees? Proper glove selection largely depends on the type of job and the risk factors involved. The operation of a power tool requires an effective vibration-adsorbing material. The U.S. currently does not have a standard in place to test the effectiveness of anti-vibration gloves. However, the International standard ISO 10819, followed by Europe and most of Asia, offers an effective guideline for anti-vibration certification. If vibration damping is the main concern, then you should only recommend the full finger certified glove. Machines that are defective or not working correctly should be changed or repaired. If possible reduce your exposure by job rotation, more or longer breaks ( not in the canteen, on different types of work!). Use tools with plastic handles, steel handles are cold and tend not to keep warm. Keep your hands warm to improve circulation, wear gloves and keep steel handles warm. "Solutions"
. Use tools with plastic handles, steel handles are cold and tend not to keep warm. Keep your hands warm to improve circulation, wear gloves and keep steel handles warm. Solutions")
166
What Else Can I Do? "Solutions" Learn to Recognize the signs of HAVS
Stop work and report any symptoms to your supervisor immediately Use any control measures provided, i.e. gloves etc., that your employer has provided Ask for advice from your safety department or safety rep Not reporting HAVS will mean that the disease will only get worse. The fingers will eventually turn red then black. Infection can follow and in extreme circumstances fingers can be lost. Pain is severe and often felt only when resting. "Solutions"

167
Remember Once you have had an attack of HAVS, you will always be at risk (it is a chronic condition) Tell your supervisor as soon as you suspect any symptoms Treatment and understanding at an early stage is crucial. HAVS is a chronic condition which means that it cumulates over a period of time. White finger will not occur straight away but builds up and can creep up on people unless they are aware of the symptoms. It is a widely held opinion that many operatives detect the symptoms away from work and do not associate the problems with work activities and carry on until they can no longer work and drift away to other industries, or become so bad they never work again. "Solutions"

168
JOB ANALYSIS "Solutions"

169
JOB ANALYSIS "Solutions"

170
CARPAL TUNNEL SYNDROME
Occurs with repetitive motion of hands & wrists--especially with high force levels Incidence up to 15% in certain industries A “natural” keyboard and good wrist support can help most PC users avoid problems GOOD NEWS: Have dropped about 30% since which most attribute to strong workplace ergonomics programs "Solutions"

171
Computer Ergonomics "Solutions"
Routine PC user defined as spending 20 hours or more per week working at a computer Studies of PC users have not shown a risk of eye damage...although fatigue very possible NIOSH studies have not indicated a radiation hazard nor pregnancy risk from PC usage Workers using bi/tri-focal glasses before beginning PC use may need special purpose glasses for computer work "Solutions"

172
“NATURAL” KEYBOARDS "Solutions" Three types: 1. Fixed split
2. Adjustable split 3. “Sculptured” Awkward wrist postures minimized with 15 to 25 horizontal degree key split AND 8 to 66 degree vertical incline "Solutions"

173
“NATURAL” KEYBOARDS

174
“NATURAL” KEYBOARDS

175
“NATURAL” KEYBOARDS "Solutions" Key Layout Design Changes Have:
- increased comfort (81% of users) improved postures reduced muscle activity lowered carpal tunnel pressure in lab settings Obtained primarily to alleviate an injury "Solutions"
 improved postures. reduced muscle activity. lowered carpal tunnel pressure in lab settings. Obtained primarily to alleviate an injury. Solutions")
176
WRIST RESTS No medical evidence that they reduce Repetitive Strain Injuries...As they work for some, but not for others Usage Guidelines: Buy a rest that is even with top of keyboard Material should be “medium-soft” (foam--gel mix) so foam doesn’t break down - AVOID hard plastic types DON’T leave wrists on rest...which compresses carpal tunnel - Palm rest instead Changing typing habits more critical than wrist support MOST APPROPRIATELY USED TO REST HANDS DURING PAUSE IN TYPING LEARN TO TYPE CORRECTLY WITH “FLOATING WRISTS” FIRST!!! "Solutions"
 so foam doesn’t break down - AVOID hard plastic types. DON’T leave wrists on rest...which compresses carpal tunnel - Palm rest instead. Changing typing habits more critical than wrist support. MOST APPROPRIATELY USED TO REST HANDS DURING PAUSE IN TYPING. LEARN TO TYPE CORRECTLY WITH FLOATING WRISTS FIRST!!! Solutions")
177
Ergonomic chairs "Solutions" Adjustable back height
Adjustable arm rest **Chair on left NOT ergonomically designed "Solutions"

178
Alternative Pointing Devices
Track-balls “Scrolling” Mouse "Solutions"

179
Other Ergonomic PC Accessories
Height-adjustable articulating keyboard tray "Solutions"

180
"Solutions"

181
"Solutions"

182
"Solutions"

183
"Solutions"

184
"Solutions"

185
"Solutions"

186
"Solutions"

187
"Solutions"

188
"Solutions"

189
"Solutions"

190
"Solutions"

191
"Solutions"

192
Standard Layout Here is a standard layout, with the mouse at one side of the keyboard.

193
Wrist and Hand Issues

194
Posture: Orientation to Work
Elbows at 90° to 105° Whenever possible, unload your upper extremity

195
From the Top… Position keyboard relative to major functions
Minimize wrist deviation

196
Compression Avoid reaching up and over
Consider the wrist-rest as a transitional landing pad; not as the “bus stop” for your wrists

197
Wrist Positioning for Mousing…

198
Mouse – What it Does In order to operate the mouse while typing, the operator is frequently forced to reach forward or sideways, or even both at the same time In order to operate the mouse while typing, the operator is frequently forced to reach forward or sideways, or even both at the same time.

199
Mouse – Common Complaints
The main complaint is pain in the neck and shoulder region. This is due to reaching forwards and sideways. Repetitive movements are not so much to blame; rather it is the effort of holding one's arm with little or no support, often in an unnatural position, for a long time. Therefore our focus must be on eliminating or at least reducing the need to place one's forearm and hand to the side of the keyboard.

200
Mouse Platform Advantages of this platform:
Reduces side- and forward movements Reduces the overall area of mouse operation Disadvantages: The mouse is located slightly higher then the keyboard – this defect can be alleviated by using a slightly higher arm support.

201
Notice that reaching forwards and sideways is substantially reduced.
Mouse Platform Notice that reaching forwards and sideways is substantially reduced. Notice that reaching forwards and sideways is substantially reduced.

202
Keyboard with a Touch Pad
A keyboard with a touch pad for those applications that don’t require frequent and precise placement of the cursor Here is a keyboard with a touch pad for those applications that don’t require frequent and precise placement of the cursor.

203
Short Keyboard A narrower keyboard (14”) allows one to operate the mouse without side movements A narrower keyboard (14”) allows one to operate the mouse without side movements. A cordless mouse further minimizes discomfort, as one is not fighting a tangled cord all the time. The minor disadvantage of having to adjust to a slightly different key arrangement is well counterbalanced by substantially increased comfort.
 allows one to operate the mouse without side movements. A cordless mouse further minimizes discomfort, as one is not fighting a tangled cord all the time. The minor disadvantage of having to adjust to a slightly different key arrangement is well counterbalanced by substantially increased comfort.")
204
Where Else Can You Keep the Mouse?
Placing the mouse between the operator and the keyboard requires using cordless mouse Placing the mouse between the operator and the keyboard requires using cordless mouse. Individuals with shorter arms (and those who cannot get closer to the desk) may not benefit from such an arrangement.
 may not benefit from such an arrangement.")
205
Proof-Reading Here's a solution for proof-reading thick and heavy documents.

206
Targeting the Work Targeting of large objects can be performed at a distance > 15 inches Targeting of small objects need to be performed at 6-10 inches, ie., needle and thread

207
Targeting Your Computer…

208
Targeting Your Computer…

209
Glare…

210
Lighting Options…

211
Proper Seating

212
Upper Extremity Unloading

213
JOB ANALYSIS "Solutions"

214
JOB ANALYSIS "Solutions"

215
JOB ANALYSIS "Solutions"

216
JOB ANALYSIS "Solutions"

217
JOB ANALYSIS

218
JOB ANALYSIS

219
JOB ANALYSIS

220
MODEL COMPUTER WORKSTATION
Keyboard trays WITH wrist support Split "Natural" keyboards to facilitate neutral wrist angle Fully adjustable ergonomic chair Document holder to minimize head / eye & neck movements "Solutions"

221
MODEL COMPUTER WORKSTATION
Corner desk units to position monitor directly in front of employee Foot rest where requested Re-organization of working materials within employee arm reach Alternative pointing devices (e.g., scrolling mouse or trackball devices "Solutions"

222
BACK SAFETY & LIFTING

224
#1 Lifting Safely Back Injuries are the Nation’s
Workplace Safety Problem

225
Normal Curves of the Spine

226
Columns of Support Posterior column of support
made up of the facet column very stable reflects an upright posture Anterior column of support made up of body of vertebra and the disc less stable reflects a flexed posture

227
The Disc & Nerve Root The disc is the shock absorber of the spine
85% water at the age of 15 25% water at the age of 75

228
A Close-up Look

229
Forward Bending Too much spinal flexion
loads the anterior column of support places the posterior wall of the disc at risk has the potential for nerve root compromise

230
Balance the Curves

231
Cervical Spine Anatomy

232
The Process of Degeneration

233
Weight of the Head = 10-12 lbs.

234
Muscular support of the Neck

235
Up-right Neutral Posture

236
Forward Head Postures

237
Consider Elevation of Product

238
Safe Lifting A back injury costs an average of $11,645 in medical claims and lost time wages. National Safety Council Most back injuries can be prevented

240
* The Forces Involved 07/16/96 The amount of force you place on your back in lifting may surprise you! Think of your back as a lever - with the fulcrum in the center, it only takes ten pounds of pressure to lift a ten pound object. * 3##

241
* The Forces Involved 07/16/96 If you shift the fulcrum to one side, it takes much more force to lift the same object. Your waist acts like the fulcrum in a lever system, on a 10:1 ratio Lifting a ten pound object puts 100 pounds of pressure on your lower back * 4##

242
The Forces Involved When you add in the 105 pounds of the
* The Forces Involved 07/16/96 When you add in the 105 pounds of the average human upper torso, you see that lifting a ten pound object actually puts 1,150 pounds of pressure on the lower back! * 5##

243
The Forces Involved If you were 25 pounds overweight, it would add
* The Forces Involved 07/16/96 If you were 25 pounds overweight, it would add an additional 250 pounds of pressure on your back every time you bend over! * 6##

244
Common Causes of Back Injuries
* 07/16/96 Common Causes of Back Injuries Anytime you find yourself doing one of these things, you should think: DANGER! My back is at risk! Try to avoid heavy lifting . . Especially repetitive lifting over a long period of time * 7##

245
Common Causes of Back Injuries
* 07/16/96 Common Causes of Back Injuries Twisting at the waist while lifting or holding a heavy load this frequently happens when using a shovel. * 8##

246
Common Causes of Back Injuries
* 07/16/96 Common Causes of Back Injuries Reaching and lifting . . . over your head, across a table, or out the back of a truck * 9##

247
Common Causes of Back Injuries
* 07/16/96 Common Causes of Back Injuries Lifting or carrying objects with awkward or odd shapes * 10##

248
Common Causes of Back Injuries
* 07/16/96 Common Causes of Back Injuries Working in awkward, uncomfortable positions . . . * 11##

249
Common Causes of Back Injuries
* 07/16/96 Common Causes of Back Injuries Sitting or standing too long in one position sitting can be very hard on the lower back * 12##

250
Common Causes of Back Injuries
* 07/16/96 Common Causes of Back Injuries It is also possible to injure your back slipping on a wet floor or ice . . . * 13##

251
Prevent Back Injuries Avoid lifting and bending whenever you can
* Prevent Back Injuries 07/16/96 Avoid lifting and bending whenever you can Place objects up off the floor Raise/lower shelves. Use carts and dollies Use cranes, hoists, lift tables, and other lift-assist devices whenever you can Test the weight of an object before lifting by picking up a corner Get help if it’s too heavy for you to lift it alone * 14##

252
Prevent Back Injuries Use proper lift procedures
* 07/16/96 Prevent Back Injuries Use proper lift procedures Follow these steps when lifting . . . * 15##

253
STEP ONE Stand close to the load with your feet spread apart about shoulder width, with one foot slightly in front of the other for balance To evaluate a worker's lifting habits, consider the following variables: frequency of lifting, duration of such activities, and type of lifting, as well as the worker's state of health, body size, age and general physical fitness.

254
STEP TWO Squat down bending at the knees (not your waist). Tuck your chin while keeping your back as vertical as possible

255
STEP THREE Get a firm grasp of the object before beginning the lift

256
STEP FOUR Begin slowly lifting with your LEGS by straightening them - Never twist your body during this step.

257
STEP FIVE Once the lift is complete, keep the object as close to the body as possible. As the load's center of gravity moves away from the body, there is a dramatic increase in stress to the lumbar region of the back

258
Safe Lifting For those Awkward Moments...
If you must lift or lower from a high place: 1. Stand on a platform instead of a ladder 2. Lift the load in smaller pieces if possible 3. Push the load to see how heavy and stable it is 4. Slide the load as close to yourself as possible before lifting up or down 5. Get help when needed to avoid an injury

259
Safe Lifting From hard-to-get-at places...
Get as close to the load as possible Keep back straight, stomach muscles tight Push buttocks out behind you Bend your knees Use leg, stomach, and buttock muscles to lift -- not your back

260
Team lifting All participants should be of similar height, build and gender One person should take control of the lift, command attention, inform others and co-ordinate the lift Double the people DOES NOT MEAN double the capacity

261
If one person can lift 100 pounds:
How much can two people lift? Only 70 % or 140 pounds Percentages: 1 person = 100 lbs, wrongly presume 2 people = 200 Rather take the 200 * .70 = 140 lbs 3 person presume 300 lbs, Rather take the 300*.50 = 150 lbs. How much can three people lift? Only 50 % or 150 pounds

262
Q. Will wearing a back support belt increase my maximum lifting potential?
A. No. Manufacturers of back support belts do not claim they increase maximum lifting potential.

263
Job Analysis

266
* 07/16/96 Things You Can Do Minimize problems with your back by exercises that tone the muscles in your back, hips and thighs Before beginning any exercise program, you should check with your doctor * 18##

267
Exercise! Warm up slowly . . . A brisk walk is a good way to warm up
Exercise regularly, every other day Warm up slowly A brisk walk is a good way to warm up Inhale deeply before each repetition of an exercise and exhale when performing each repetition

268
Exercises To Help Your Back
* Exercises To Help Your Back 07/16/96 Wall slides to strengthen your muscles Stand with your back against a wall, feet shoulder-width apart. Slide down into a crouch with knees bent to 90 degrees Count to 5 and slide back up the wall - Repeat 5 times "Solutions" * 19##

269
Exercises To Help Your Back
* Exercises To Help Your Back 07/16/96 Leg raises to strengthen back and hip muscles . . . Lie on your stomach Tighten muscles in one leg and raise leg from floor Hold for count of 10, and return leg to floor Do the same with your other leg Repeat five times with each leg "Solutions" * 20##

270
Exercises To Help Your Back
* Exercises To Help Your Back 07/16/96 Leg raises to strengthen back and hip muscles . . . Lie on back, arms at your sides Lift one leg off the floor and hold for count of ten Do the same with the other leg Repeat 5 times with each leg If this is too difficult… keep one knee bent and the foot flat on the floor while raising the other leg "Solutions" * 21##

271
Exercises To Help Your Back
* Exercises To Help Your Back 07/16/96 Leg raises while seated ... Sit upright, legs straight and extended at an angle to floor Lift one leg waist high Slowly return to floor Do the same with the other leg Repeat 5 times with each leg "Solutions" * 22##

272
Exercises To Help Your Back
* Exercises To Help Your Back 07/16/96 Partial sit-up to strengthen stomach muscles . . Lie on back, knees bent and feet flat on floor Slowly raise head and shoulders off floor and reach both hands toward your knees Count to 10 Repeat 5 times "Solutions" * 23##

273
Exercises To Help Your Back
* 07/16/96 Exercises To Help Your Back Back leg swing to strengthen hip and back muscles Stand behind chair, hands on chair Lift one leg back and up, keeping the knee straight Return slowly Raise other leg and return Repeat 5 times with each leg "Solutions" * 24##

274
Exercises To Decrease the Strain on Your Back
* 07/16/96 Exercises To Decrease the Strain on Your Back Lie on back, knees bent, feet flat on floor Raise knees toward chest Place hands under knees & pull knees to chest Do not raise head Do not straighten legs as you lower them Start with 5 repetitions, several times a day "Solutions" * 25##

275
Exercises To Decrease the Strain on Your Back
* 07/16/96 Exercises To Decrease the Strain on Your Back Lie on stomach, hands under shoulders, elbows bent and push up Raise top half of body as high as possible Keep hips and legs on floor Hold for one or two seconds Repeat 10 times, several times a day "Solutions" * 26##

276
Exercises To Decrease the Strain on Your Back
* 07/16/96 Exercises To Decrease the Strain on Your Back Stand with feet apart Place hands in small of back Keep knees straight Bend backwards at waist as far as possible and hold for one or two seconds Repeat as needed "Solutions" * 27##

277
A FEW SOLUTIONS... "Solutions" Reduce manual material handling
Pre-Plan material drops Utilize material handling equipment Keep materials in “neutral zone” Equipment Use the right tool for the job Evaluate new tools for ergonomics Keep sharp & in good repair Use vibration dampening tools / gloves Reduce Duration Mini-breaks Multi-task Employee rotation/job share Preplan – ties to be delivered for a retaining wall. Arrange delivery at a location nearest the work area and oriented so they don’t need re-arranging. ½ at one end of the project, ½ at the other end. Or 1/3, 1/3, 1/3 Equipment – wheelbarrows, hoists, Neutral zone – self-adjusting carts, stacks on more than 1 pallet to reduce bending for lowest items "Solutions"

278
PRODUCTS SCISSORS LIFT TABLE 550 LB "Solutions"

279
Ergonomics at Work "Solutions" Risk of injury - Heavy lifting
These pictures show the difference between lifting and moving something heavy and awkward by hand (in this case a roll of carpet) and moving the same thing with the help of a co-worker and mechanical assistance (in this case a carpet dolly). You can see where lifting by hand might create a risk for back or shoulder injury. The science of ergonomics teaches us that using the dolly puts a lot less strain on the back and shoulders, and it’s also less tiring overall. The worker who gets help is a lot more likely to have a little energy left at the end of the day, and in the long run is a lot less likely to have injuries and miss work. Help may not always be available and it may not always be possible to use mechanical assistance. In some cases this type of help isn’t even needed. But when it is available and makes the job easier, then there’s no reason not to use it. Ergonomics can be as simple as using a dolly to move something instead of lifting by hand. Ergonomics is about making jobs easier and reducing the risk of injury. Risk of injury - Heavy lifting Cart reduces risk of injury "Solutions"
 and moving the same thing with the help of a co-worker and mechanical assistance (in this case a carpet dolly). You can see where lifting by hand might create a risk for back or shoulder injury. The science of ergonomics teaches us that using the dolly puts a lot less strain on the back and shoulders, and it’s also less tiring overall. The worker who gets help is a lot more likely to have a little energy left at the end of the day, and in the long run is a lot less likely to have injuries and miss work. Help may not always be available and it may not always be possible to use mechanical assistance. In some cases this type of help isn’t even needed. But when it is available and makes the job easier, then there’s no reason not to use it. Ergonomics can be as simple as using a dolly to move something instead of lifting by hand. Ergonomics is about making jobs easier and reducing the risk of injury. Risk of injury - Heavy lifting. Cart reduces risk of injury. Solutions")
280
Ergonomics at Work "Solutions"

281
Safe Lifting "Solutions" Up-right neutral posture
Posterior column of support Stable -- less risk of injury "Solutions"

282
Avoid Twisting "Solutions"

283
Awkward Positions "Solutions" Adjustability Raise Worker or Raise Work
Extending or Articulating Tools Tilt Tables Magnifiers Mirrors/Video for difficult access viewing Chest, Head, Arm supports Locate Objects w/in arms reach Alternate Positions/Tasks Adjustability: height, depth, ramps, footrests, Raise: ramps, seats, stools, ladders, scaffolds, Work: Tables, tilt tables, pallets Magnifiers: Head angle improvement Mirrors: Don’t have to crank neck to see (I.e. forklift drivers) "Solutions"
 Solutions")
284
It Costs Less to Be Safe Average Cost of Common WMSDs:
1. Low back: $6,000 2. Shoulder: $7,000 3. Elbow: $4,000 4. Wrist: $5,500 Average Cost of Common Controls: 1. Hydraulic lift: $600 2. Adjustable height workstation: $800 3. Powered screwdriver: $100 4. Assembly work positioner: $75

285
CREATING A COMPANY ERGONOMICS PROGRAM

286
WE ARE HERE TO SHARE IDEAS!
“Okay! I’ll talk! I’ll talk…. Take two sticks of approximately equal size and weight -- rub them together at opposing angles using short, brisk strokes…”

287
START WITH A STEERING COMMITTEE
Designated Safety Coordinators Field Supervision Who must be involved-- to make a positive impact in your company?

288
STEP ONE: THE “CAUTION ZONE” INVENTORY
Awkward Work Postures High Hand Force Highly Repetitive Motion Repeated Impact Heavy, Frequent or Awkward lifting Moderate to High Vibration

289
STEP TWO: EMPLOYEE AWARENESS
Education for affected employees Causes of musculoskeletal disorders Caution Zone Jobs of concern How to identify and prevent WMSDs Non-work related physical activities Promote physical fitness...

290
STEP THREE: ANALYSIS OF CAUTION ZONE JOBS
By the steering committee? By all field employees? By selected crafts or professions? Checklists or Pocket Cards? General or Specific Performance?

291
STEP FOUR: SET REASONABLE OBJECTIVES
“If we pull this off, we’ll eat like kings!”

292
STEP FIVE: GET EMPLOYEE INPUT & IDEAS
Changes in tools or equipment Use of ergonomic PPE Reducing the size & weight of loads Ideas for task variety or job rotation Remember the impact of peer pressure

293
Primitive Peer Pressure

294
STEP SIX: PRIORITIZE HAZARD REDUCTION
Senior management support is needed Consider cost/benefits of changes Assign trial teams and a trial schedule Reduce exposures below hazardous levels, or to the extent technologically and economically feasible

295
STEP SEVEN: COMPANY-WIDE APPLICATION
Discuss experiments at safety meetings Assign new equipment or procedures Encourage continuing suggestions Keep ergonomic awareness high at safety meetings, and during new employee orientation

296
WHAT ARE OTHER COMPANIES DOING?

297
TOOLS & RESOURCES WorkSafe Institute of Washington OSHA Website
Dept. of Labor & Industries The Internet – general information search Ergonomic Equipment Suppliers Training Materials & Consultants Other?

298
Discrimination & Retaliation are Illegal !
Employees have a legal right to report injuries and raise safety and health concerns without fear of retaliation or discrimination If an employee becomes disabled, an employer must still comply with the Americans with Disabilities Act (ADA) For ADA information, contact the federal Department Of Labor at or the Northwest Disability Business Technical Assistance Center at HELP-ADA For example, an employer cannot terminate an employee because he or she files a claim for worker's compensation or complains about safety or health hazards.
 For ADA information, contact the federal Department Of Labor at or the Northwest Disability Business Technical Assistance Center at HELP-ADA. For example, an employer cannot terminate an employee because he or she files a claim for worker s. compensation or complains about safety or health hazards.")
Similar presentations

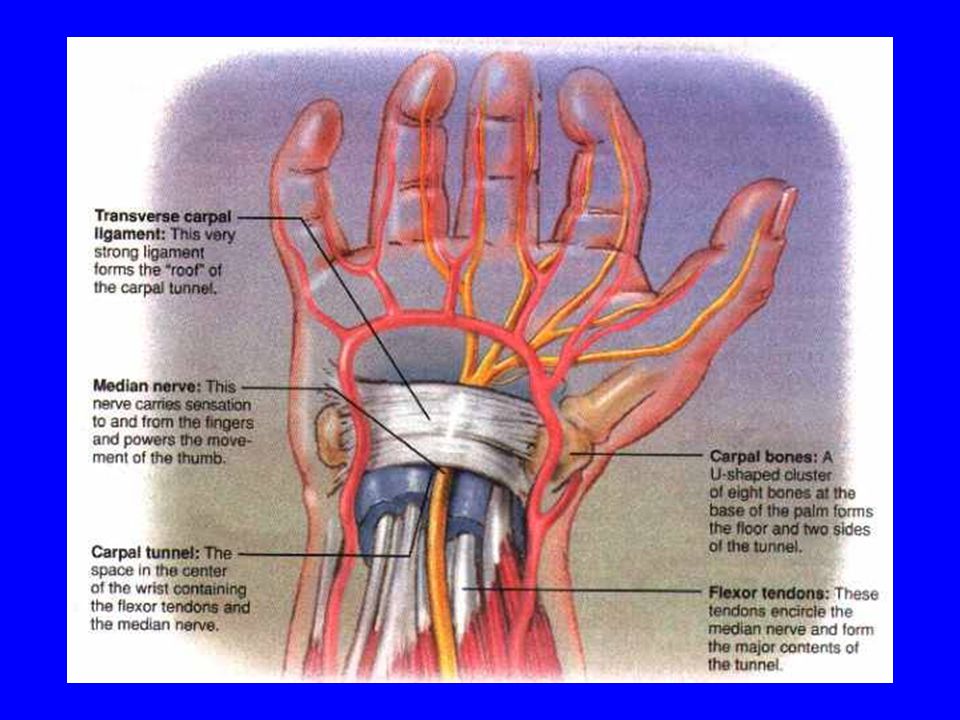


(1) of the OSH Act.>")


