Download presentation
Presentation is loading. Please wait.

1
WHAT IS THE SHORTEST DISTANCE BETWEEN TWO POINTS

2
OBJ ODA Straight Line? Not always Route Planning Considerations Rate of travel Special equipment Special training Distance / Time / Energy spent

3
SPECIAL FORCES QUALIFICATION COURSE PHASE 1A
BASIC LAND NAVIGATION SSG. Scott

4
REASON To become a Special Forces Soldier, you must be able to navigate cross-country using a map, compass, and protractor, under any conditions.

5
CLASSROOM CONDUCT If you have a question… ask it.
If you feel sleepy, stand up. No tobacco of any kind (SWC policy). Can drink. Wait till break to use bathroom.
. Can drink. Wait till break to use bathroom.")
6
MARGINAL INFORMATION AND TOPOGRAPHICAL SYMBOLS

7
OBJECTIVE Action: Use marginal information to determine technical specifications about the map and to identify features on the map. Condition: Given a 1:50,000 scale military map. Standard: IAW FM 21-26

8
REFERENCES FM MAP READING AND LAND NAVIGATION

9
REASONS The instructions for any particular map sheet are located in the upper and lower margins of a map. All military maps are not the same, therefore, these instructions must be read each time a different map sheet is used.

10
AGENDA Locate key marginal information on a military map.
Identify the five different colors used on a map and state what they represent.

11
SHEET NAME Sheet Name is located in two places. Center of upper margin. Left side of lower margin. Usually named for its outstanding cultural or geographic feature.

12
SHEET NUMBER Located in the upper right margin.
Used as a reference number for that map sheet.

13
SERIES NAME Located in the upper left margin along with the scale.

14
SERIES NUMBER Located in the upper right margin and the lower left margin.

15
EDITION NUMBER Located in the upper margin and the lower left margin.
Represents the age of the map in relation to other editions.

16
BAR SCALES Located in the center of the lower margin. They are rulers.
Used to convert map distance to ground distance.

17
ADJOINING SHEET DIAGRAM
Location varies with scale sizes. All military maps contain a diagram which illustrates the adjoining sheets.

18
INDEX TO BOUNDARIES Located in different places on different maps.
Shows the boundaries which occur within the map area.

19
GRID NOTE Located in the center of the lower margin.
Gives information about the grid system used, the interval of grid lines, and the number of digits omitted from grid values.

20
PROJECTION NOTE Located in the lower margin.
This projection system is the framework of the map.

21
GRID REFERENCE BOX Located in the center of the lower margin.
Contains the instructions for composing a grid reference.

22
VERTICAL DATUM NOTE Located in the center of the lower margin.
Designates the basis for all vertical control stations, contours, and elevations.

23
HORIZONTAL DATUM NOTE Located in the center of the lower margin.
Indicates the basis for all horizontal control stations.

24
LEGEND Located in the lower left margin.
Illustrates and identifies the topographic symbols used.

25
DECLINATION DIAGRAM Located in the lower margin.
Indicates the angular relationships of the true, grid, and magnetic north.

26
USER’S NOTE Located in the center of the lower margin.
Requests cooperation in correcting errors or omissions.

27
UNIT IMPRINT Located in the lower left margin.
Identifies the agency that printed the map and the printing date.

28
CONTOUR INTERVAL Located in the center of the lower margin.

29
SPECIAL NOTES AND SCALES
Various locations. Under certain conditions, special notes or scales may be added to the marginal information to aid the map reader.

30
CLASSIFICATION Located in the center of the upper and lower margins.
Certain maps require a note indicating the security classification.

31
STOCK NUMBER IDENTIFICATION
Located in the lower left margin. All military maps published by the Corps of Engineers have stock identifications. Used when requisitioning map supplies.

32
a Where is the sheet name found? Top center and lower left margin.
Where is the contour interval found? Center of the lower margin. Where is the declination diagram found? Lower margin. Where is the elevation guide found? Lower right.

33
TOPOGRAPHIC SYMBOLS Black Blue Green Brown Red

34
BLACK Used to indicate cultural or man-made features.
Buildings, roads, spot elevations.

35
BLUE Used to indicate water features.
Ponds, lakes, rivers, streams, intermittent streams.

36
GREEN Used to indicate vegetation. Woods, orchards, vineyards.

37
BROWN Used to indicate surface features. Contour lines.

38
RED Used to indicate type or use of man-made features.
Main roads and built up population areas.

39
QUESTIONS

40
OBJECTIVE Action: Use marginal information to determine technical specifications about the map and to identify features on the map. Condition: Given a 1:50,000 scale military map. Standard: IAW FM 21-26

41
AGENDA Locate key marginal information on a military map.
Identify the five different colors used on a map and state what they represent.

42
REVIEW Where is the grid reference box found?
Located in the center of the lower margin. Where is the contour interval found? Where is the declination diagram found? Located in the lower margin.

43
REVIEW What does black indicate? Cultural or man-made features.
What does blue indicate? Water features. What does green indicate? Vegetation. What does brown indicate? Contour lines. What does red indicate? Main roads, built-up areas.

44
REASONS To aid you in finding necessary information on the map sheet.
To aid you in interpreting symbols and colors on a military map.

45
BREAK

46
MILITARY GRID REFERENCE SYSTEM

47
OBJECTIVE Action: Determine an 8-digit grid coordinate within 10 meters, including the grid zone designator and 100,000 meter square. Condition: Given a 1:50,000 military scale map, protractor, pencil, and an unknown point. Standard: Within two minutes.

48
REFERENCE FM 21-26 - Map Reading and Land Navigation Chapter #4
Pages 4-1 through 4-18

49
REASON To become a Special Forces Soldier, you must be able to navigate cross-country using a map, compass, and protractor, under any conditions

50
AGENDA Explain Military Grid Reference System.
Determine Grid Zone Designator. Determine 100,000 Square Identifier. Determine a grid coordinate.

51
GEOGRAPHIC COORDINATES
PRIME MERIDIAN W E EQUATOR S

52
UNIVERSAL POLAR STEREOGRAPHIC GRID (UPS)
Letters: A, B, Y, and Z used. Each polar area is divided into two zones separated by the meridian.

53
UPS GRID ZONE DESIGNATOR
w Y Z A B 180 SOUTH POLE NORTH POLE E 18 0 Z Y B A SOUTH POLE NORTH POLE E W

54
UNIVERSAL TRANSVERSE MERCATOR (UTM)
Designed to cover a part of the world between latitude 84`N and latitude 80`S Consist of 60 zones Area cover by UTM grid system

55
UTM GRID cont. Each zone is 6 degrees wide by 8 degrees high and 6 degrees wide by 12 degrees high. Zones are numbered from west to east, 1-60, starting at the 180 degree meridian. This surface is divided into 20 east-west rows in which 19 rows are 6 degrees wide, 8 degrees high, and 1 row in the extreme north is 6 degrees wide, 12 degrees high.

56
UTM GRID cont. These rows are then lettered from S-N, C through X (letters O and I omitted). Any 6 degree by 8 degree, or 6 degree by 12 degree zone can be identified by giving the number and letter of the grid zone and row in which it lies. Read right then up. This combination of zone number and row letter constitutes the grid zone designation.

57
UTM GRID ZONE DESIGNATION (17S)
X S R UP E RIGHT D 4 5 16 17 53 54 55 56 57 58 59 60 C 1 2 3 180` 174` 168` 162` 180` 162` 168` 174`

58
100,000-METER SQUARE IDENTIFIER
Between 84 degrees N and 80 degrees S, each zone is covered by 100,000-meter square that is identified by the combination of two alphabetical letters.

59
UTM GRID ZONE 6 17S 8 180 174 168 162 156 100,000-METER SQUARE U R T T
WIDE 17S U R T Q T 8 HIGH S UP R P R S Q RIGHT P OR 6 WIDE BY 12 HIGH 180 174 168 162 156 N

60
100,000-METER SQUARE IDENTIFIER cont.
6 WIDE 17S PU RU SU U R T Q T PR RR SR 8 HIGH S PT RT ST UP R PQ RQ SQ P R S Q RIGHT P 180 174 168 162 156 O

61
100,000-METER SQUARE IDENTIFIER cont.
First letter is the column designation. Second letter is the row designation. 100,000-meter square identification letters are located in the grid reference box in marginal information on the map.

62
GRID ZONE DESIGNATION AND 100,000 METER SQUARE
IDENTIFICATION (17SPU) 84` 96` 90` TU XU GN PU YP CN BN TN GT 17S XN YN 16W BT CT TM XM CS GS YM BS TL XL GR YL CR BR TK XK GQ PK BQ CQ TJ CP GP XJ YJ BP
 84` 96` 90` TU. XU. GN. PU. YP. CN. BN. TN. GT. 17S. XN. YN. 16W. BT. CT. TM. XM. CS. GS. YM. BS. TL. XL. GR. YL. CR. BR. TK. XK. GQ. PK. BQ. CQ. TJ. CP. GP. XJ. YJ. BP.")
63
GRID COORDINATE SCALE Divides a grid square more accurately.
Designed to plot grid coordinates. GTA (1993)
")
64
GRID COORDINATE SCALE 1:50 scale subdivides the 1,000-meter grid block into 10 major sub-divisions. Each equal to 100 meters. Each 100 meter block is divided in half, equal to 50 meters.

65
GRID COORDINATE SCALE cont.
1:25,000-scale subdivides the 1,000-meter grid block into 10 major sub-divisions. Each equal to 100 meters. Each 100-meter block has five graduations, each equal to 20 meters.

66
READING COORDINATE SCALE
Place zero index line at lower left corner of grid square. Keep scale on lower horizontal grid line. Slide it right until the point for which the coordinates are desired, touches the edge of the scale.

68
READING COORDINATE SCALE cont.
Ensure that one side of the scale is horizontally aligned with the east-west grid line and that the other side of the scale is vertically parallel with the north-south grid line. Read right, then up.

69
READING COORDINATE SCALE cont.
The precision of a reference point is shown by the number of digits in the coordinate. 4 digit – 1,000 meter square 6 digit – nearest 100 meter 8 digit – nearest 10 meter 10 digit – nearest 1 meter

70
RECORD COORDINATES IN SEQUENCE
Grid Zone Designation 100,000-meter square identification Complete east and north coordinates Read right, then up.

71
RECORD COORDINATE IN SEQUENCE cont.
PU 100,000-M SQUARE IDENTIFICATION EIGHT DIGIT GRID GRID ZONE DESIGNATION 17SPU

72
PRACTICAL EXERCISE What is the 8 digit grid for the only building located in grid square 17SPU 23 78? 17SPU What is the 8 digit grid for the church in grid 17SPU 32 84? 17SPU What is located at 17SPU ? A school

73
PRACTICAL EXERCISE cont.
What is the 8 digit grid for BM in grid 17SPU 33 84? 17SPU What is located at 17SPU ? A mine Where are you standing if you are at grid 17SPU ? A six-way intersection

74
QUESTIONS

75
OBJECTIVE Action: Determine an 8-digit grid coordinate within 10 meters, including the grid zone designator and 100,000 meter square. Condition: Given a 1:50,000 military scale map, protractor, pencil, and an unknown point. Standard: Within two minutes.

76
AGENDA Explain Military Grid Reference System.
Determine Grid Zone Designator. Determine 100,000 Square Identifier. Determine a grid coordinate.

77
REVIEW The Military Grid Reference System is divided into two parts, what are they? UPS and UTM Where are the GEO coordinates taken from? Prime Meridian, Equator, and Reference Lines The UTM is divided into how many zones? 60 zones The UPS is divided into how many zones? 4 zones

78
REVIEW cont. What letters are used to identify the polar areas?
A, B, Y, and Z

79
REASON To become a Special Forces Soldier, you must be able to navigate cross-country using a map, compass, and protractor, under any conditions

80
BREAK

81
DIRECTION AND AZIMUTH

82
OBJECTIVE Action: Express an azimuth and back azimuth, convert a grid/magnetic azimuth, state a direction as a unit of angular measurement, determine a grid azimuth, and plot directions. Condition: Given a 1:50,000 military scale map, protractor, and pencil. Standard: IAW 21-26

83
REFERENCE FM Map Reading and Land Navigation

84
REASON To become a Special Forces Soldier, you must be able to navigate cross-country using a map, compass, and protractor, under any conditions

85
AGENDA Express an azimuth and back azimuth.
Convert a grid and/or magnetic azimuth. State a direction as a unit of angular measurement. Determine a grid azimuth. Plot directions on a military map.

86
ANGULAR MEASUREMENT Degrees Mils

87
DEGREES Most commonly used unit of measurement.
Sub-divided into minutes and seconds. 360 degrees in a complete circle.

88
EXPRESSING DIRECTION Start point. Point of reference.
These two points designate a base line or reference line.

89
BASELINES OR REFERENCES
Magnetic North Grid North True North

90
MAGNETIC NORTH Direction to the north magnetic pole.
Indicated by magnetic instrument. Symbolized by a half arrow.

91
GRID NORTH Established by vertical grid lines on a map.
Symbolized by the letters GN.

92
TRUE NORTH Line from any position on the earth’s surface to the North Pole. All lines of Longitude are True North lines. Symbolized by a star.

93
AZIMUTHS An azimuth is a horizontal angle measured in a clock-wise manner from a north baseline.

94
BACK AZIMUTH Reverse direction of an azimuth and is comparable to an about-face. If the azimuth is more than 180 degrees, subtract 180. If the azimuth is less than 180 degrees, add 180.

95
CONVERT TO BACK AZIMUTHS
84 degrees 172 degrees 263 degrees 356 degrees 264 degrees 352 degrees 83 degrees 176 degrees

96
DECLINATION DIAGRAM The declination diagram is located on most maps.
Declination is the angular difference between True North and either Magnetic or Grid North. The two types of declinations are: Magnetic and Grid.

97
GRID-MAGNETIC ANGLE (G-M ANGLE)
An arc indicated by a dashed line. Connects the grid and magnetic north prongs or baselines. Labeled with size of angle and year it was prepared. Where is the G-M Angle located on your map? What is the G-M Angle on your map?

98
CONVERTING AZIMUTHS Look at your Declination Diagram and read it !

99
G-M ANGLE Convert the following using the G-M Angle on your map.
45 degrees MAG 240 degrees MAG 359 degrees GRID 5 degrees Grid 37 degrees GRID 232 degrees GRID 7 degrees MAG 13 degrees MAG

100
PLOTTING DIRECTION B A E C F D

101
PLOTTING DIRECTIONS cont.
Place Start Point on the map. Place End Point on the map. A line connecting the two points. Place the center of the protractor over the start point. Make sure the protractor is aligned correctly. Read your grid azimuth. Convert grid to magnetic. Move out !

102
MOST COMMON MISTAKE The most common cause of failure while land navigating is improper plotting. Plot once and erase it. Re-read and re-plot, two more times. When you have the same plot three times, you know you are correctly plotted.

103
PRACTICAL EXERCISE Start Point: 17SPU 2146 9619
End Point: 17SPU What are the Grid and Magnetic azimuths? Grid – 206 degrees Magnetic – 214 degrees

104
PRACTICAL EXERCISE cont.
Start Point: 17SPU End Point: 17SPU What is the azimuth you are going to walk with your compass? 007 degrees MAG

105
PRACTICAL EXERCISE cont.
Start Point: 17SPU End Point: 17SPU What is the azimuth you are going to walk with your compass? 278 degrees MAG

106
QUESTIONS

107
OBJECTIVE Action: Express an azimuth and back azimuth, convert a grid/magnetic azimuth, state a direction as a unit of angular measurement, determine a grid azimuth, and plot directions. Condition: Given a 1:50,000 military scale map, protractor, and pencil. Standard: IAW 21-26

108
AGENDA Express an azimuth and back azimuth.
Convert a grid and/or magnetic azimuth. State a direction as a unit of angular measurement. Determine a grid azimuth. Plot directions on a military map.

109
REVIEW WHAT IS THE GM ANGLE ON YOUR MAP 8 DEGREES
TO CONVERT A MAGNETIC TO A GRID AZIMUTH WHAT DO YOU DO SUBTRACT THE GM ANGLE

110
REASON To become a Special Forces Soldier, you must be able to navigate cross-country using a map, compass, and protractor, under any conditions

111
BREAK

112
INTERSECTION AND RESECTION

113
OBJECTIVE Action: Locate an unknown point within 50 meters.
Condition: Given a 1:50,000 scale military map, protractor, straightedge, and a pencil. Standard: IAW

114
REFERENCES FM MAP READING AND LAND NAVIGATION

115
REASON To become a Special Forces Soldier, you must be able to navigate cross-country using a map, compass, and protractor, under any conditions

116
AGENDA map and compass method of intersection
straightedge method of intersection polar plot method modified resection.

117
INTERSECTION Intersection is the location of an unknown point by successively occupying two points and sighting on the unknown position.

118
ORIENT THE MAP Can be done two ways. Map method. Compass method.

119
MAP METHOD EXAMPLE

120
COMPASS MEHTOD EXAMPLE

121
MAP AND COMPASS METHOD OF INTERSECTION
Once you have oriented the map… Locate and mark your position on the map. Find the magnetic azimuth to the unknown point. Convert to a grid azimuth. Place the protractor on the map. Ensure the zero degree indicator is pointed to the top of the map.

122
MAP AND COMPASS METHOD OF INTERSECTION cont.
Place a tick mark on the azimuth from your location to the unknown point. Draw a light line on your map. Move to another known point and repeat the steps. The intersecting point of the lines is the unknown location.

123
INTERSECTION MAP AND COMPASS EXAMPLE
Known point A, 45 degree az. MAG Known point B, 320 degree az. MAG Unknown point. B A 17SPU

124
INTERSECTION MAP AND COMPASS PE
From: grid 17SPU BM 199.9 142 degrees MAG From: grid 17SPU Belford church 208 degrees MAG 17SPU

125
INTERSECTION MAP AND COMPASS PE cont.
Grid 17SPU degrees MAG Grid 17SPU degrees MAG 17SPU

126
STRAIGHTEDGE METHOD OF INTERSECTION
The straightedge method is used without a compass to find an unknown point. Orient the map by terrain. Lay the straightedge on the map. Use your position as a pivot point. Rotate the straightedge until it lines up with the unknown point. Draw a line. Move to another point and repeat the steps. Find the eight-digit grid to the intersecting lines.

127
RESECTION The method of locating one’s unknown position on a map.
Determine the grid azimuth to at least two known points.

128
RESECTION MAP AND COMPASS METHOD
Orient the map. Identify at least two locations on the ground and mark them on the map. Take a magnetic azimuth to these locations. Convert them to grid azimuths. Change to a back azimuth. Using the protractor, measure from the known position back to your location.

129
RESECTION MAP AND COMPASS METHOD cont.
Mark this on the map. Repeat this using a second known location. The intersection is your location. Find the eight digit grid.

130
MAP AND COMPASS RESECTION PE
From: grid 17SPU look out tower 207 degrees MAG From: grid 17SPU hill top 338 degrees MAG 17SPU

131
STRAIGHTEDGE METHOD OF RESECTION
Used to identify your location by orienting the map with terrain features, then using the straightedge to find your location.

132
STRAIGHTEDGE METHOD OF RESECTION cont.
Orient the map with the terrain. Locate two known points. Lay the straightedge on the map. Use the known point as a pivot point to line up with your position. Mark it on your map. Repeat these steps. The point where the lines intersect is your location. Record the eight digit grid coordinate.

133
MODIFIED RESECTION Needs only one known location to find your unknown position. You must be located on a linear terrain feature.

134
MODIFIED RESECTION cont.
Orient the map. Locate a known object. Determine the magnetic azimuth to the known point. Convert to a grid azimuth. Convert to a back azimuth. Plot the azimuth on your map from the known point to your position.

135
POLAR PLOT Used to locate an unknown point from your location.
You must know the distance to the unknown point.

136
QUESTIONS

137
OBJECTIVE Action: Locate an unknown point within 50 meters.
Condition: Given a 1:50,000 scale military map, protractor, straightedge, and a pencil. Standard: IAW

138
AGENDA map and compass method of intersection
straightedge method of intersection polar plot method modified resection

139
REVIEW What is a grid azimuth? What is a magnetic azimuth?
What is a back azimuth? What is intersection used for? What is resection used for? What is the objective of this class? Why is this important?

140
REASON To become a Special Forces Soldier, you must be able to navigate cross-country using a map, compass, and protractor, under any conditions

141
BREAK

142
ELEVATION AND RELIEF

143
OBJECTIVE Action: Determine the elevation of a point on a map.
Condition: Given a 1:50,000 scale military map, grid coordinate scale, and protractor. Standard: IAW FM 21-26

144
REASON To become a Special Forces Soldier, you must be able to navigate cross-country using a map, compass, and protractor, under any conditions

145
AGENDA Define elevation and relief.
Describe the five methods of depicting relief. Identify ten terrain features. Identify four types of slopes. Measure elevation on a map. Identify bench marks and spot elevations.

146
ELEVATION To measure elevation and relief, you need a reference point or start point. The start point is referred to as the datum plane or mean sea level. Mean sea level is the point halfway between high and low tide. Elevation is a point on the earth’s surface which is a vertical distance above or below mean sea level.

147
RELIEF The representation of the shapes of hills, valley, streams, and other terrain features on the earth’s surface.

148
RELIEF DEPICTING METHODS
Layer tinting Form lines Relief shading Hachures Contour lines

149
LAYER TINTING Shows relief by color. Legend depicts elevation.
Disadvantage of not knowing the exact elevations. High Medium Low 188 142 167 85

150
FORM LINES Indicated by dashed lines.
Are not measured from any datum plane. Have no standard elevation and are never labeled with elevations.

151
RELIEF SHADING AND HACHURES
Uses a shadow effect, a result of darkening one side of a terrain feature. The darker the shading the steeper the slope. May be used with contour lines. Hachures Short, broken lines used to show relief. May be used with contour lines. Don’t represent exact elevations. Primarily used on small scale maps.

152
CONTOUR LINES Most common method of showing relief.
Represents an imaginary line on the ground connecting points of equal elevation. The vertical distance between adjacent contour lines is known as? The contour interval.

153
TYPES OF CONTOUR LINES Index Every 5th line, heavier, and numbered.
Intermediate Fall between index lines, not numbered. Supplementary Dashed lines used for sudden elevation changes 1/2 the contour interval.

155
CONTOUR LINES Index Intermediate Supplementary
Contour interval is 20 meters 200 100

156
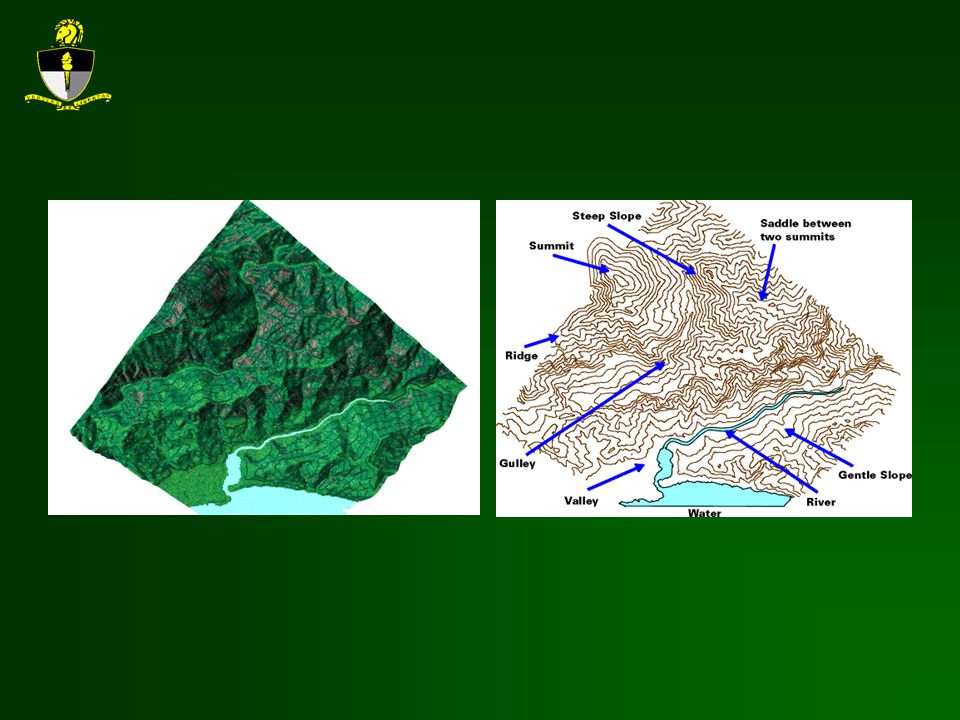
TERRAIN FEATURES Major Minor

157
MAJOR TERRAIN FEATURES
Hill Saddle Valley Ridge Depression

158
HILL Ground slopes down in all directions.
Contour lines form concentric circles.

159
SADDLE High ground in two opposite directions and lower ground in the other two directions.

160
VALLEY A stream course which consists of reasonably level ground bordered on the sides by higher ground.

161
RIDGE Slopes down in three directions and has high ground in one.
Contour lines are U or V shaped with the closed end pointing away from the high ground.

162
DEPRESSION A low point on the ground surrounded by higher ground on all sides.

163
MINOR TERRAIN FEATURES
Draw Spur Cliff Cut Fill

164
DRAW Less developed stream course than a valley.
Little or no maneuver room. Does not need water to be a draw.

165
SPUR A short continuous sloping line of higher ground, normally jutting out from the side of a ridge. Often formed by two roughly parallel stream cutting draws down the side of a ridge.

166
CLIFF A vertical or near vertical feature which is an abrupt change in the land.

167
CUT A man-made feature resulting from cutting through high ground to form a level bed for a road or railroad.

168
FILL A man made feature resulting from filling in low ground to form a level roadbed.

171
FOUR TYPES OF SLOPES Uniform Gentle Uniform Steep Concave Convex

172
UNIFORM GENTLE SLOPE Contour lines show a uniformed gentle slope, evenly spaced and wide apart. 100

173
UNIFORM STEEP Contour lines show a uniformed steep slope, evenly spaced and close together. 200 100

174
CONCAVE Contour lines are closer together at the top (steep), and wide apart at the bottom (gentle). 200 100

175
CONVEX Contour lines are wide apart at the top (gentle), and close together at the bottom (steep). 200 100

176
QUESTIONS

177
OBJECTIVE Action: Determine the elevation of a point on a map.
Condition: Given a 1:50,000 scale military map, grid coordinate scale, and protractor. Standard: IAW FM

178
AGENDA Define elevation and relief.
Describe the five methods of depicting relief. Identify ten terrain features. Identify four types of slopes. Measure elevation on a map. Identify bench marks and spot elevations

179
TERRAIN FEATURE REVIEW
HILL DRAW SPUR DEPRESSION SADDLE RIDGE FILL CUT VALLEY CLIFF

180
REASON To become a Special Forces Soldier, you must be able to navigate cross-country using a map, compass, and protractor, under any conditions

181
BREAK

182
MEASURING DISTANCE

183
OBJECTIVE Action: Measure distance on a map
Condition: In a classroom environment, measure straight and curved lined distance from two known points Standards: Measure straight and curved line distance from two known points within 50 meter accuracy

184
REFERENCE FM 21-26

185
REASON To become a Special Forces Soldier, you must be able to navigate cross-country using a map, compass, and protractor, under any conditions

186
AGENDA Graphic (Bar) Scale Measure Straight Line Distance
Measure Curved Line Distance Determine Exact Distance Read Extension Scale

187
GRAPHIC BAR SCALE

188
MEASURING STRAIGHT LINE DISTANCE
Lay a straight-edged piece of paper on the map so that the edge of the paper touches both points and extends past them. Make a tick mark on the edge of the paper at each point. Measure the distance between the points using the correct unit of measure on the bar scale

189
MEASURING STRAIGHT LINE DISTANCE

190
DETERMING STRAIGHT LINE DISTANCE WITH GRAPHIC (BAR) SCALE
 SCALE")
191
MEASURING CURVED DISTANCE
An 8 digit grid should be used for start and finish point Place a tick mark on the paper and map at the beginning point Align the edge of the paper along a straight portion and make a tick mark on both map and paper Continue to follow the road with the edge of the paper insuring to make tick marks on the map and paper.

192
MEASURING CURVED LINE DISTANCE

193
MEASURE CURVED LINE DISTANCE CONT.

194
DETERMINE DISTANCE Use correct unit of measure
Measure the distance between point A and B Remember to read from right to left when using the extension scale.

195
DETERMINING DISTANCE

196
DETERMINING EXACT DISTANCE

197
DETERMINE EXACT DISTANCE USING EXTENSION SCALE

198
EXTENSION SCALE CONT.

199
MEASURING DISTANCE PE What is the straight line distance in meters from BM in grid 17SPU 2180 to BM in grid 17SPU 2479 2950 meters What is the distance from BM 97.3 in grid 17SPU 2883 to the intersection located at 17SPU 4110 meters

200
QUESTIONS

201
OBJECTIVES Action: Measure distance on a map
Condition: In a classroom environment, measure straight and curved lined distance from two known points Standards: Measure straight and curved line distance from two known points within 50 meter accuracy

202
AGENDA Graphic (Bar) Scale Measure Straight Line Distance
Measure Curved Line Distance Determine Exact Distance Read Extension Scale

203
REVIEW Which way do you read the extension scale Right to Left
What size increments is the extension scale broken down into 10 meter increments Who is the best Land Navigation instructor in SFQC PH 1A SFC Lewis

204
REASON To become a Special Forces Soldier, you must be able to navigate cross-country using a map, compass, and protractor, under any conditions

205
BREAK

206
PACE AND DRIFT COURSE

207
PACE The pace course is broken down by 200, 100, and 50 meters.
The course is over wooded terrain. Will be conducted during daylight and evening hours.

208
PACE COURSE EXPLAINED A pace is considered two steps, usually starting with the left foot. If you start with the left foot (and you will), the pace is counted each time the right foot hits the ground. Starting at Point # 1, you will go out to the 200 meter mark (striped stake with 200 meters marked on it), turn and go back to the start point, keeping the TOTAL number of paces. The total number will then be divided by four to give you your pace count for 100 meters. The 100 and 50 meter markers are only there as reference points. (they are marked in the same manner as the 200 meter stake)
, the pace is counted each time the right foot hits the ground. Starting at Point # 1, you will go out to the 200 meter mark (striped stake with 200 meters marked on it), turn and go back to the start point, keeping the TOTAL number of paces. The total number will then be divided by four to give you your pace count for 100 meters. The 100 and 50 meter markers are only there as reference points. (they are marked in the same manner as the 200 meter stake)")
209
DRIFT Every soldier drifts left or right moving through the woods.
It is important to know if you drift left or right. By knowing which way you drift you know that you will almost always be to the left or to the right of your point.

210
PACE AND DRIFT COURSE 3rd PLT 2nd PLT 1st PLT

211
PACE AND DRIFT COURSE EXPLAINED
When you get to your assigned start point, read the plaque. The plaque will give you a distance in meters, and an azimuth which is a GRID azimuth (convert it). Follow the azimuth using your pace count to go the correct distance. When moving on azimuth, make sure you alternate right and left when going around obstacles.
. Follow the azimuth using your pace count to go the correct distance. When moving on azimuth, make sure you alternate right and left when going around obstacles.")
212
PACE AND DRIFT COURSE EXPLAINED cont.
Continue on azimuth until you get to the end of your pace count and stop. If you have not reached a stake, continue ON AZIMUTH until you get to a stake. If you have passed a row of stakes, take a back azimuth, back to the passed row and stop when you get to a stake. Write down the color and number of the stake, and again, read the plaque and follow the direction.

213
PACE AND DRIFT COURSE EXPLAINED cont.
Once you get to your fourth point (not counting your start point), go back to Point #1 in the lane.
, go back to Point #1 in the lane.")
214
PACE AND DRIFT COURSE 3 4 2 1

215
WHITE LANE EXPLAINED KNOW the color lane you left from.
The white lane has blue and red plaques. If you just came from the red lane, follow the instructions on the RED plaque. If you came from the blue lane follow the instructions on the BLUE plaque. Any questions?

216
Distance and Azimuth Walked
DRIFT Distance and Azimuth Walked Correct Distance and Azimuth

217
Distance and Azimuth Walked
DRIFT Correct Distance and Azimuth Distance and Azimuth Walked

218
ROADS / BOUNDARIES DUMP N

Similar presentations


 Blue -hydrography or water features (stream, river, lake, swamp,>")


>")