Download presentation
Presentation is loading. Please wait.

1
Workday Training Comp Changes and Costing

2
Four Main Objectives: Explain compensation and costing
Training Objectives Four Main Objectives: Explain compensation and costing Understand terms and concepts Compare processes Perform comp changes and costing

3
Agenda Review: position management, appointments, job changes
Expectations, Overview, and Navigation Request Compensation Change Assign Costing Allocation

4
Review: Position Management
Main BPs Create position Create job requisition Edit position/HC Edit position (or HC) restrictions Freeze/Close Position or HC Sub BPs Change Org Assignments Assign Costing Allocation Review and approve Key concepts/fields Types of positions: classified, group, student, informational HC group Job Classification Field Supervisory Organization: how to find a position Create position or job req: How to start the process What are the key fields Edit position/HC How to start What key fields are Edit position/HC restrictions What difference is between restrictions and edit position/HC Freeze/Close Position/HC What differences are Why to use
 restrictions. Freeze/Close Position or HC. Sub BPs. Change Org Assignments. Assign Costing Allocation. Review and approve. Key concepts/fields. Types of positions: classified, group, student, informational. HC group. Job Classification Field. Supervisory Organization: how to find a position. Create position or job req: How to start the process. What are the key fields. Edit position/HC. How to start. What key fields are. Edit position/HC restrictions. What difference is between restrictions and edit position/HC. Freeze/Close Position/HC. What differences are. Why to use.")
6
Assign Organizations Required field: Company.
Important Note: all Temps (temp and casual) need to have Not Students/Grads custom org applied! This can be done at the appointment level or as an independent process. Identify Cost Center for default costing.
 need to have Not Students/Grads custom org applied! This can be done at the appointment level or as an independent process. Identify Cost Center for default costing.")
7
Employee Create Position: All Fixed Term, Temporary, and Casual employee types require an Expected End Date for the position. It will not actually term them, however. This is for audit purposes. Create Headcount: It is also ok to have all of the Job Profiles from a Job Family in the headcount, an entry in the Job Profiles field is not necessary. However, to limit the actual titles to specific job codes/profiles, you may want to only select specific Job Profiles and not a Job Family.

8
The restriction options are the same for Create Position or Create Headcount.
Important: it will be up to the users to remember that Headcount positions are for temps, casuals, students, and some academics only.

9
Hiring Requirements vs.
After you fill out all fields, you can see/review the restrictions you have placed on the position (on left) or the HC group (on right).
 or the HC group (on right).")
10
Employee The next step in Create Position is Change Organization Assignments. Who performs this step depends on how your department has configured roles/security.

11
Manage position or HC freeze requires the same entries:
The reason The date The checkbox for Freeze Similarly, Close requires the same entries, except for the checkbox:

12
Review: Appointments Main BPs Sub BPs Key Concepts/Fields
Create applicant Hire Add job Sub BPs Propose Comp Assign Costing Change Org Assignments Assign Pay Group Key Concepts/Fields Name, Address, Phone, , SS# Job classifications Comp end date Cross Company/Pay Non-paid pay group Create Applicant: How to start the process: What are key fields to complete? How does onboarding use those fields? Hire and add job: How to start the process What are key fields

13
Create Applicant Critical:
Effective Date of applicant has to be greater than or equal to Hire Start Date or else you cannot hire. (note dates on position as well.) Legal Name, Country Code: has to be US. Downstream effects. Input home Address, Phone, and for onboarding, tax and benefits purposes. Phone: Area Code issue – put numbers in the appropriate places!
 Legal Name, Country Code: has to be US. Downstream effects. Input home Address, Phone, and for onboarding, tax and benefits purposes. Phone: Area Code issue – put numbers in the appropriate places!")
14
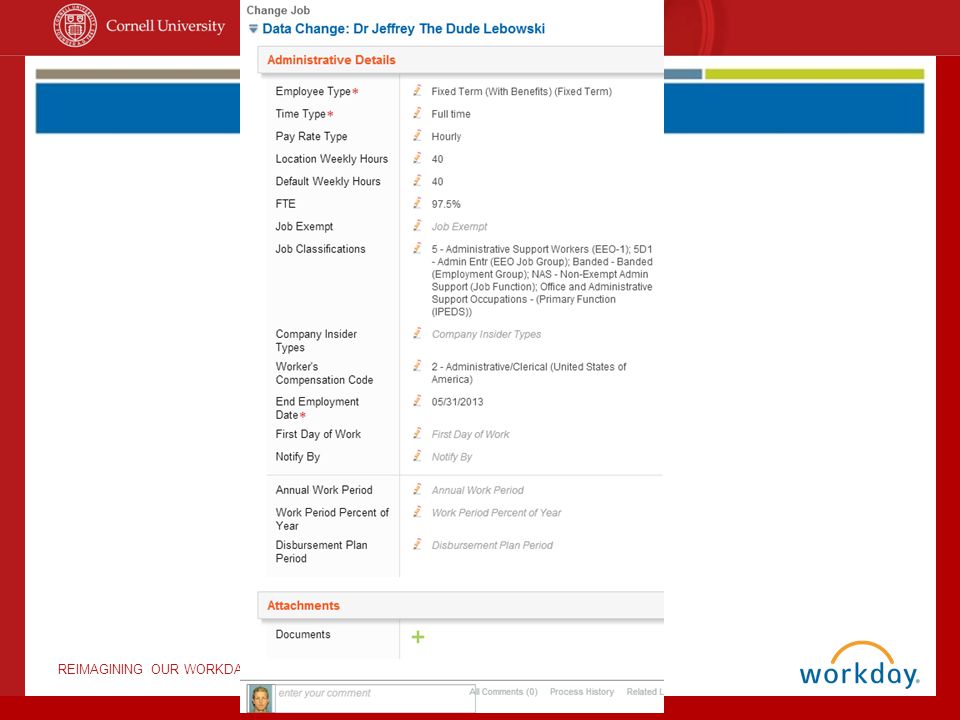
Hire and Add Job Very Important: the Job Classification field identifies CUFY Work Months, KRONOS information (need to keep the EMPL_RCD designation in unless they are transferred – this is critical for bi-weekly employees to get paid), Union employees, Federal work Study for student employees. Fields that drive benefits eligibility: the main field that drives benefits eligibility is employee-type. In combination with employee-type, other fields (namely, scheduled weekly hours and time type) inform Workday that a problem may exist, causing Workday to kick off a notice to benefits administration. For example, if the employee type said fixed-term with benefits but the term was only two months (i.e., not enough time to earn benefits), Workday would kick off a notice to benefits folks, who would then make an adjustment to correct the mistake. Thus, the management partner or hire initiator who assigns (or modifies) the employee type should be especially careful to select the appropriate field. See the attached screen shot for clarity. Fixed-term appointments: Yes, if an appointment has an end date, Workday will trigger a reminder (which goes to the management partner and, likely, the HR partner, too) that the appointment term is about to end. It does NOT actually term the employee. Positions that report to more than one manager: Yes, a position can report to more than one manager: At go-live: At go-live, this procedure is how we will manage folks who report to more than one manager. For Shared Departments and Research Centers, we will create another position for supervisors responsible for positions in both departments. The positions will be identified by new job profiles that need to be added to both PeopleSoft and Workday, prior to go-live: the job profile will be "Supervisor - Cross Unit" in the Job Family Group "Other" in a new Job Family called "Supervisor - Cross Unit" with appropriate Comp Grade for no pay. Job Code will come from the creation of the job profile in PeopleSoft. The positions will have the following attributes: 0 FTE, $0 Compensation, No pay paygroup, Job Profile = "Supervisor - Cross Unit.” (Note: these positions should NOT be entered into APDB.) The intent is to get these positions created prior to the snapshot, so that the positions are in the conversion and that campus will see people in the "right" supervisory orgs when we go live. For immediately after go-live, procedures are being developed for these situations when supervisors have employees in more than one org. After go-live: At some point after go-live, we will likely use a grouping feature in Workday called Matrix, but more details are needed. Location Weekly Hours - Displays the standard weekly hours associated with the worker's business site using the Create Business Site or Edit Business Site tasks. Leave as default Default Weekly Hours Defaults from weekly hours for the business site. Leave as 40 for exempt employees. For non-exempt employees change as necessary to 39 hours or hours that the employee will be working during a regularly scheduled week. Scheduled Weekly Hours Defaults from Default Weekly Hours - Leave as 40 for exempt employees. For non-exempt employees change as necessary to 39 hours or hours that the employee will be working during a regularly scheduled week. FTE - Scheduled Weekly Hours value divided by the Default Weekly Hours value; displays as percentage. Leave as default Company Insider Types - Leave blank Work Shift - Available work shifts are those defined for the location of the worker's position. This field is available and required if the Work Shift Required check box is selected on the Create Job Profile page for the worker's job or position. Leave Blank First Day of Work Defaults to hire date. Continuous Service Date Probation Start Date Enter the date on which the probation period begins. Leave blank Probation End Date Enter the date on which the probation period ends. End Employment Date Available only if the worker is assigned to an employee type reserved for Fixed Term Employees. Assign workers to a fixed term employee type in the Employee Type field. Enter for any category of Fixed Term Employees Benefits Service Date Enter the date on which the benefit enrollment begins. Company Service Date Enter the date on which employment begins. This can different than the hire date. Default Weekly Hours will default to 40 for all positions. Leave at 40 for exempt employees. For non-exempt employees, edit this number accordingly, i.e., change it to 20, 35, 39, or another appropriate number. Default Weekly Hours for Academic Admins should be 0. Workday compares the Scheduled Weekly Hours to the Default Weekly Hours to compute the employee’s FTE. For instance, if you set the Scheduled Weekly Hours to 39 and leave the Default Weekly Hours at 40, the FTE will read 97.5%, a number that may (or may not) be correct. Update the Default Weekly Hours and Scheduled Weekly Hours to accurately reflect FTE.
, Union employees, Federal work Study for student employees. Fields that drive benefits eligibility: the main field that drives benefits eligibility is employee-type. In combination with employee-type, other fields (namely, scheduled weekly hours and time type) inform Workday that a problem may exist, causing Workday to kick off a notice to benefits administration. For example, if the employee type said fixed-term with benefits but the term was only two months (i.e., not enough time to earn benefits), Workday would kick off a notice to benefits folks, who would then make an adjustment to correct the mistake. Thus, the management partner or hire initiator who assigns (or modifies) the employee type should be especially careful to select the appropriate field. See the attached screen shot for clarity. Fixed-term appointments: Yes, if an appointment has an end date, Workday will trigger a reminder (which goes to the management partner and, likely, the HR partner, too) that the appointment term is about to end. It does NOT actually term the employee. Positions that report to more than one manager: Yes, a position can report to more than one manager: At go-live: At go-live, this procedure is how we will manage folks who report to more than one manager. For Shared Departments and Research Centers, we will create another position for supervisors responsible for positions in both departments. The positions will be identified by new job profiles that need to be added to both PeopleSoft and Workday, prior to go-live: the job profile will be Supervisor - Cross Unit in the Job Family Group Other in a new Job Family called Supervisor - Cross Unit with appropriate Comp Grade for no pay. Job Code will come from the creation of the job profile in PeopleSoft. The positions will have the following attributes: 0 FTE, $0 Compensation, No pay paygroup, Job Profile = Supervisor - Cross Unit. (Note: these positions should NOT be entered into APDB.) The intent is to get these positions created prior to the snapshot, so that the positions are in the conversion and that campus will see people in the right supervisory orgs when we go live. For immediately after go-live, procedures are being developed for these situations when supervisors have employees in more than one org. After go-live: At some point after go-live, we will likely use a grouping feature in Workday called Matrix, but more details are needed. Location Weekly Hours - Displays the standard weekly hours associated with the worker s business site using the Create Business Site or Edit Business Site tasks. Leave as default. Default Weekly Hours. Defaults from weekly hours for the business site. Leave as 40 for exempt employees. For non-exempt employees change as necessary to 39 hours or hours that the employee will be working during a regularly scheduled week. Scheduled Weekly Hours. Defaults from Default Weekly Hours - Leave as 40 for exempt employees. For non-exempt employees change as necessary to 39 hours or hours that the employee will be working during a regularly scheduled week. FTE - Scheduled Weekly Hours value divided by the Default Weekly Hours value; displays as percentage. Leave as default. Company Insider Types - Leave blank. Work Shift - Available work shifts are those defined for the location of the worker s position. This field is available and required if the Work Shift Required check box is selected on the Create Job Profile page for the worker s job or position. Leave Blank. First Day of Work. Defaults to hire date. Continuous Service Date. Probation Start Date. Enter the date on which the probation period begins. Leave blank. Probation End Date. Enter the date on which the probation period ends. End Employment Date. Available only if the worker is assigned to an employee type reserved for Fixed Term Employees. Assign workers to a fixed term employee type in the Employee Type field. Enter for any category of Fixed Term Employees. Benefits Service Date. Enter the date on which the benefit enrollment begins. Company Service Date. Enter the date on which employment begins. This can different than the hire date. Default Weekly Hours will default to 40 for all positions. Leave at 40 for exempt employees. For non-exempt employees, edit this number accordingly, i.e., change it to 20, 35, 39, or another appropriate number. Default Weekly Hours for Academic Admins should be 0. Workday compares the Scheduled Weekly Hours to the Default Weekly Hours to compute the employee’s FTE. For instance, if you set the Scheduled Weekly Hours to 39 and leave the Default Weekly Hours at 40, the FTE will read 97.5%, a number that may (or may not) be correct. Update the Default Weekly Hours and Scheduled Weekly Hours to accurately reflect FTE.")
15
Change Personal Info DOB required (for duplicate checking?) Ask Karen Darling for best practice.
 Ask Karen Darling for best practice.")
16
Edit Government IDs

17
Review: Job Change Main BPs Sub BPs Key Concepts/Fields
General job changes Transfer/promote/lateral Switch primary job Phased retirement Sub BPs Review by current MP and proposed MP Propose Comp Assign Costing Change Org Assignments Assign Pay Group Key Concepts/Fields Differences: edit pos, job change, edit pos restrictions Differences: transfer/promo/lateral Phased retirement: 5 fields to change Job classifications Comp end date Differences: What does job change do? Position or person in position? What is similar to job change: edit position or edit position restrictions? What does edit position restrictions do? General job changes How to start What reason to choose Which fields are important Transfer/Promote/Lateral Which fields are key Switch primary job When to use Who monitors and approves Phased retirement What fields are key What sub BP is critical

18
Job Change

22
Agenda Review: week 1, 2, 3 Expectations, Overview, and Navigation
Request Compensation Change Assign Costing Allocation

23
Access Roles affect workflow Ownership Comp and Costing Workday
Expectations Workday Access Ownership Comp and Costing Roles affect workflow Processes and procedures will be different in Workday. Some will be easier, some will be more challenging. Focus on trying to understand how to complete BPs in Workday, not “what ifs” or “they’ll never do this the right way.” Keep comments constructive and positive. Shift in culture – continue quality, however, since “data-at-source” there is more emphasis – quality checks, accountability. HRIS will continue to support quality control, via audits, reports, etc.

24
Overview: Terms & Procedures
Compensation Changes Relationship of comp and costing Pay periods Additional pay (allowances) Costing Allocation Costing allocation = labor distribution Default Cost Center: position Position-level vs. Worker-level costing WD: % & Pay Period PS: Day & Dollar The decision was that, if the appointment was less than a year, we would divide annual amount by 24 and provide that amount in comp field w/ the start and end dates and use “SEMI”… And also, when a transaction gives an “ACTUAL” amount, we need to inflate to an annual amount and divide by 24 to get the semi rate. I noticed in a couple of the blackout entry transactions, we had comp variances because an actual amount was entered as “ANNUAL” rather than doing the calculation and entering as semi.
 Costing Allocation. Costing allocation = labor distribution. Default Cost Center: position. Position-level vs. Worker-level costing. WD: % & Pay Period. PS: Day & Dollar. The decision was that, if the appointment was less than a year, we would divide annual amount by 24 and provide that amount in comp field w/ the start and end dates and use SEMI … And also, when a transaction gives an ACTUAL amount, we need to inflate to an annual amount and divide by 24 to get the semi rate. I noticed in a couple of the blackout entry transactions, we had comp variances because an actual amount was entered as ANNUAL rather than doing the calculation and entering as semi.")
25
http://impl.workday.com/cornell3 Overview: Navigation
Ask questions to ensure that the trainees can accomplish these objectives: Find costing allocation on a worker Use the “Worker Costing Allocation by Employee” report Reports: CU Costing Allocation by Worker All workers Costing Allocation Here’s some others. I highlighted the one I think would also be good: All Position Restrictions Costing Allocations *Payroll Costing by Organization Worker Costing Allocation Missing Organization

26
Agenda Review: week 1, 2, 3 Expectations, Overview, and Navigation
Request Compensation Change Assign Costing Allocation

27
Request Comp Change: Workflow of BP
Management Partner Initiates the comp-change request Compensation Finance Partner Assigns costing (Labor Distribution) HR Partner Reviews/Approves the initiation
 HR Partner. Reviews/Approves the initiation.")
28
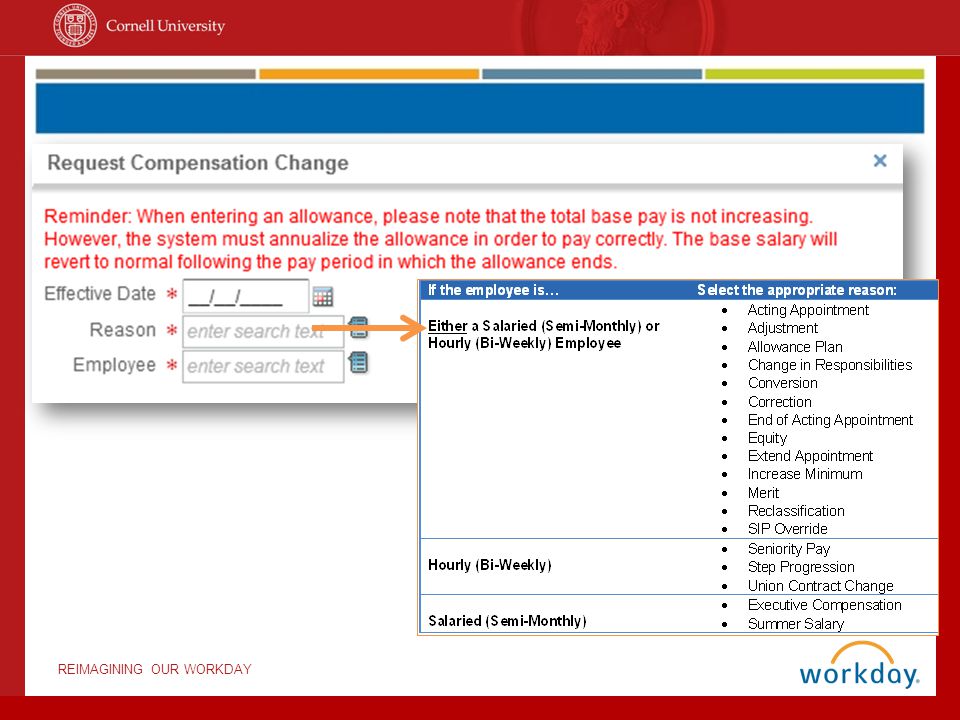
Request Comp Change: Types

29
Request Comp Change: Types
Guidelines Compensation package Job profile drives grade and grade profile Salary plans Acting Appointment Administrative Add-on Executive compensation Summer salary Hourly plans Hourly plan Allowance plans Auto allowance Cell phone Parental leave Summer session

30
Request Comp Change: Salary Plans
Use semi-monthly options Salary for fewer than 12 months Inflate to annual amounts Actual amounts

31
Staff compensation data: who can view it?

34
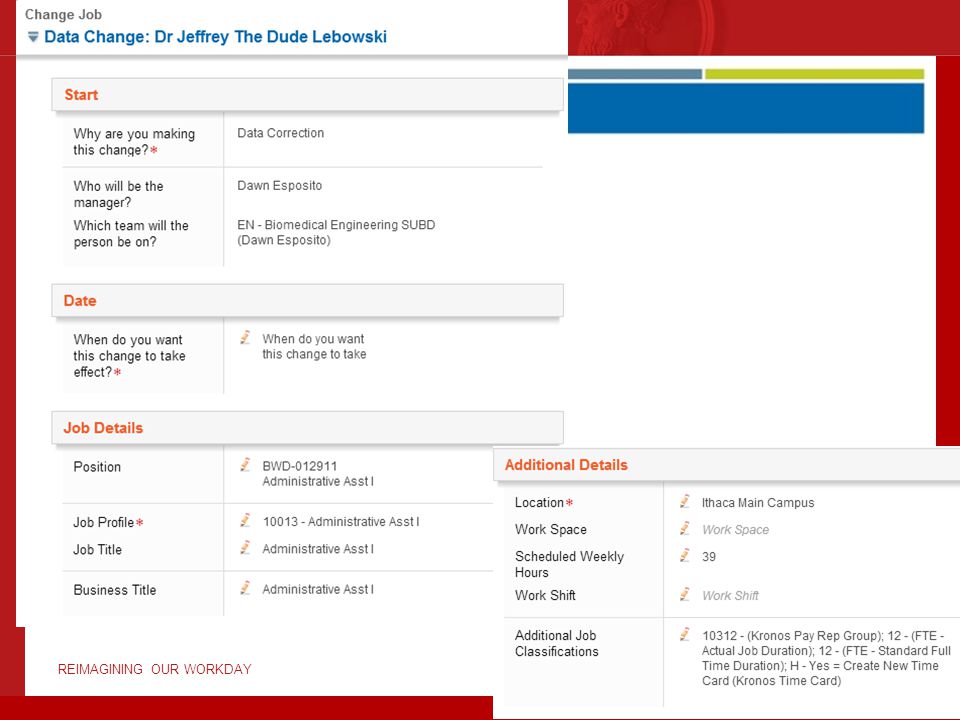
Employee

37
Notice that, when we fill in the amount, the percent change and amount change fields automatically update. Important Note: Workday displays an annualized compensation amount for salaried employees, regardless of the length of the appointment. Entering the correct start and end compensation dates ensures proper payment.

38
Expected End Date for comp ONLY effects (stops) Exempt employee’s pay – there is no effect on hourly employees. Best practice is to have this date match the End Employment Date on the position.

39
When you click outside of the hourly plan field, the page updates to reflect your changes.

40
Employee Employee Note that this screen depicts the Costing kicking off immediately after submission of the Request. This is due to the user having BOTH MP and CFP roles. This may route to someone else. Check Process tab.

41
Try it!

42
Agenda Review: week 1, 2, 3 Expectations, Overview, and Navigation
Request Compensation Change Assign Costing Allocation

43
Costing Allocation: PeopleSoft vs Workday
Labor distribution is limited: assign on every job every time you hire or transfer. Labor distribution by position is not possible. Workday Set costing on a position Use override costing for temporary changes Use effective dates Use KFS for retroactive changes Conceptual: Today, the campus has to apply costing (in one place): to every job, every time they hire or transfer a person. They do not have the opportunity to manage costing by position. WD gives us the ability to do costing much more granular. BUT campus should be using defaults: e.g., jobs with no grants and contracts. Set the account once: wont need to change agian anytime soon. IF you want to override, you can. When a unit, like HR admin, has a position that doesn't change often, set the default (and any splits) and don't need to change them again.
: to every job, every time they hire or transfer a person. They do not have the opportunity to manage costing by position. WD gives us the ability to do costing much more granular. BUT campus should be using defaults: e.g., jobs with no grants and contracts. Set the account once: wont need to change agian anytime soon. IF you want to override, you can. When a unit, like HR admin, has a position that doesn t change often, set the default (and any splits) and don t need to change them again.")
44
Costing Allocation: Workflow of BP
Compensation Finance Partner Initiate Assign Costing Allocation(Labor Distribution) No approval is necessary
 No approval is necessary.")
45
Costing Allocation: Types
Position One default account Multiple accounts Worker Override the defaults on the position Earning Override the defaults for specific allowances

46
Overview: how cost allocation works
Talk through this diagram, so that trainees understand how default costing allocation works and what worker-level earnings and costing is and what position-level costing is. Important Notes: Use KFS to make retroactive changes to costing allocations. And note that KRONOS will no longer accept costing allocation changes, as of December 27, 2012. Overview of the new Costing Model. % and Pay Period vs. $ and Day. Define key terminology related to the module. Ex. Costing Allocation vs. Labor Distribution Understand WD Roles as they relate to costing Review the Assign Costing Allocations BP. Determine appropriate Start and End Dates. Identify the correct accounts. The Kuali Account string Define costing at Position level. Define costing at Worker level. Define costing at Earnings level.

47
Talk through this diagram, so that trainees understand how default costing allocation works and what worker-level earnings and costing is and what position-level costing is. Important Notes: Use KFS to make retroactive changes to costing allocations. And note that KRONOS will no longer accept costing allocation changes, as of December 27, 2012. Overview of the new Costing Model. % and Pay Period vs. $ and Day. Define key terminology related to the module. Ex. Costing Allocation vs. Labor Distribution Understand WD Roles as they relate to costing Review the Assign Costing Allocations BP. Determine appropriate Start and End Dates. Identify the correct accounts. The Kuali Account string Define costing at Position level. Define costing at Worker level. Define costing at Earnings level.

49
Levels of Costing Be sure to explain that this screen is where to start costing at a worker-level or a position-level, depending on whether the trainee enters info into worker costing OR other costing fields. In the Worker Costing section, enter appropriate Effective Date. Important Note: Use the beginning pay period date, or a date within the appropriate pay period. If the effective date falls within the pay period, the allocation will be applied for the entire pay period. To assign/override costing to the worker: If an existing override is in place, simply add another costing line with the appropriate Start and End Date so the new costing will only take place during the specified period (due to a leave, for example). It will revert back after the period ends. Worker-level: use this for more transient labor distribution. Select the Position that you want to add/change costing for. You may also identify costing for a specific earning, if necessary. Position-level: use this section to identify the more long-term costing allocations. You can add/change the default account(s) tied to the position.
. It will revert back after the period ends. Worker-level: use this for more transient labor distribution. Select the Position that you want to add/change costing for. You may also identify costing for a specific earning, if necessary. Position-level: use this section to identify the more long-term costing allocations. You can add/change the default account(s) tied to the position.")
50
Mid-pay-period changes
Consider the pay period How many working days? How many days (or what % of time) on each account? What % of time and money for each account? Enter the transaction Use pay period start date. Enter an end date, if appropriate. Enter changes for future pay periods.
 on each account What % of time and money for each account Enter the transaction. Use pay period start date. Enter an end date, if appropriate. Enter changes for future pay periods.")
51
Try it!

52
Employee Employee

55
Employee Employee Employee
Note that the process completes, without any further steps or approvals.

56
Summary Congratulations!
You have completed this Workday training session

Similar presentations


 Individual 2) Manager 3) Timekeeper.>")
. Agenda Introduction 1 Terminology 2 Employee Self-Service Components 3 More Information 4 Questions & Answers 5.>")


