Download presentation
Presentation is loading. Please wait.

1
Ultrasound Guided Central Venous Cannulation (CVC)
Shirley Lee MD CAEP 2008 Disclaimer - unless same folks as last talk

2
Why Ultrasound guidance?
Traditionally, CVC mechanical complications occur up to 15% Insertion unsuccessful up to 12% Becoming standard of care The use of ultrasound has obviated the absolute need for anatomical landmarks in the traditional method of CVC insertion. Ultrasound can readily identify the locations of veins relative to arteries and therefore can take into account for individual anatomic differences (Gordon AC, Troianos CA, Denys BG). The use of ultrasound in experienced hands decreases the number of attempts and arterial punctures compared with landmark method. It is also the preferred method in difficult cannulations such as those patients with obscure surface landmarks or hypotensive patients (Hind D, Calvert N, Miller AH, Keenan SP, Fyr WR). Several meta-analyses have been performed and national recommendations have been made by both the National Quality Forum in the United States and the National Institute of Clinical Excellence in the United Kingdom (The National Quality Forum, National Institute for Clinical Excellence). Merrer J, De Johnghe B, Golliot F, et al. Complications of femoral and subclavian venous catheterization in critically ill patients: a randomized controlled trial. JAMA. 286:700-7, 2001 McGee and Gould, NEJM 2003; 348: Merrer, De Johnghe, Golliot, et al. JAMA. 286:700-7, 2001
. The use of ultrasound in experienced hands decreases the number of attempts and arterial punctures compared with landmark method. It is also the preferred method in difficult cannulations such as those patients with obscure surface landmarks or hypotensive patients (Hind D, Calvert N, Miller AH, Keenan SP, Fyr WR). Several meta-analyses have been performed and national recommendations have been made by both the National Quality Forum in the United States and the National Institute of Clinical Excellence in the United Kingdom (The National Quality Forum, National Institute for Clinical Excellence). Merrer J, De Johnghe B, Golliot F, et al. Complications of femoral and subclavian venous catheterization in critically ill patients: a randomized controlled trial. JAMA. 286:700-7, McGee and Gould, NEJM 2003; 348: Merrer, De Johnghe, Golliot, et al. JAMA. 286:700-7,")
3
Right pneumothorax, post IV insertion

4
CVC Complications Pneumothorax, arterial puncture, hematoma, malposition, increased skin punctures with bleeding complications, delay and failure to catheterize, thoracic duct injury (left sided approach), air embolism, arrhythmias, and death Delayed complications: infection and thrombosis
, air embolism, arrhythmias, and death. Delayed complications: infection and thrombosis.")
5
Advantages Safer Markedly decreased pneumothorax rate
Real-time visualization of target See needle enter target vein, avoiding adjacent arteries, nerves Tseng, Sadler et al, CARJ 2001;5(6): (i.e., 0/3267 at Foothills Hospital), high success (>99%)
: (i.e., 0/3267 at Foothills Hospital), high success (>99%)")
6
Evidence In ER: Prospective, randomized trial of 130 patients
Complication rate: 4.6% vs. 16.9% Success rate: 93.9% vs. 78.5% Time not significantly different Leung, Duffy, Finckh. Ann Emerg Med 2006;48(5):540-7
:")
7
Evidence ICU – Prospective,randomized trial of 900
Success: 100% vs. 94% Carotid puncture 1% vs. 10% Pneumothorax 0% vs. 2.4% Hemothorax 0% vs. 1.7% Reduced time and number of attempts with US Karakitsos et al, Crit Care,2006;10(6):R162
:R162.")
8
Jugular and Subclavian anatomy

9
Compression confirms patency
Landmarks: SCM muscle above, central vein larger, more irregular in shape vs carotid artery smaller, rounder, prominently pulsatile. Right side - vein compresses easily. Compression confirms patency

10
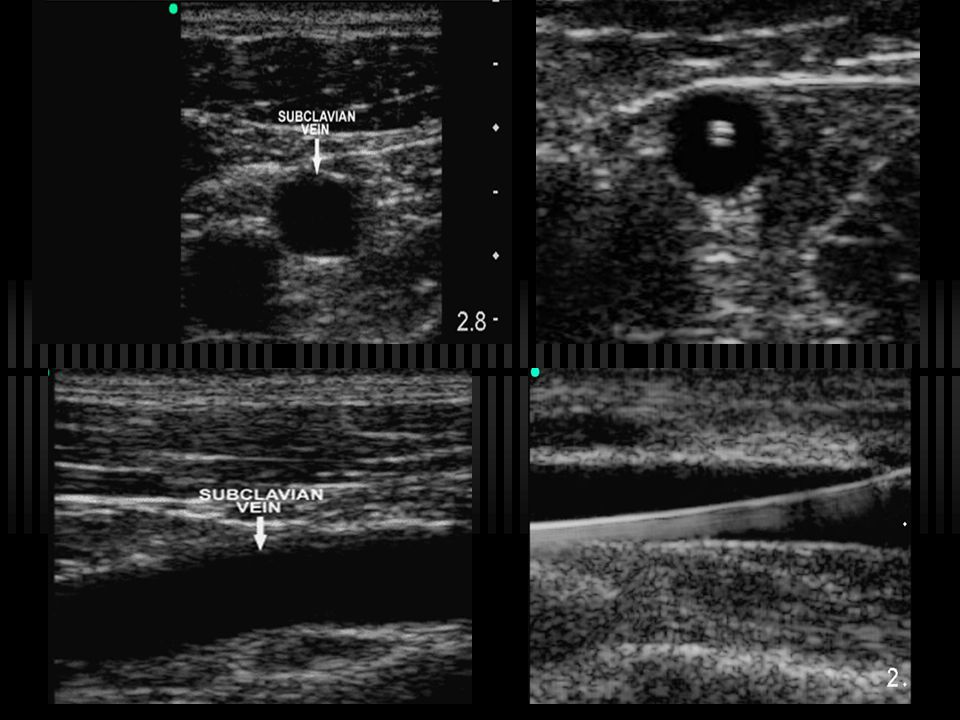
Subclavian vein Transverse Sagittal

11
Common indications for CVC
Hemodynamic monitoring Administration of drugs likely to induce phlebitis Temporary cardiac pacemaker Hemodialysis Lack of peripheral venous access

12
Technique 5-10 MHz probe - locate vein, ensure patency, then puncture blindly – but no safer than landmark technique Real-time visualization of needle tip helps prevent pneumothorax, arterial puncture Still need X-ray to document tip position, as catheter can still go wrong direction START by facing caudad, facing patient’s feet, probe marker to patient’s LEFT (not traditional patient’s right). SINGLE OPERATOR: Probe in non-dominant hand, needle and syringe in dominant hand. Beward catheter can go to other innominate vein, azygous, deep in right atrium!
. SINGLE OPERATOR: Probe in non-dominant hand, needle and syringe in dominant hand. Beward catheter can go to other innominate vein, azygous, deep in right atrium!")
13
Technique Use either transverse or longitudinal orientation of ultrasound beam to needle path Transverse supposedly easier for novice Advantage of longitudinal: see needle through entire course With either, you will NOT see needle tip if out of plane Can use needle guides to help

14
Predictors of difficult cannulation
Emergency Placement Obesity Coagulopathy Intubated Hypotensive/Hypovolemic Edematous patient Known previous difficult cannulation

16
Static vs Dynamic technique
Static technique: Using 2-3 ultrasound planes, mark with felt pen Dynamic technique: 1 vs 2 person technique Use image as guide Observe needle throughout procedure, as it penetrates vessel Watch tip! 2 person process: Scan for vein first (non sterile), mark site. Then give probe to nurse to prep for sterility, while you prep sterile dress and patient and prep equipment, then probe handed back to you. While you scan patient, nurse preps for sterile dress, and when you find the vein, grab nurse’s hand to hold position (NB - sometimes better if nurse does not see imaging screen, so won’t keep moving around). You proceed with cannulation.
, mark site. Then give probe to nurse to prep for sterility, while you prep sterile dress and patient and prep equipment, then probe handed back to you. While you scan patient, nurse preps for sterile dress, and when you find the vein, grab nurse’s hand to hold position (NB - sometimes better if nurse does not see imaging screen, so won’t keep moving around). You proceed with cannulation.")
17
Venous access – easiest to more challenging
1st CHOICE: Internal/External Jugular 2nd CHOICE: Femoral – easy 3rd CHOICE: Subclavian/Axillary – harder due to location, more difficult to visualize while you puncture 4th CHOICE: Cephalic/Basilic/Antecubital – 4th choice: harder due to small size

18
Jugular Vein Large, easy to see, good choice
Trendelenberg, head contralaterally turned 30 degrees Put probe transversely across vein, just superior to clavicle btn two SCM heads, just superior to clavicle Bring needle in from laterally above probe (in same plane as transducer), aiming just slightly down to toes ~ degrees (Posterior approach) Watch needle well away from vein, indenting vein wall, and pop through…and know where carotid is! Beware of anatomical variants: Widest diameter just superior to clavicle - is closer to lung, hence need steeper angle of degrees to safely avoid lung.
, aiming just slightly down to toes ~ degrees (Posterior approach) Watch needle well away from vein, indenting vein wall, and pop through…and know where carotid is! Beware of anatomical variants: Widest diameter just superior to clavicle - is closer to lung, hence need steeper angle of degrees to safely avoid lung.")
19
Subclavian Vein More challenging to see needle and vein at puncture site Jugular much easier, less risk of venous stenosis, thrombosis, catheter fracture from pinch off syndrome Place probe inferior to most lateral aspect of clavicle Puncture axillary-subclavian junction close to clavicle Infraclavicular or supraclavicular technique.

20
Femoral vein Also easy Orient transducer longitudinally, along course of vein, bring needle in from below, parallel to transducer and vein Valsalva often helps distend vein, bigger target Externally rotate leg to move artery more lateral NAVEL (lateral to medial leg) . Avoid going too distal for needle insertion, as femoral artery tends to become more anterior to femoral vein, the more distal you go from the inguinal ligament.
 . Avoid going too distal for needle insertion, as femoral artery tends to become more anterior to femoral vein, the more distal you go from the inguinal ligament.")
21
U/S CVC Pitfalls 1. Failure to identify the vein correctly
2. Failure to locate the needle in tissue

22
Tips Awake patient - Check position. If patient has moved after you have landmarked, this results in a change in anatomical position of the vein Centre vein in middle of the screen Lighten probe pressure, as may be collapsing vein Insert needle at sharper angle ( degrees), to properly intersect with the vein directly under transducer Keep acoustic shadow and ring down artifact in center of vessel, if is off center, withdraw slowly and redirect, using depth markers to help guide needle insertion. ALSO to prevent drift of the transducer due to slippery gel, a steady US position can be maintained by resting BOTH hand and transducer onto the patient’s body (be careful not to place undure pressure that may collapse the target vessel during the procedure)
, to properly intersect with the vein directly under transducer. Keep acoustic shadow and ring down artifact in center of vessel, if is off center, withdraw slowly and redirect, using depth markers to help guide needle insertion. ALSO to prevent drift of the transducer due to slippery gel, a steady US position can be maintained by resting BOTH hand and transducer onto the patient’s body (be careful not to place undure pressure that may collapse the target vessel during the procedure)")
23
7 Steps to Success: Use adequate gel
Confirm orientation of probe - conventionally probe head pointing to RIGHT (rub edge with finger, look at screen) Do preliminary US - find patent target vein Mark site (static vs direct technique) Consider local anesthetic Sterilize skin, sterile probe, sterile technique! Advance the needle!
 Do preliminary US - find patent target vein. Mark site (static vs direct technique) Consider local anesthetic. Sterilize skin, sterile probe, sterile technique! Advance the needle!")
24
Sterile preparation of US transducer
Apply non-sterile gel to probe Slip sterile sleeve over transducer, smooth all air bubbles away from scanning surface to prevent artifact Secure sleeve with rubber band Alternate: large sterile glove, with fingers folded over, palmar surface of glove is scan surface. Sterile gel applies outer surface of glove/sterile sleeve

25
General Tips on CVC insertion
Be aware that more than 3 failed attempts to cannulate the vein can result in a 6 fold increase in mechanical complication. (McGee) Aids to distinguish arterial vs. venous cannulation A pressure transducer can be attached to the needle cannulating the vessel to confirm the presence of venous waveforms and pressure Blood gases from the needle in the vessel can be measured and compared with known a known arterial sample
 Aids to distinguish arterial vs. venous cannulation. A pressure transducer can be attached to the needle cannulating the vessel to confirm the presence of venous waveforms and pressure. Blood gases from the needle in the vessel can be measured and compared with known a known arterial sample.")
26
Summary US guided procedures have a number of clinical utilities in the ED US can improve the safety of specific procedures and success rate Initially, can be more time consuming due to learning curve, but with practice, patience and good hand-eye coordination improve efficiency and efficacy of patient care

27
References Abboud PAC and Kendall JL. Ultrasound guidance for vascular access. Emergency Clinics of North America. 22(3): , 2004 Leung, Duffy and Finckh. Ann Emerg Med 2006;48(5):540-7 McGee DC and Gould MK. Preventing complications of central venous catheterization. NEJM. 348(12): , 2003 Miller AH, Roth BA, Mills TJ et al. Ultrasound guidance versus the landmark technique for the placement of central venous catheters in the emergency department. Academic Emergency Medicine. 9(8) : , 2002.
: McGee DC and Gould MK. Preventing complications of central venous catheterization. NEJM. 348(12): , Miller AH, Roth BA, Mills TJ et al. Ultrasound guidance versus the landmark technique for the placement of central venous catheters in the emergency department. Academic Emergency Medicine. 9(8) : ,")
28
Procedure Video Reference
NEJM video - (look under Procedure videos on right side of webpage) – download to ipod, mem stick, etc.
 – download to ipod, mem stick, etc.")
29
References National Institute for Clinical Excellence. NICE technology appraisal guidance No.49: guidance on the use of ultrasound locating devices for placing central venous catheters. London: NICE, September (accessed 21 Apr 2004) The National Quality Forum. Safe Practices for Better Health Care. A consensus report.Washington, D.C (accessed 27 Jan 2005).
 The National Quality Forum. Safe Practices for Better Health Care. A consensus report.Washington, D.C (accessed 27 Jan 2005).")
Similar presentations


 Central Line Insertion Paul Currier, MD, MPH MGH Pulmonary & Critical Care Unit Associate Program Director for Procedures and.>")


>")


